

Introduction
WordPress doesn’t include a built-in backup system beyond a basic content export. Unless you’ve set something up yourself, recovering from a plugin update breaking your site or a malware infection slipping through could mean rebuilding by hand.
Most hosting providers offer a way to run automated backups at the server level, and those are useful for quick rollbacks. But they’re tied to your hosting account. If something disrupts the account itself, you can lose access to the backups at the same time as the site. A backup plugin gives you an independent copy stored somewhere else entirely, like your own Google Drive or Dropbox, on a schedule you control.
This tutorial covers what a backup needs to contain and how to set up a reliable backup plugin. Part 21 covers the hands-on backup and restore process itself.
What Does a Complete Backup Include?
A WordPress backup is only useful if it contains everything the site needs to work on a blank server. That means four things the plugin handles.
- The database holds every post, page, comment, user account, plugin setting, and (if you use WooCommerce) every order on your site. It changes every time someone publishes, edits, or places an order.
- The wp-content folder contains the media library, your active theme, all installed plugins, and any custom code. On a site with loads of images, this folder is the largest part of the backup by far.
- The wp-config.php file stores the database connection credentials, the security keys that WordPress uses to manage login sessions, and any custom settings you’ve added (like the revision limit you might have added from our WordPress database cleanup tutorial). Without this file, a restored WordPress installation can’t connect to its own database.
- Server configuration files like
.htaccess(which most shared hosting uses) or.user.inicontrol URL routing, PHP memory limits, and redirect rules. Missing these after a restore can cause broken links or blank screens that are really hard to diagnose if you don’t know what’s missing.
DNS records and external credentials are outside of WordPress’s jurisdiction. If you ever need to move to a completely different host, you’d also need your domain’s DNS settings and any API keys for connected services like payment processors. A backup plugin can’t capture these, so keep them documented elsewhere.
Why Not Just Rely on Automated Server Backups?
Your hosting provider’s backups and your plugin backups serve different purposes, and the best setup uses both.
Hosting backups (accessed through Plesk on ServeTheWorld) cover the full server environment and are good for quick restores when something goes wrong during maintenance. They run automatically, and you can restore individual files or databases through the control panel.
Hosting backups are stored on your provider’s infrastructure, run on a schedule you can’t customize per site, and can only be restored through the hosting control panel. If your hosting account is inaccessible for any reason, the backups are inaccessible too.
Running your own backup plugin puts you in control of how backups work and it offers another layer of redundancy. You can send copies to other storage you own (Google Drive, Dropbox, or a similar service), set up whatever schedule makes sense for your business, and restore through the WordPress admin or even onto a completely different server. You gain independence, so it’s worth setting up even when your host already takes backups.
Full Backups vs. Incremental Backups
You’ll often hear backup solution providers talking about full backups or incremental backups.
A full backup copies every file and every database table into a single compressed archive each time it runs. On a small site with a few pages and a handful of images, this is fast and the archives stay small.
An incremental backup creates one full snapshot as a baseline, then on each subsequent run only captures what’s changed. This will include things like new uploads, modified files, and updated database rows. Such backups finish faster and the archive is smaller.
As your site gets bigger and sees more changes, the difference between these two methods starts to add up. A WooCommerce store with thousands of product images can take 20 to 30 minutes to create a full backup, and the resulting archive might be several gigabytes in size. Running that daily wastes server resources and can slow the site down for visitors while the backup job runs. Incremental backups of the same site might take a few minutes and produce an archive measured in megabytes.
Most backup plugins offer incremental backups in their premium tiers. You can still decide to take a full backup from time to time as a snapshot of the current setup.
Our Example Backup Plugin: UpdraftPlus
You’re free to choose any backup WordPress plugin you wish, but for this example, we’ll use UpdraftPlus. UpdraftPlus is the most widely used WordPress backup plugin, with over three million active installations.
The free version handles scheduled backups, supports sending them to remote storage (Google Drive, Dropbox, and others), and can restore directly from the WordPress admin. UpdraftPlus Premium adds incremental backups, more storage options, and automatic pre-update backups that run before any core, theme, or plugin update starts.
For a growing site or a WooCommerce store, the premium version is worth considering for the incremental backup feature alone. For a smaller brochure site or blog, the free version with daily database backups and weekly file backups to Google Drive covers the essentials.
Installing UpdraftPlus
The installation of UpDraft follows the same process we outlined for security plugins in Part 18.
- In your WordPress dashboard, go to Plugins → Add Plugin.
- Search for UpdraftPlus.
- Find UpdraftPlus WordPress Backup & Migration Plugin in the results.
- Click Install Now, then Activate when the button changes.
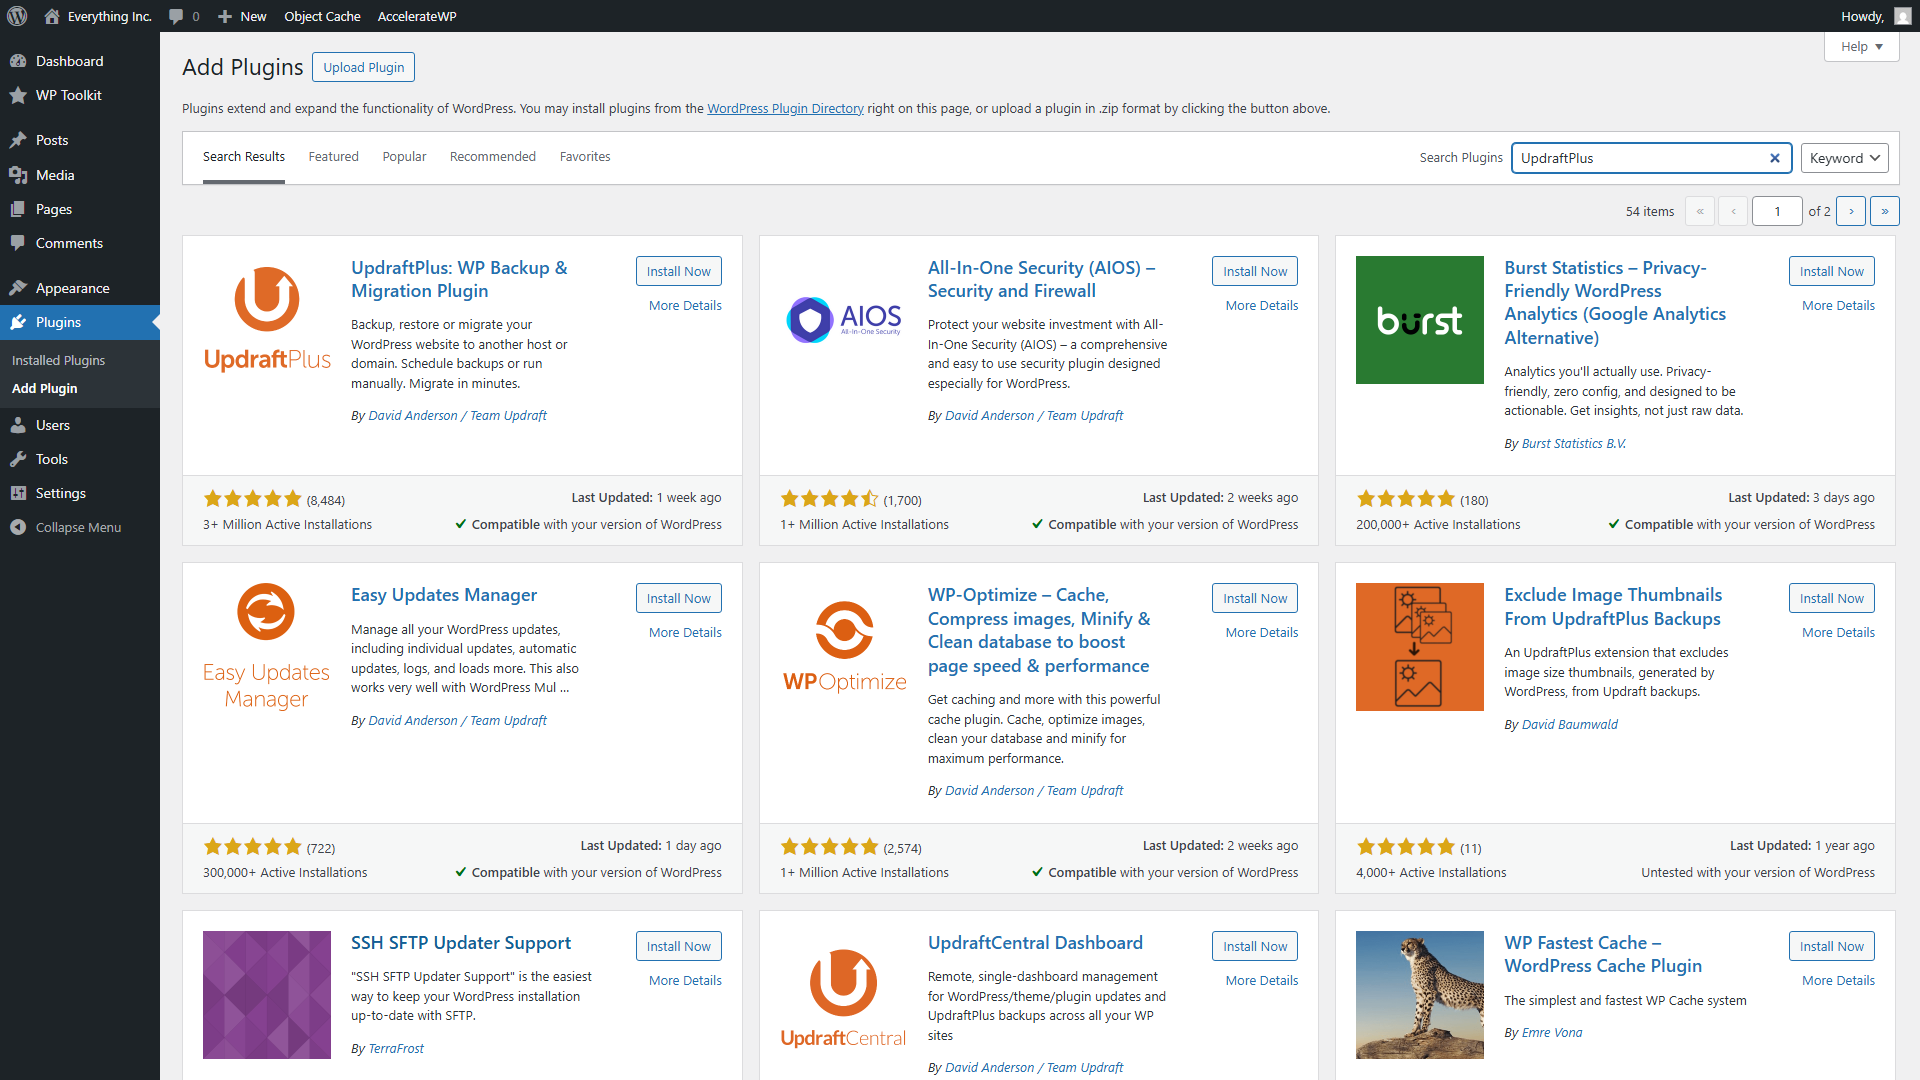
After activation, UpdraftPlus appears in the left sidebar. The plugin opens on the Backup / Restore tab, with Settings available along the top.
Connecting remote storage
Without remote storage configured, UpdraftPlus saves backups on the same server as your website, which somewhat defeats the purpose. The first thing to set up is where backups get sent.
In the UpdraftPlus menu, Click the Settings tab. Scroll to Choose your remote storage. UpdraftPlus supports Google Drive, Dropbox, Amazon S3, Microsoft OneDrive, and several others. Google Drive is a simple free choice because it provides 15 GB at no cost and the authentication is straightforward for those with an existing Google account.
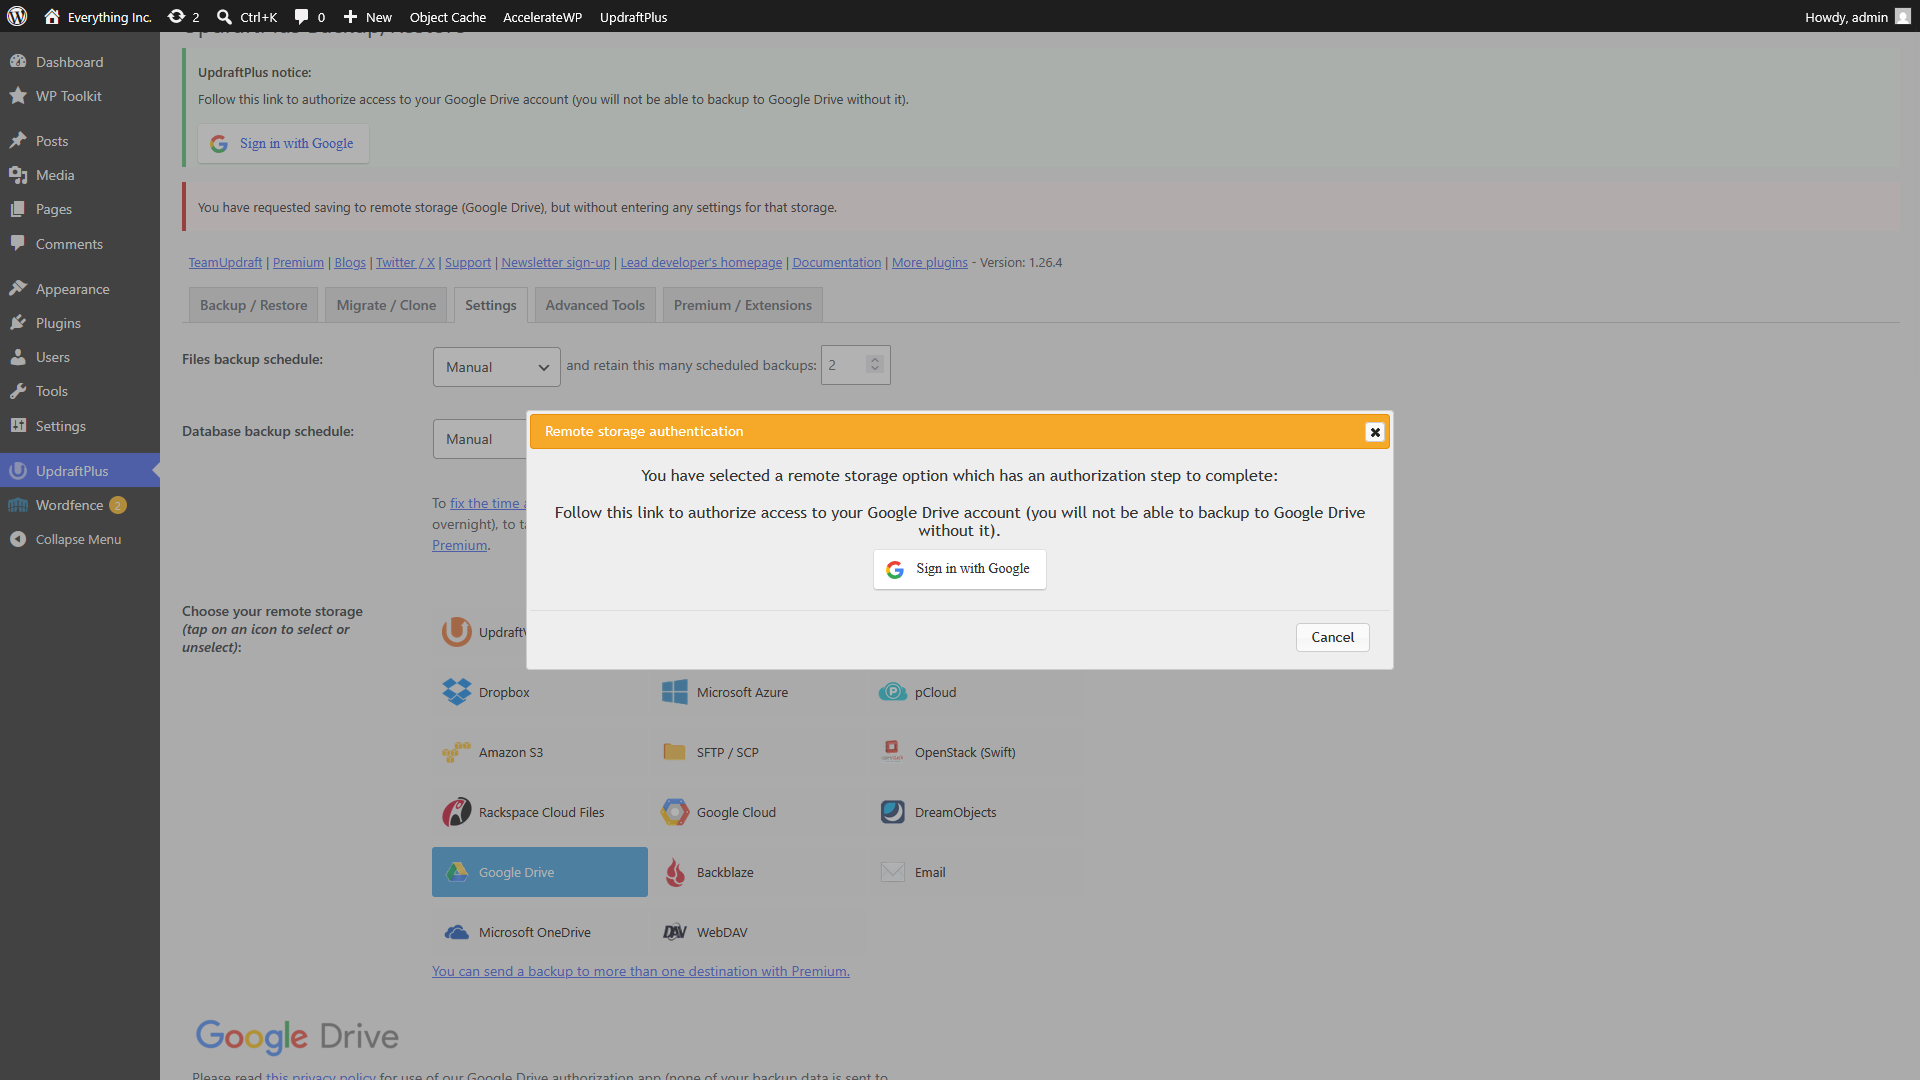
Click the Google Drive icon, then click Save Changes. UpdraftPlus displays a link to authenticate with your Google account. Click through, sign in, and grant permission for UpdraftPlus to create and read files in your Drive. After approval, you’re redirected back to WordPress with the connection confirmed.
By default, backups will be stored in a folder called UpdraftPlus. If you manage multiple WordPress sites through one Google account, use distinct folder names for each site so archives don’t mix together. UpdraftPlus Premium lets you specify a subfolder.
Setting the schedule
On the same Settings tab, the scheduling options sit near the top. UpdraftPlus lets you set separate frequencies for file backups and database backups. This is because the database changes far more often than your files. Every new post, comment, settings change, and order goes into the database, while files only change when you upload media or update a plugin.
A reasonable starting schedule for most sites:
- Database: Daily, retaining 7 copies
- Files: Weekly, retaining 4 copies
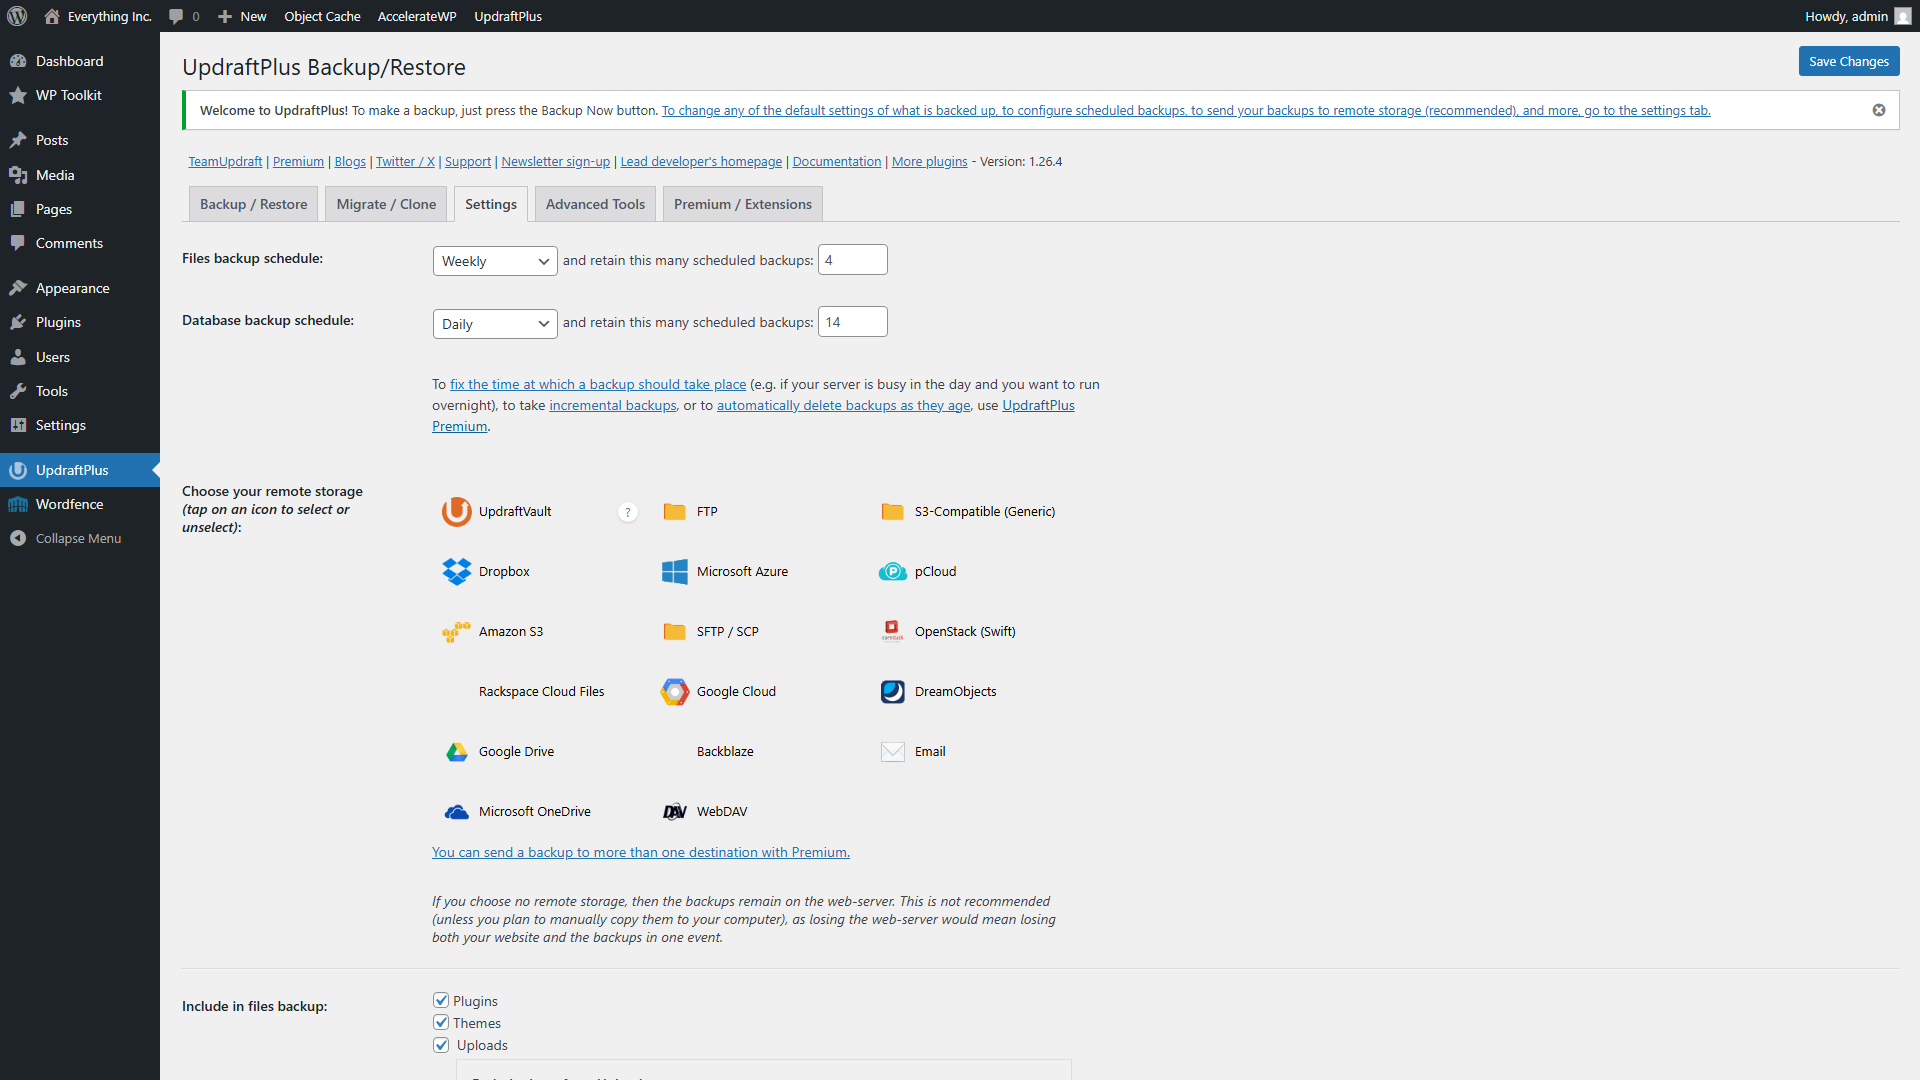
A brochure site updated once a month can drop to weekly database backups. A WooCommerce store processing orders through the day should back up the database every 4 to 8 hours, because the time between backups is the window of data you could lose.
The retention count controls how far back you can reach. Seven daily copies gives you a week. Four weekly copies gives you a month. Anything older gets deleted automatically to keep your cloud storage from filling up.
Click Save Changes when both the schedule and storage are set.
Running and verifying your first backup
Create a manual backup before waiting for the schedule to kick in. Go to the Backup / Restore tab and click Backup Now. Keep Include your database in the backup and Include your files in the backup checked. If remote storage is connected, UpdraftPlus sends the backup there automatically.
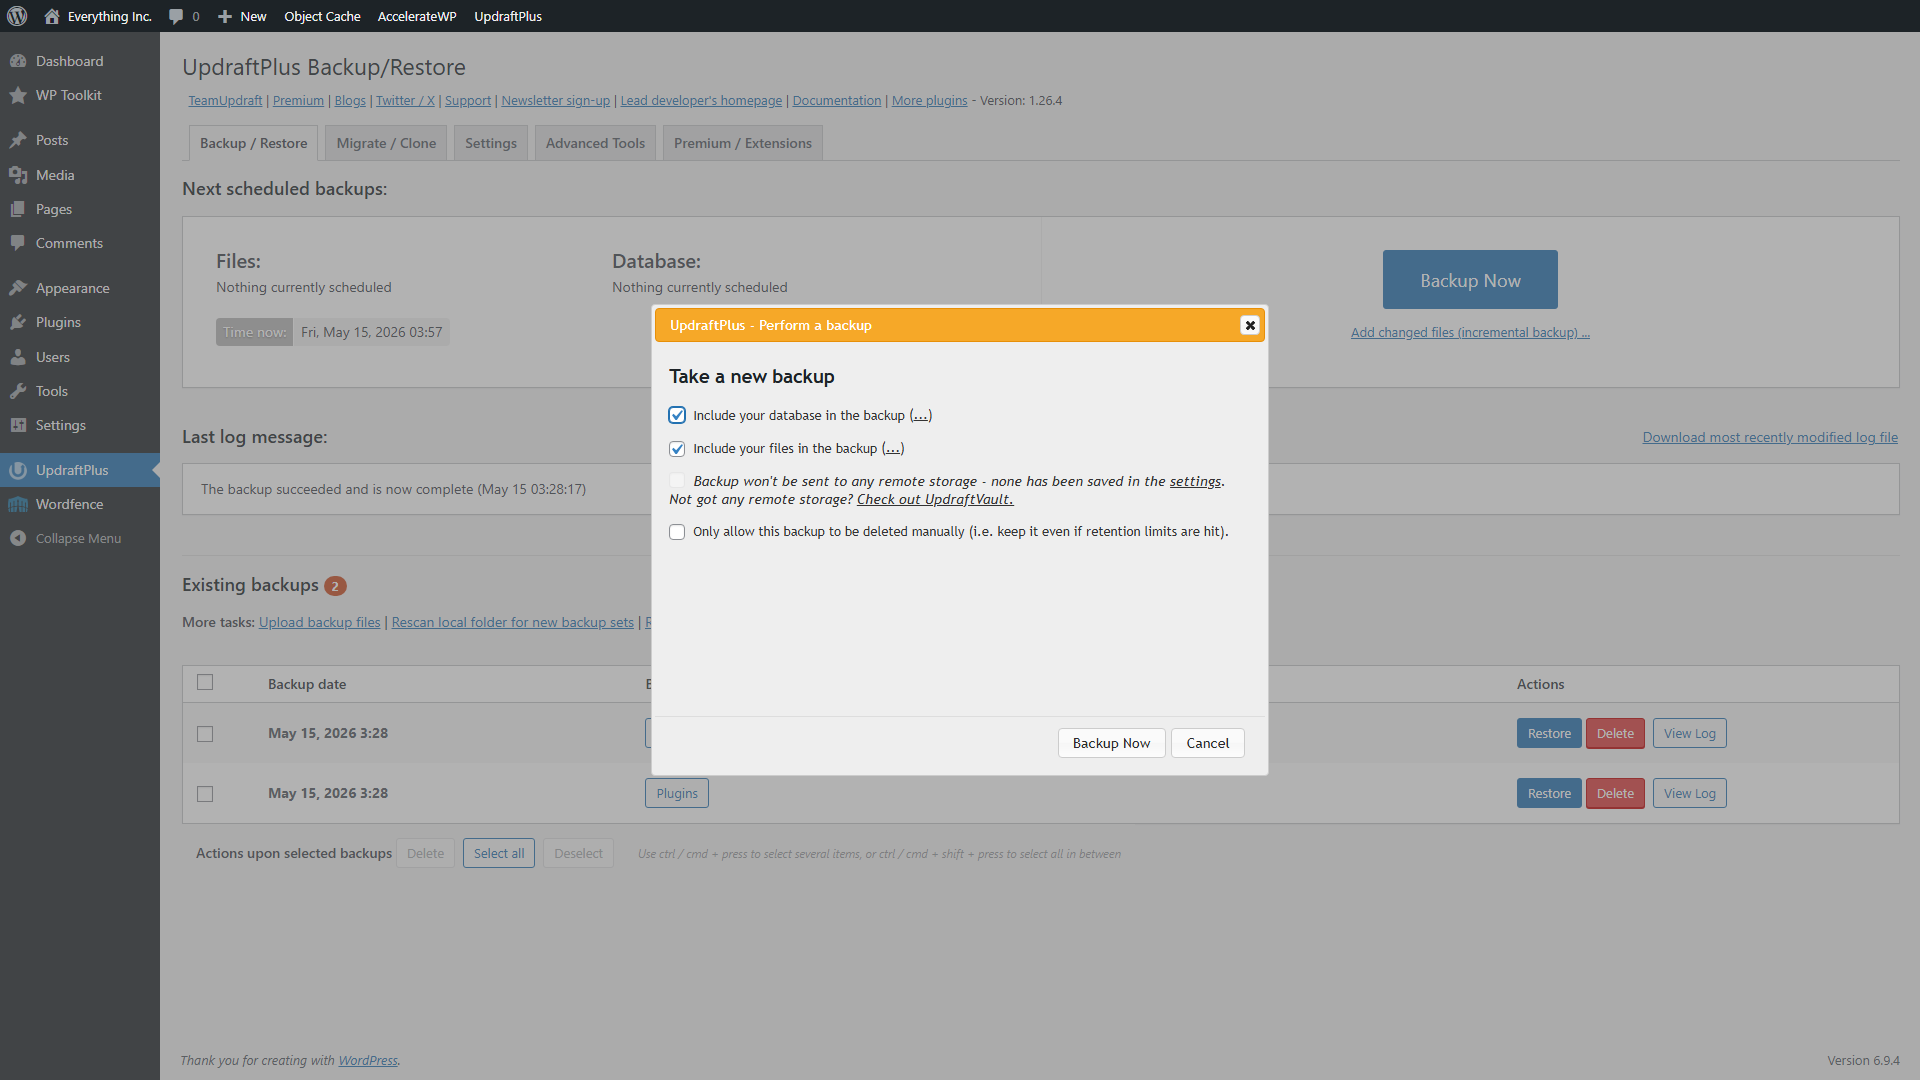
When the backup finishes, a new entry appears in the Existing Backups list with the date and separate buttons for database, plugins, themes, uploads, and other files.
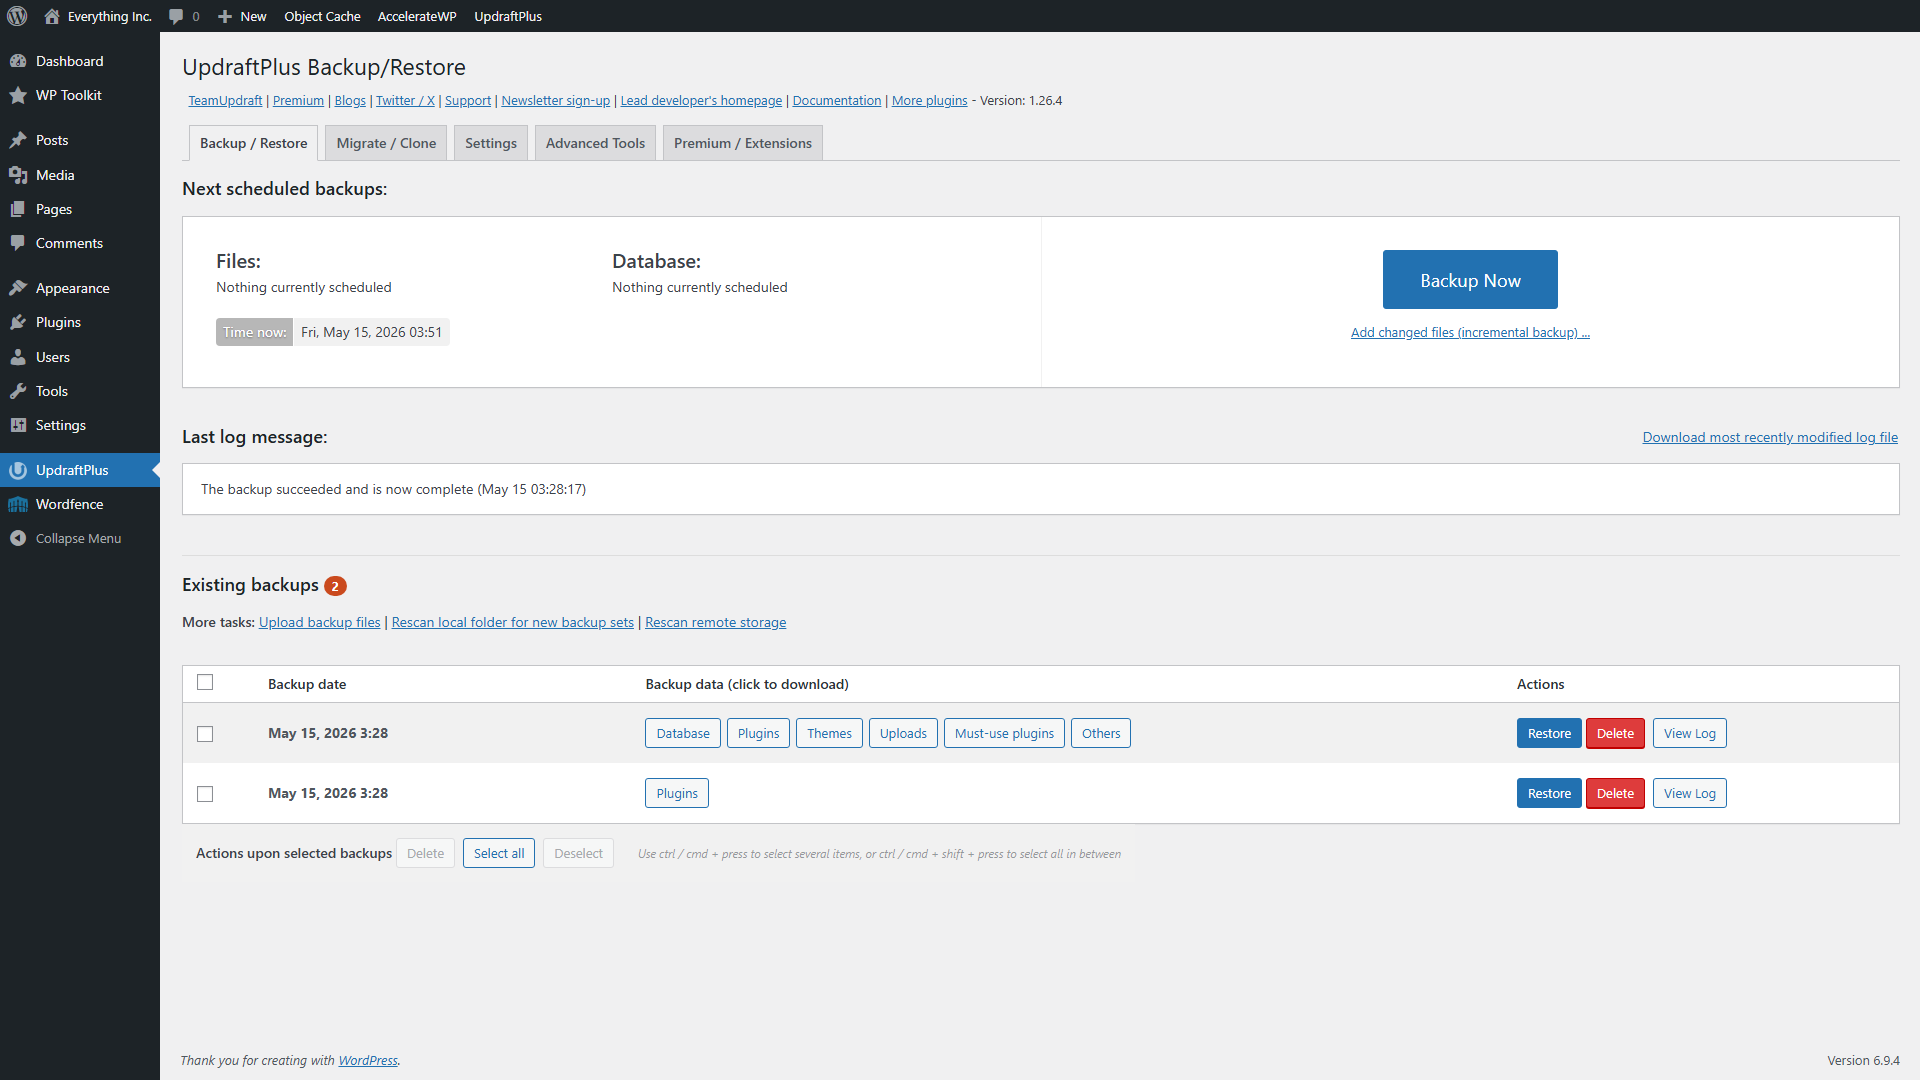
Now check the destination. Open your Google Drive and look for compressed archives named with the date and content type: database, plugins, themes, uploads, and “others” (wp-config.php, .htaccess, and similar files). If all five are present, your backup pipeline is working end to end.
If the backup shows as completed in WordPress but nothing arrived in Google Drive, the authentication may have expired. Go back to Settings and re-authorize the connection.
What to check when backups are running
Once UpdraftPlus is on a schedule, check these things periodically:
- Cloud storage usage. Open Google Drive (or your chosen service) and verify that new backups are appearing on the expected schedule. If they’ve stopped, the authentication token may have expired silently.
- Archive completeness. Each scheduled backup should produce archives for the database, plugins, themes, uploads, and other files. If any are missing, check the file component checkboxes under Settings.
- Storage space. 15 GB of free Google Drive fills up quickly if you have a large media library and are running full backups. Watch your usage and adjust the retention count or consider upgrading storage if archives are getting deleted before you’d want them to be.
Alternatives to UpdraftPlus
UpdraftPlus is a common recommendation because it has a large user base, works reliably on shared hosting, and gives you control over where backups are stored. But it’s far from the only WordPress backup solution.
- BlogVault is a lightweight agent that syncs data to BlogVault’s own cloud, where the compression and storage happen. Your hosting server does almost no work. It’s good for large WooCommerce stores where a local backup job competes with real traffic. BlogVault also includes staging tools for testing changes. However, there’s no free tier, and your backups will be on BlogVault’s infrastructure rather than your choice of storage.
- Jetpack VaultPress Backup captures changes in real time rather than on a schedule. Every post, comment, order, and setting change is streamed to Jetpack’s cloud as it happens. For stores processing orders throughout the day, this means you’d lose at most a few seconds of data in a failure. Like BlogVault, it’s a paid subscription with vendor-controlled storage.
- WPvivid is a free plugin with a similar feature set to UpdraftPlus. It offers scheduled backups, remote storage support, and incremental backups in its paid tier. It also bundles staging and migration tools. It’s smaller user base means less community testing, but it’s credible if you want to compare.
Conclusion
A backup plugin adds a safety net that works regardless of what happens to your hosting account. UpdraftPlus handles the job well for most WordPress sites, with Google Drive or Dropbox as practical free storage. The important thing is that your backups are complete, reaching their destination on schedule, and restorable when you need them.
Part 21 of the tutorial walks you through a complete backup and restore process, but next we’ll be discussing search engine optimization plugins that can help your site be found.
Next steps: