

Introduction
WordPress is a constant target for automated attacks. Bots crawl the internet around the clock trying default admin passwords, probing for known plugin vulnerabilities, and injecting malicious code wherever they can find an opening. The vast majority of WordPress security incidents trace back to outdated plugins and weak login credentials, not flaws in WordPress itself.
Your hosting provider handles many protections at the server level, things like network firewalls, operating system patches, and account isolation between customers. WordPress security plugins instead protect the WordPress application itself by filtering out malicious requests aimed specifically at WordPress. These are things your host’s infrastructure can’t see, because they happen inside the application.
What WordPress Security Plugins Protect
Security plugins cover a range of functions inside WordPress, and understanding those categories helps you avoid doubling up. There are four main areas worth knowing about.
1. Request filtering (often called a “web application firewall”)
You’ll see security plugins advertise a “firewall,” but these are web application firewalls, which work differently from the network firewall sitting in front of your hosting server. A network firewall filters raw internet traffic by IP address, port number, and protocol. A WordPress security plugin can’t do that because it runs inside WordPress itself, after the request has already reached the server.
What it does instead is inspect the content of each request in the context of WordPress. When someone submits a form, loads a page, or sends data to your site, the plugin examines that request for patterns that look like common attacks.
An SQL injection attempt, for example, sends database commands disguised as form input, trying to trick WordPress into running them. Cross-site scripting (XSS) injects bits of JavaScript into your pages that can steal visitor data or redirect people to malicious sites. The plugin recognizes these patterns and blocks the request before WordPress processes it.
This filtering catches threats that target WordPress specifically, things a network firewall wouldn’t recognize as dangerous because they arrive through normal web traffic on normal ports.
2. File scanning
Even with request filtering in place, something can occasionally slip through. File scanners check your WordPress core files, themes, and plugins against known clean versions, looking for code that’s been added or changed. If a plugin file has been modified since it was installed, or if an unfamiliar PHP file appears in your uploads directory, the scanner flags it.
Some scanners, such as Wordfence, do this work on your own server, which uses your hosting resources. Others, such as MalCare, copy file signatures (essentially fingerprints of your files, not the files themselves) to an external service for analysis, which is lighter on your hosting but requires trusting the external provider with that data.
3. Login protection
Brute-force attacks are automated scripts that try thousands of username and password combinations against your WordPress login page until one works. A single WordPress site can receive hundreds of these attempts per day without the owner ever noticing.
Login protection limits how many failed attempts a single IP address can make before getting locked out. It can also add two-factor authentication (2FA), which means logging in requires both your password and a temporary code from an app on your phone. Even if an attacker has your password, they can’t get in without physical access to your phone.
4. Vulnerability alerts
Most WordPress breaches exploit known security holes in outdated plugins. When a security researcher finds a vulnerability in a popular plugin, the details eventually get published in public databases.
Attackers monitor these databases too, and often start exploiting known flaws within days of disclosure. Some security plugins like Patchstack track these published vulnerabilities and warn you when a plugin on your site has a known issue, giving you time to update or deactivate it before anyone can exploit the flaw.
Why Stacking Security Plugins Backfires
It’s tempting to install several security plugins like Wordfence, Solid Security, and an extra scanning plugin for good measure. The logic feels sound, but multiple full-suite security plugins create problems that are worse than the gaps they’re meant to fill.
When two plugins both hook into the same WordPress processes to inspect incoming requests, they compete. Both try to scan the same files, write to the same database tables, and filter the same traffic at the same time. This causes database lock conflicts and a measurable slowdown in page response times.
Generally, it’s best to focus on one primary security plugin handling request filtering, scanning, and login protection together.
The Recommended Plugin: Wordfence
Wordfence Security is the most widely installed WordPress security plugin, with millions of active sites. It covers all four categories above in a single installation: request filtering, file scanning, login protection with two-factor authentication, and vulnerability alerts.
The free version is fully functional for a typical WordPress site. The premium tier adds real-time rule updates (the free version receives the same rules after a 30-day delay) and priority malware signature delivery, but for most sites the free version provides a solid baseline.
Because Wordfence runs across millions of sites, when a new type of attack appears on one site, the pattern gets added to the rules and pushed out to all installations.
Installing Wordfence
If you haven’t installed a plugin through the WordPress admin before, this is the general process you’ll follow for any plugin in the official WordPress plugin directory.
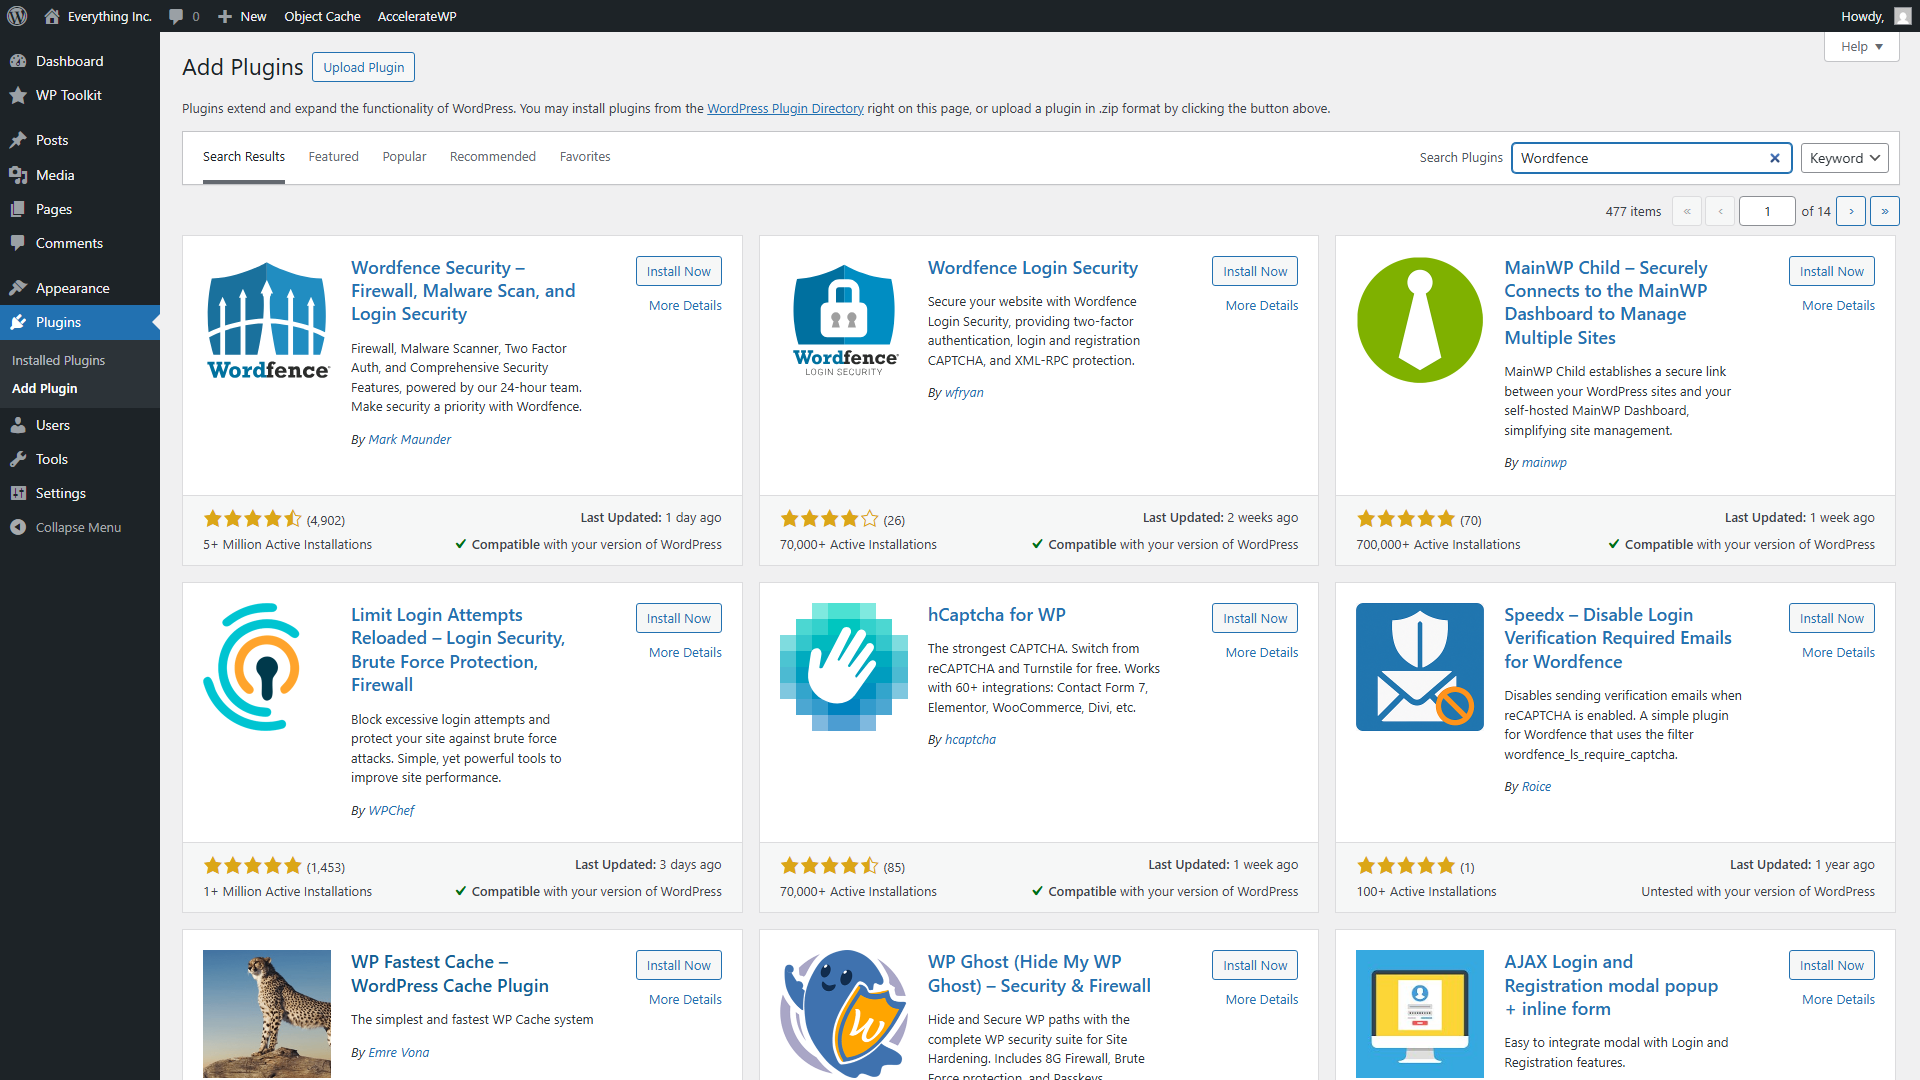
- In your WordPress dashboard, go to Plugins → Add New Plugin.
- Type Wordfence in the search box.
- Find Wordfence Security – Firewall, Malware Scan, and Login Security in the results. Look for the one by Wordfence with millions of active installations listed.
- Click Install Now. When the button changes to Activate, click it again.
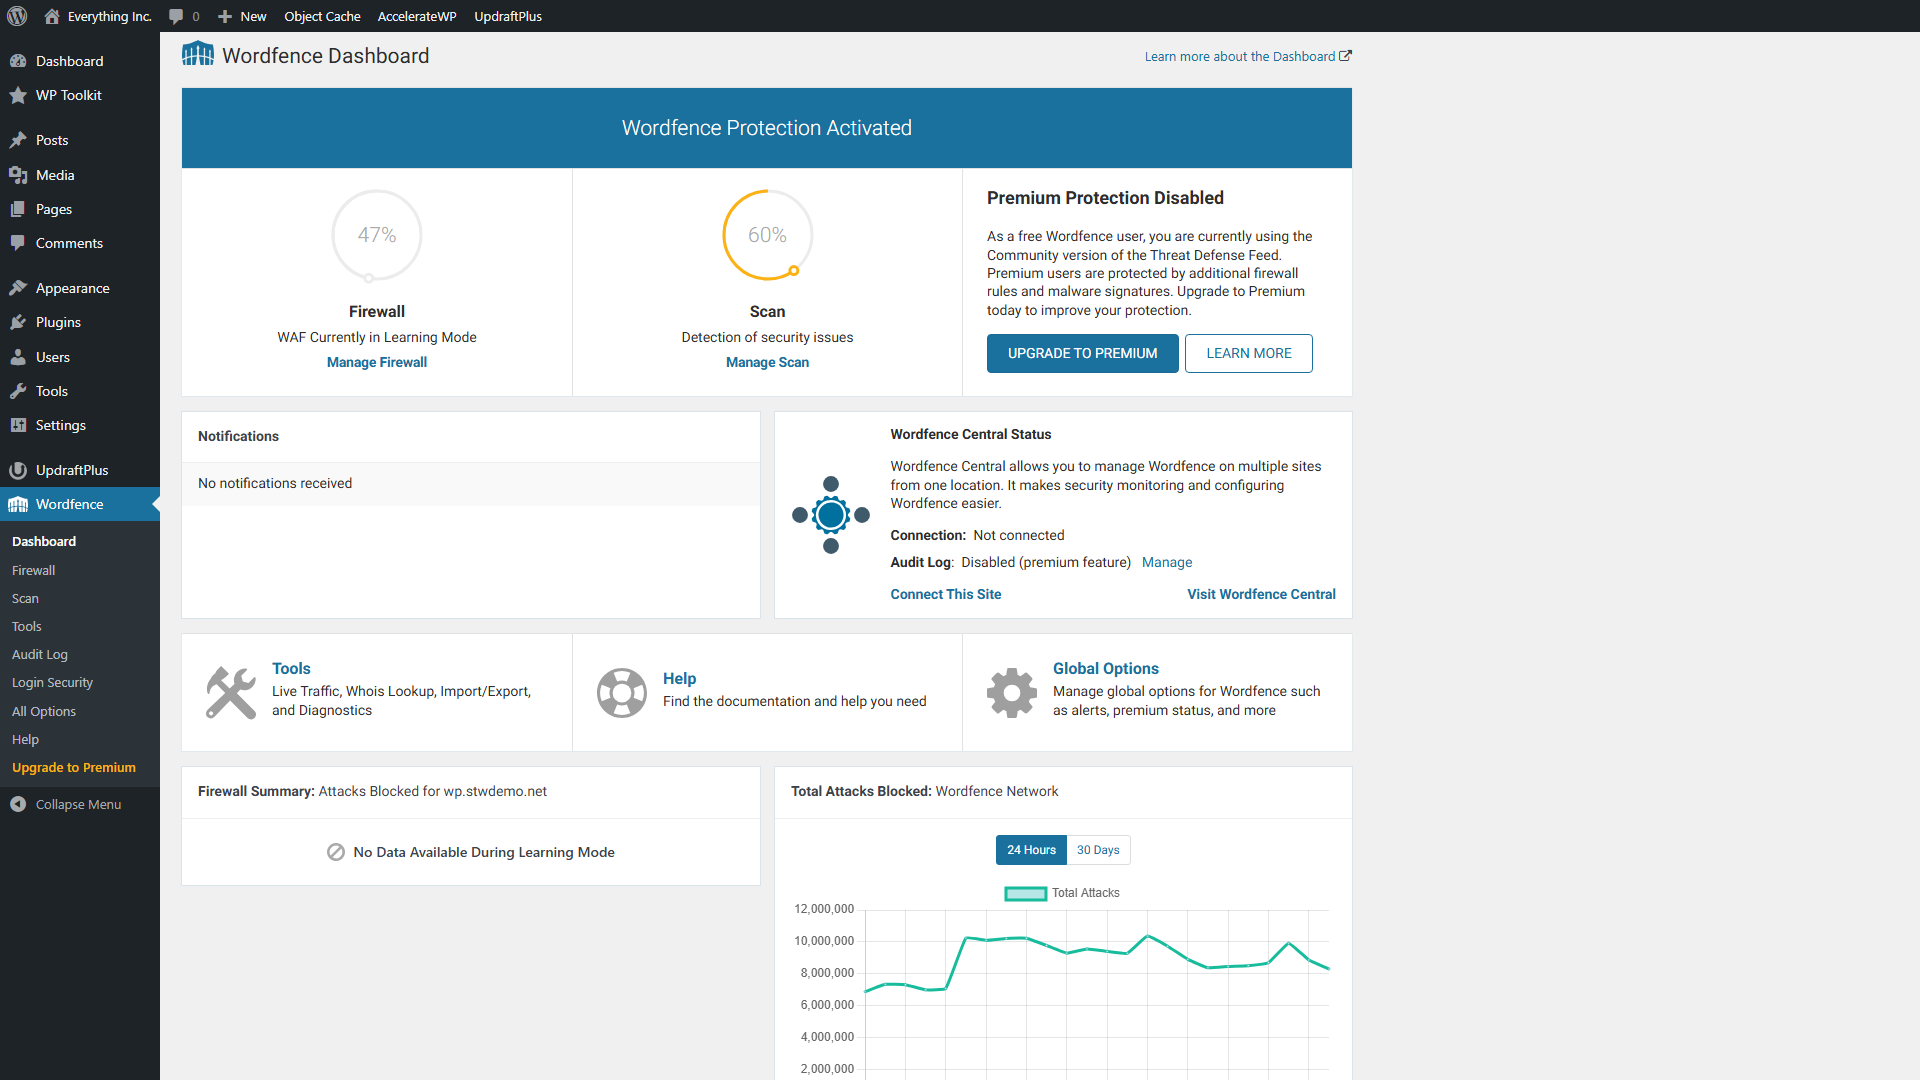
After activation, Wordfence adds a new Wordfence menu item to the left sidebar and asks you to finish the free license setup:
- Click Get your Wordfence license.
- Choose the free license and confirm that you’re OK with the free tier’s delayed firewall and malware-signature updates.
- Enter an email address you check regularly. Wordfence sends the free license key to that email.
- Come back to WordPress and click Install an existing license.
- Paste the key, choose whether you want security and vulnerability alerts by email, and click Install License.
Configuring request filtering
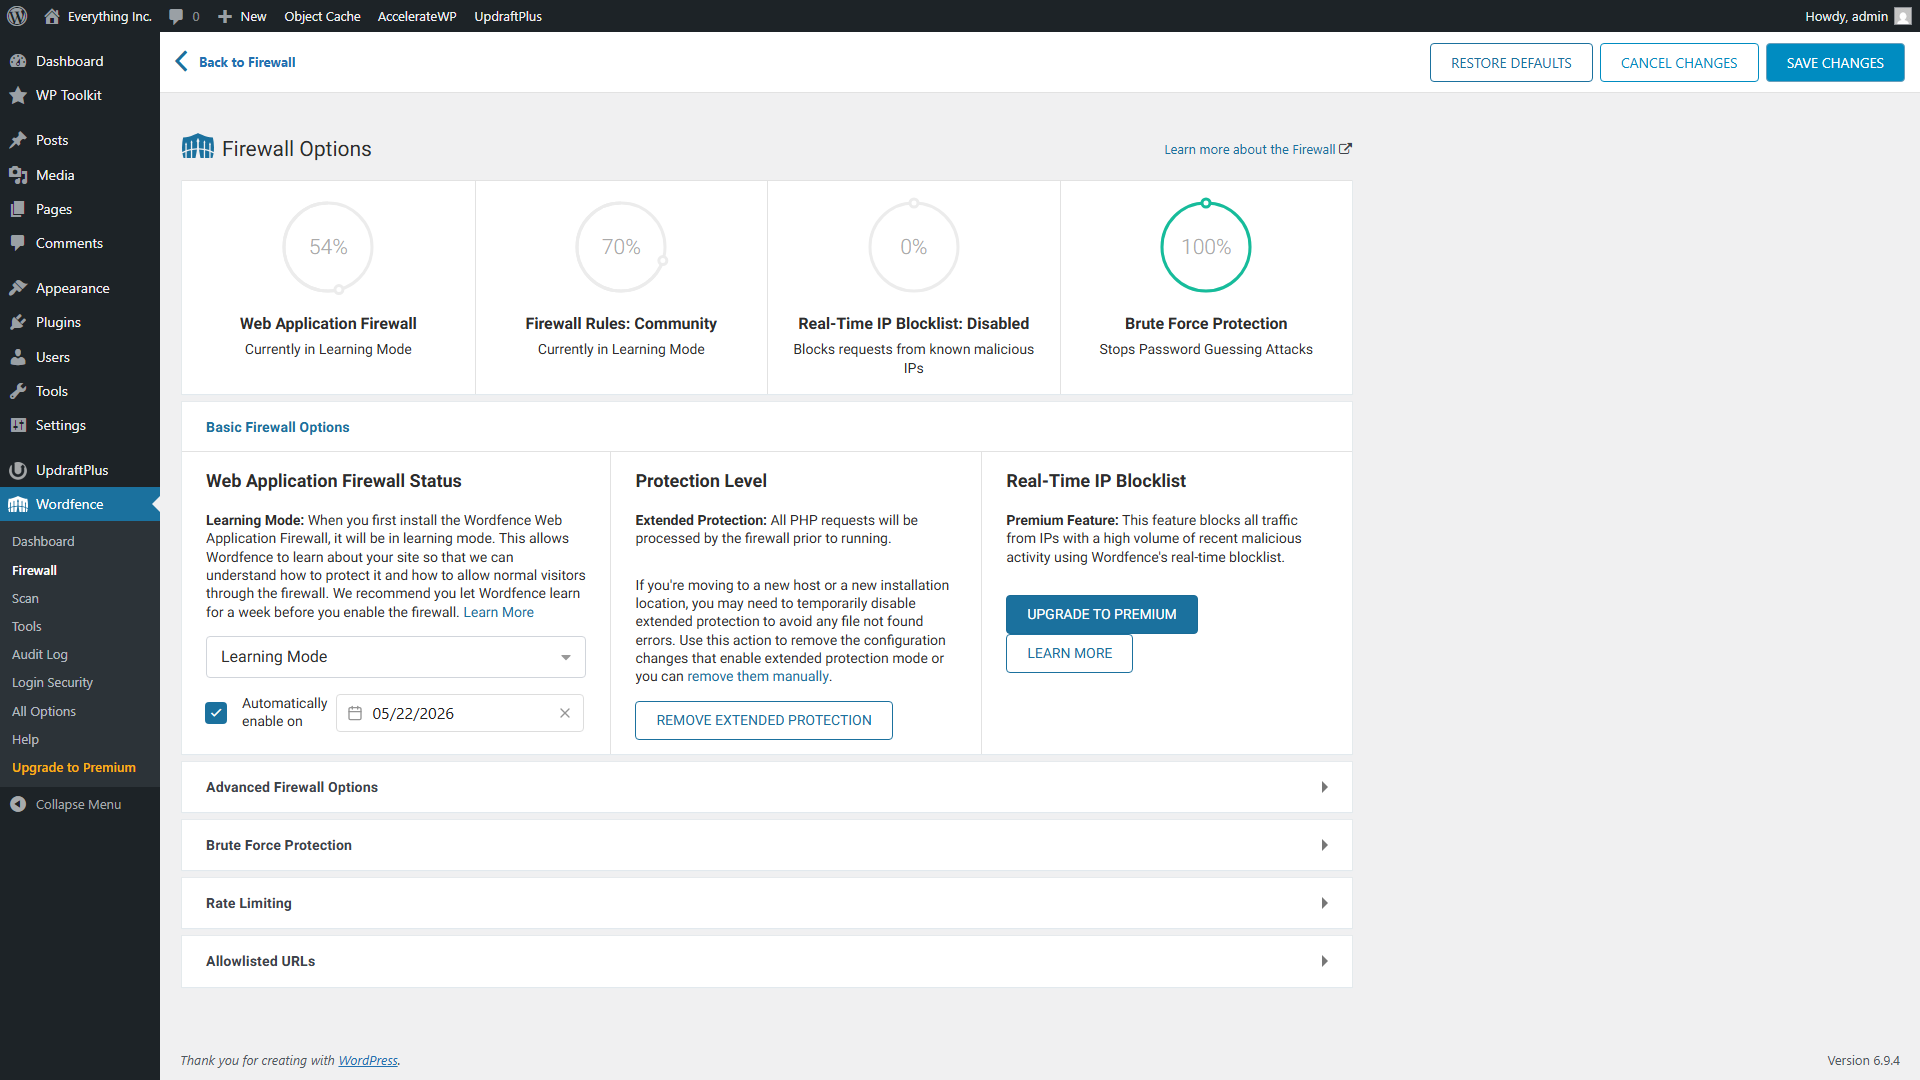
Wordfence’s request filter (which it calls its “firewall”) starts in Learning Mode for seven days after installation. During this time, it watches the normal traffic on your site without blocking anything, building a picture of what legitimate requests look like. Every WordPress site has slightly different patterns depending on the theme, plugins, and features it uses.
While it’s in Learning Mode, use your site normally. Log in, navigate pages, submit forms, and post content. If you run a contact form or a WooCommerce store, submit a test inquiry or process a test order. The filter uses this activity to build its baseline, which prevents it from accidentally blocking real visitors or breaking features later.
After seven days, the filter automatically switches to Enabled and Protecting mode. You can check the status at any time under Wordfence → Firewall.
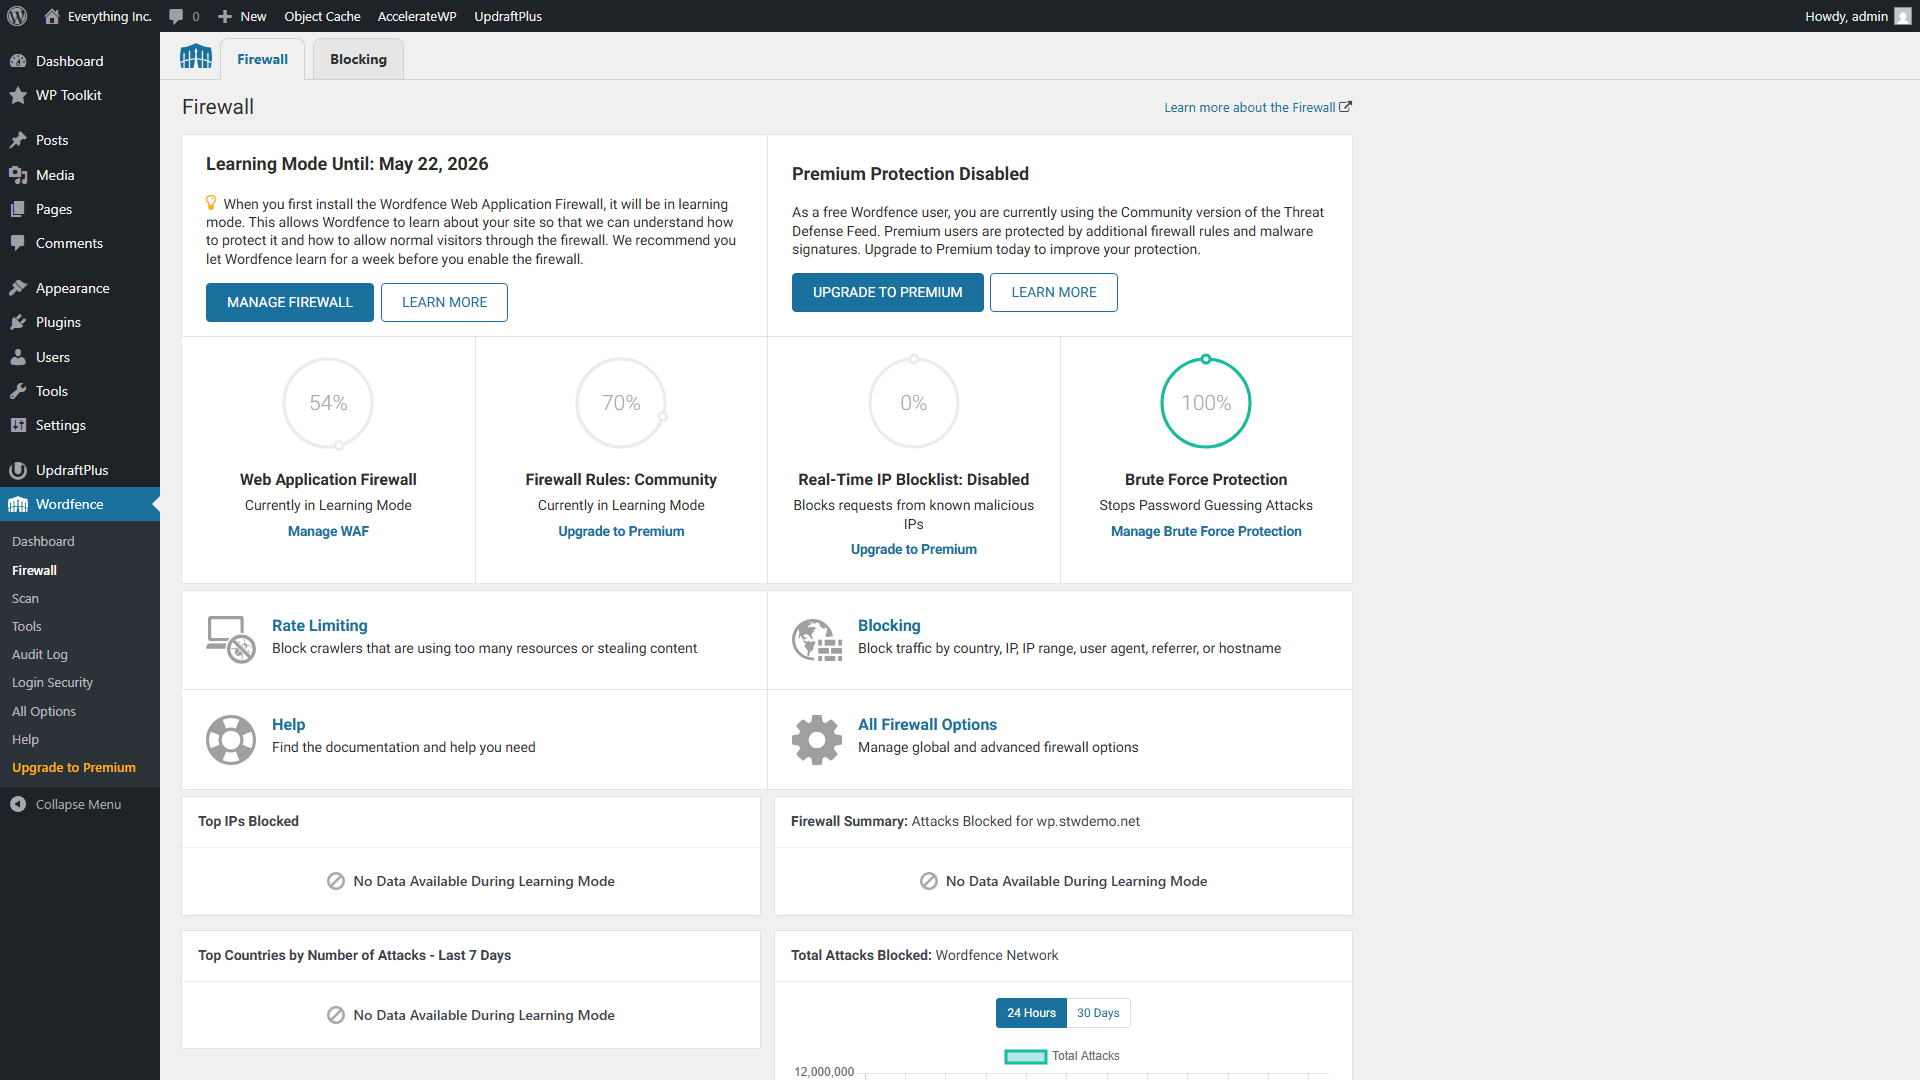
The Manage WAF link opens the firewall settings. For a new site, leave the firewall in Learning Mode until the date Wordfence shows. Once the learning period ends, review the same page and switch to normal protection if Wordfence hasn’t already done it automatically.
Optimize the Web Application Firewall (optional)
Depending on your hosting, Wordfence may also show a notice asking you to optimize the Web Application Firewall. Hit Click Here To Configure or open Wordfence → Firewall → Manage WAF, then click Optimize The Wordfence Firewall. Download the .htaccess backup when Wordfence asks, then click Continue.
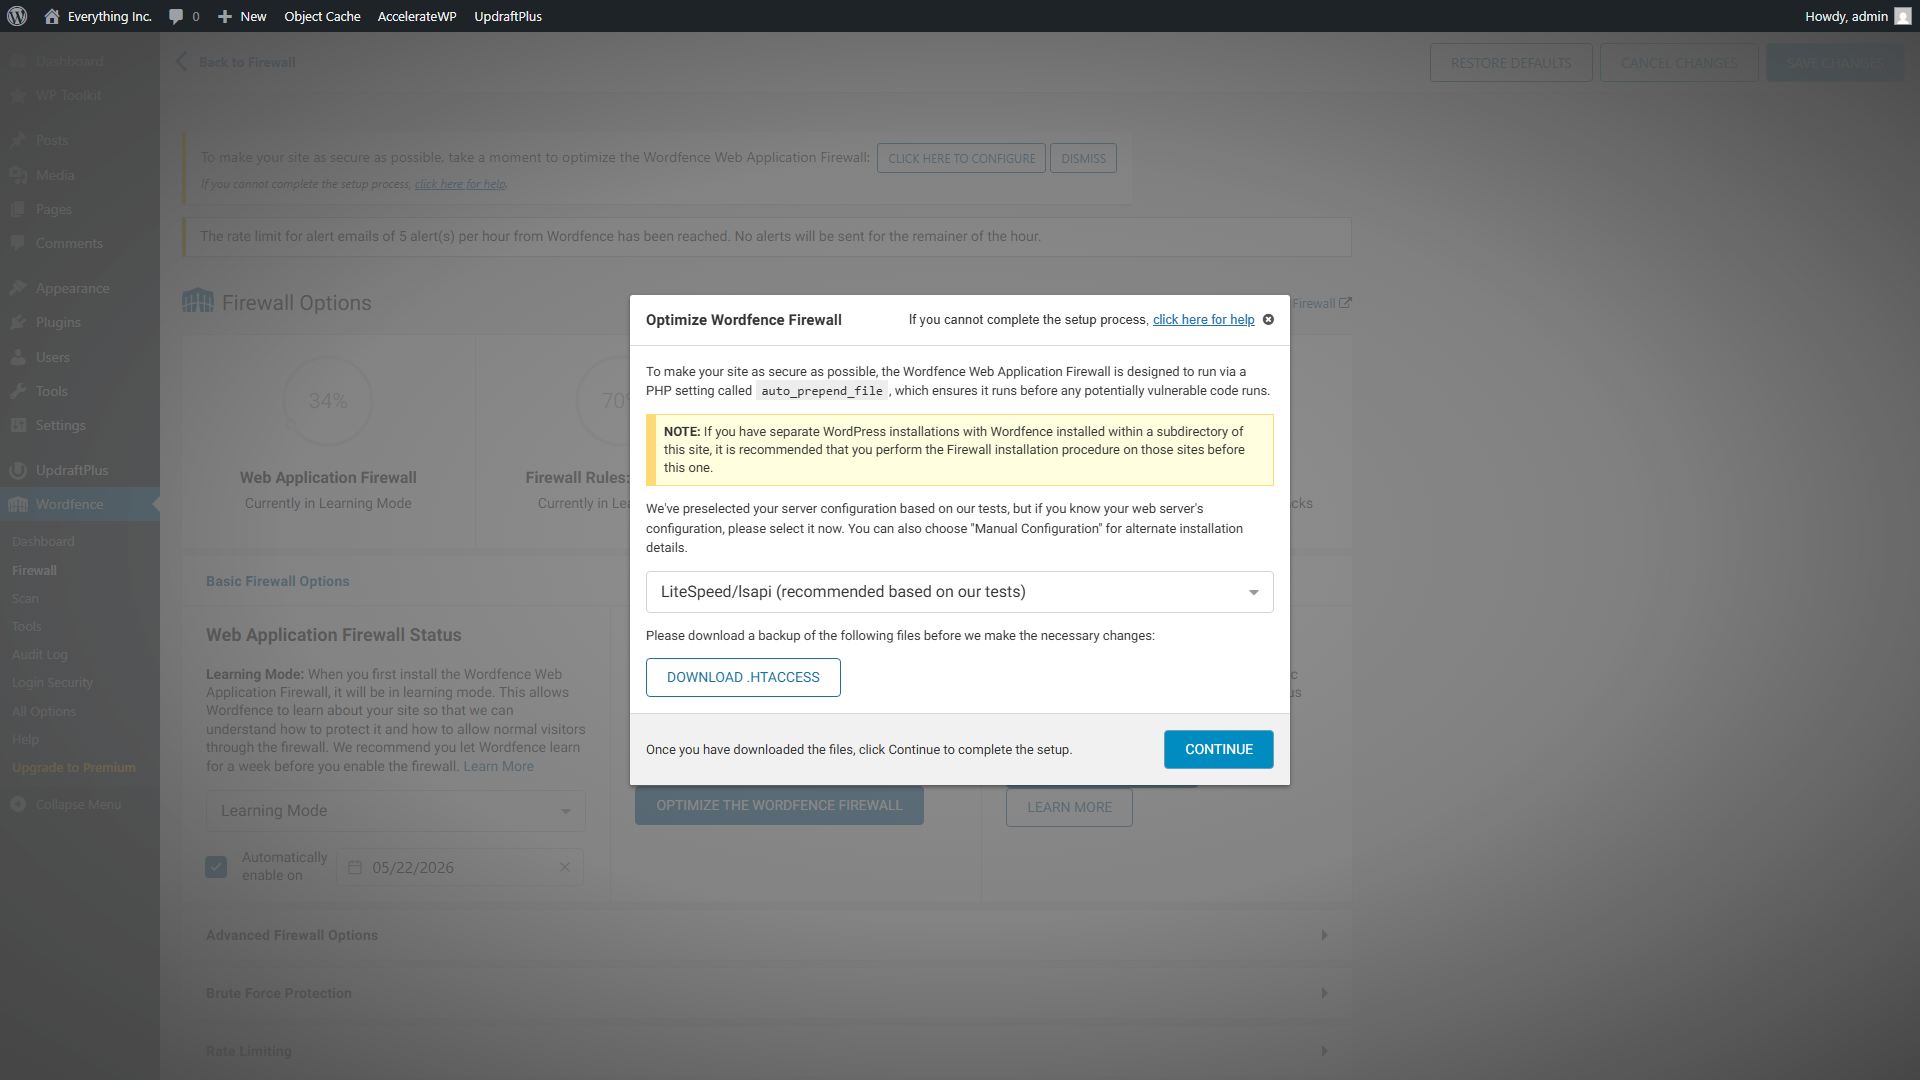
This optimization can change the order in which your server processes requests so Wordfence can inspect traffic before WordPress fully loads. After it succeeds, the firewall options page shows Extended Protection under Protection Level.
Setting up two-factor authentication
Go to Wordfence → Login Security. This page lets you add two-factor authentication to your WordPress login.
Two-factor authentication means that logging in requires two things: your password (something you know) and a temporary code from your phone (something you have). Even if someone steals or guesses your password, they can’t log in without your phone.
Wordfence uses authenticator apps for this. Google Authenticator, Authy, and Microsoft Authenticator all work. Install one of these on your phone if you don’t have one already, then:
- Open the authenticator app on your phone.
- Scan the QR code shown on the Wordfence Login Security page.
- The app generates a six-digit code that changes every 30 seconds. Enter the current code into the verification field on the page.
- Click Activate.
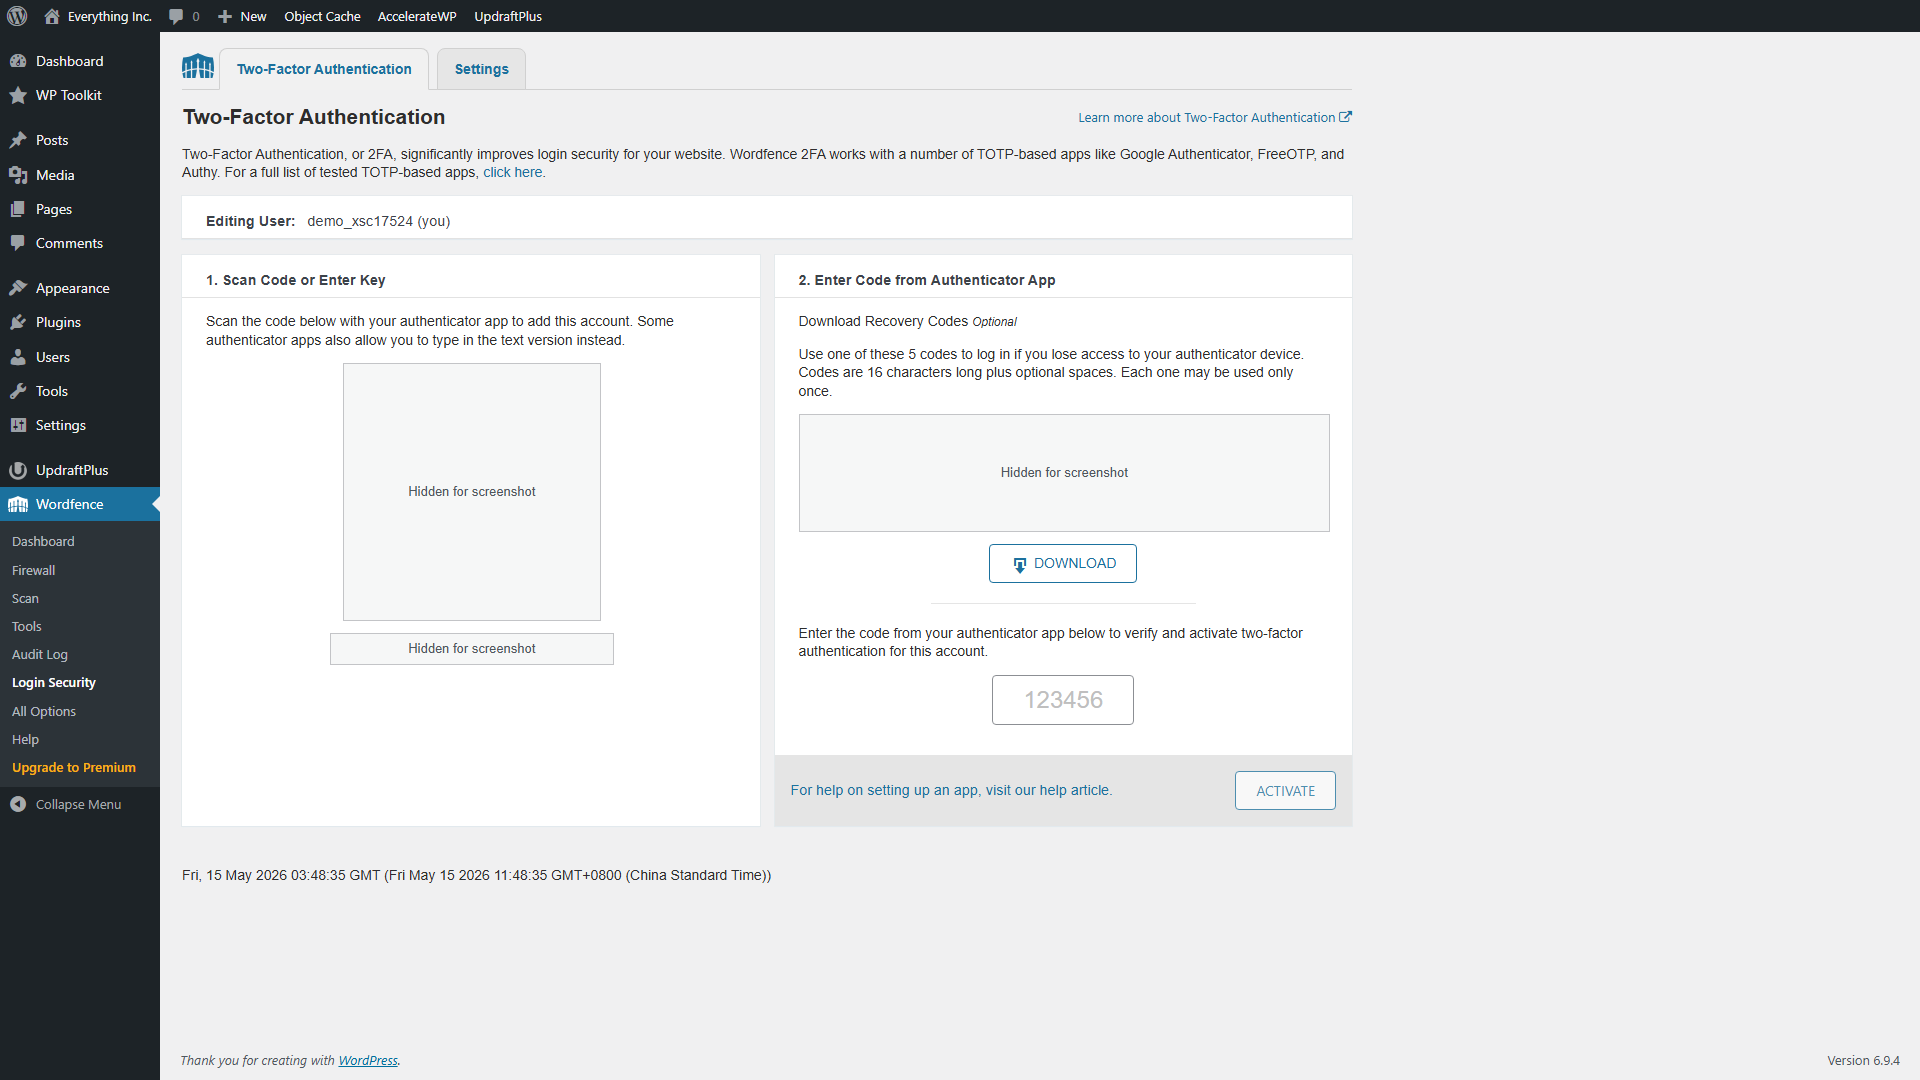
Save the recovery codes that Wordfence shows you. These are one-time backup codes you can use to log in if you lose access to your phone. Store them somewhere safe outside your website, like a password manager or a printed sheet.
Enable 2FA for every user account that has admin or editor privileges on your site. If someone gains access to an admin password through a data breach on another service, the second factor stops them from getting into your WordPress.
While you’re in the Wordfence settings, check the brute-force protection options under Wordfence → Firewall. The firewall overview shows Brute Force Protection separately from the web application firewall. The defaults are reasonable, but verify that failed login lockouts are turned on. This limits how many times an attacker can guess passwords from the same IP address before being locked out temporarily.
Running your first scan
Go to Wordfence → Scan and click Start New Scan. The scanner checks your WordPress core files, theme files, and plugin files against known clean versions from the official WordPress directory, looks for recognized malware signatures, and flags anything that’s been modified or doesn’t belong.
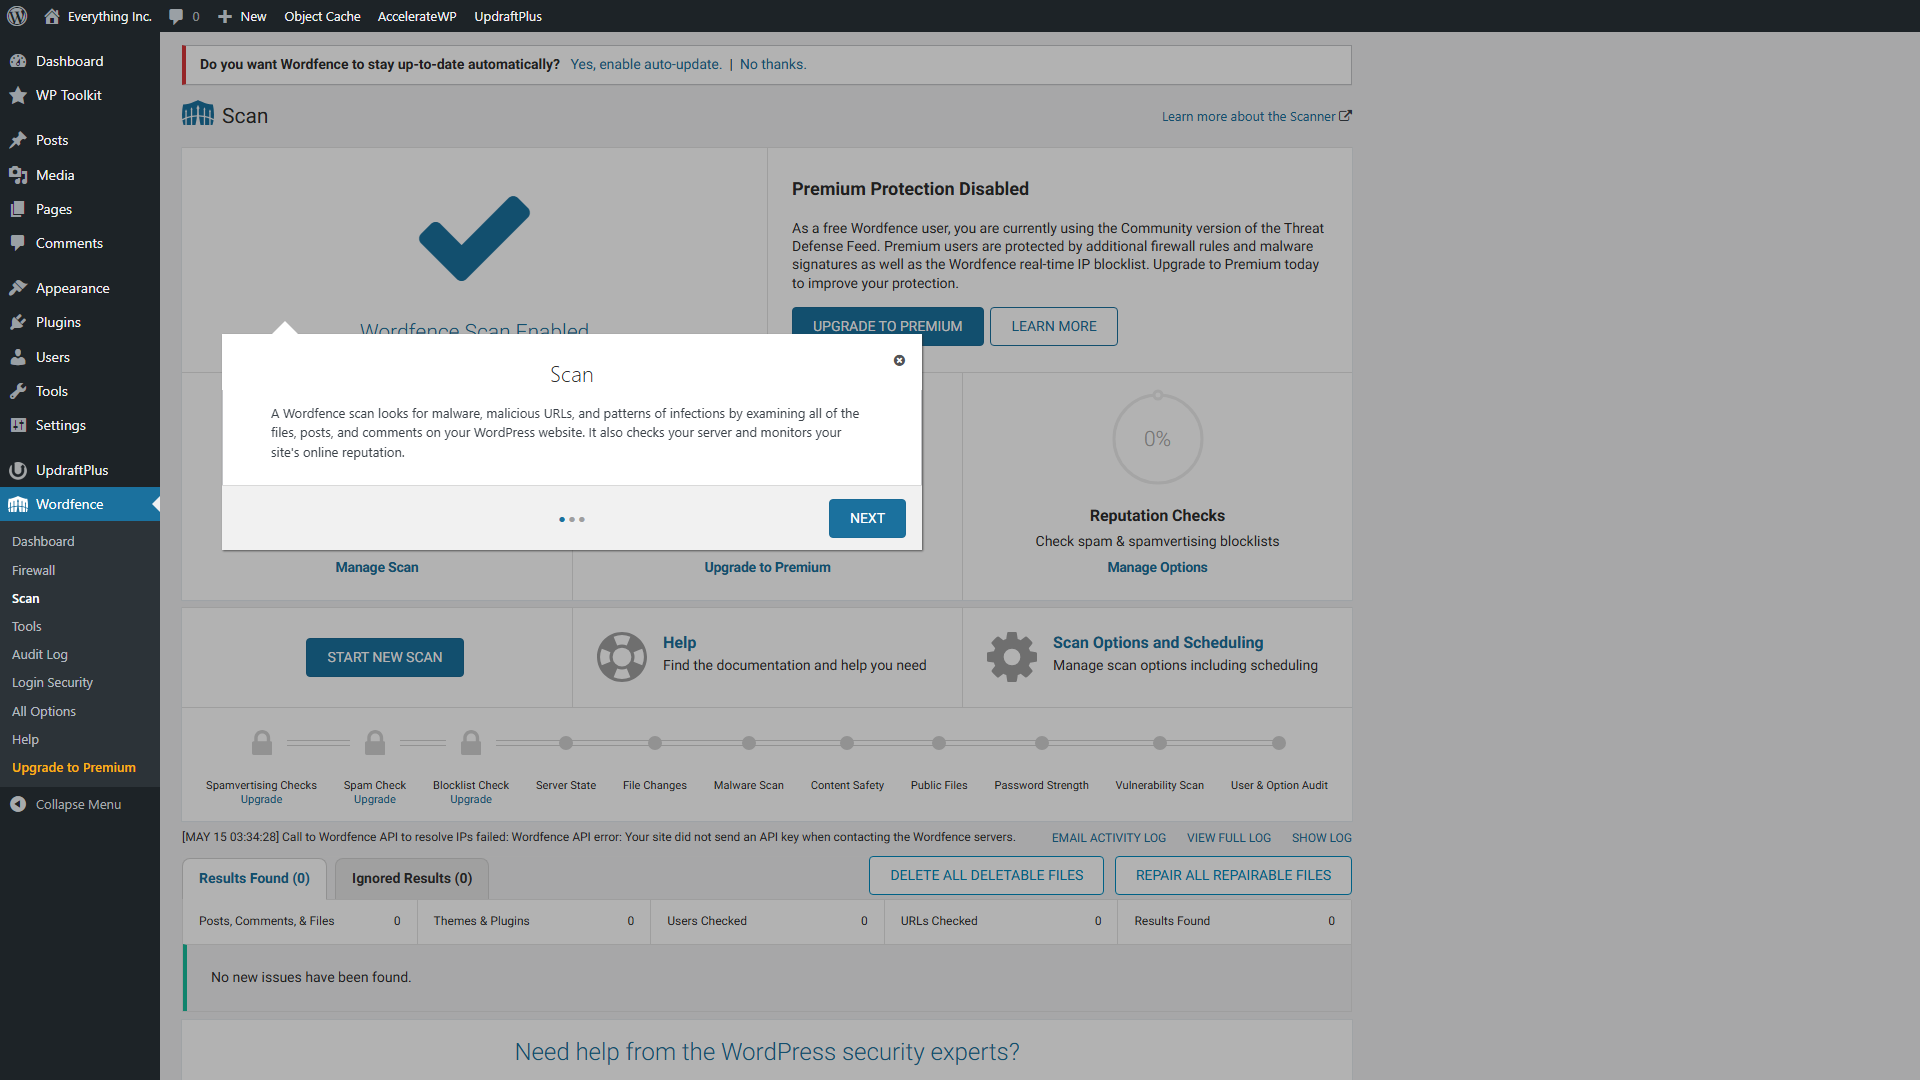
On a fresh site, the scan should come back clean. If it flags anything, read the details carefully. Wordfence explains what it found, where it found it, and what you can do about it. Common findings on a new site include a modified .htaccess file (often fine if your hosting provider customized it during setup) or a plugin that hasn’t been updated recently.
Run a scan after installing new plugins, after updates, or any time your site behaves unexpectedly. You can also schedule automatic scans under Wordfence → All Options → Scan Scheduling.
Managing Wordfence emails
Wordfence sends email alerts for blocked attacks, scan results, and plugin vulnerability warnings. On a site that gets a lot of bot traffic, these alerts can pile up fast. Under Wordfence → All Options → Email Alert Preferences, you can adjust which notifications you receive. Keep the important ones, like administrator sign-in alerts, scan results, and vulnerability warnings, and turn down the noise on less urgent notifications like individual blocked IP addresses.
Optional: Cloudflare as a Network-Level Layer
Wordfence protects WordPress at the application level. Cloudflare works at an entirely different layer, sitting between your visitors and your hosting server as a middleman that filters traffic before it arrives.
Cloudflare is a strong complement but entirely optional. Wordfence on its own covers the essential WordPress-level security for most sites. Cloudflare adds value if your site attracts heavy bot traffic, if you’re concerned about DDoS attacks, or if you serve visitors globally and want the speed benefit of a CDN.
When you set up Cloudflare, you change your domain’s nameservers (the DNS records that tell browsers where to find your site) to point at Cloudflare’s network. Every visitor request then passes through Cloudflare first. Cloudflare checks the request against its own threat databases, blocks traffic from known malicious IP addresses, and absorbs DDoS attacks, where thousands of machines flood a server with requests in an attempt to knock it offline. Only legitimate traffic gets forwarded to your actual server.
Cloudflare’s free tier includes basic DDoS protection and a content delivery network that caches your site’s static files (images, CSS, JavaScript) on servers around the world, so visitors load those files from a location closer to them.
Setting up Cloudflare
- Create a free account at cloudflare.com.
- Add your domain. Cloudflare scans your existing DNS records and imports them.
- Review the imported DNS records to make sure nothing is missing. Your main domain record should show an orange cloud icon, which means traffic is being routed through Cloudflare’s network.
- Under DNS → Records for your domain, Cloudflare lists two nameservers. Record these.
- Log in to wherever you registered your domain (your domain registrar, which might be STW, or a separate provider) and replace the existing nameservers with the ones Cloudflare provides. The change can take up to 24 hours to take effect globally, though it’s often faster.
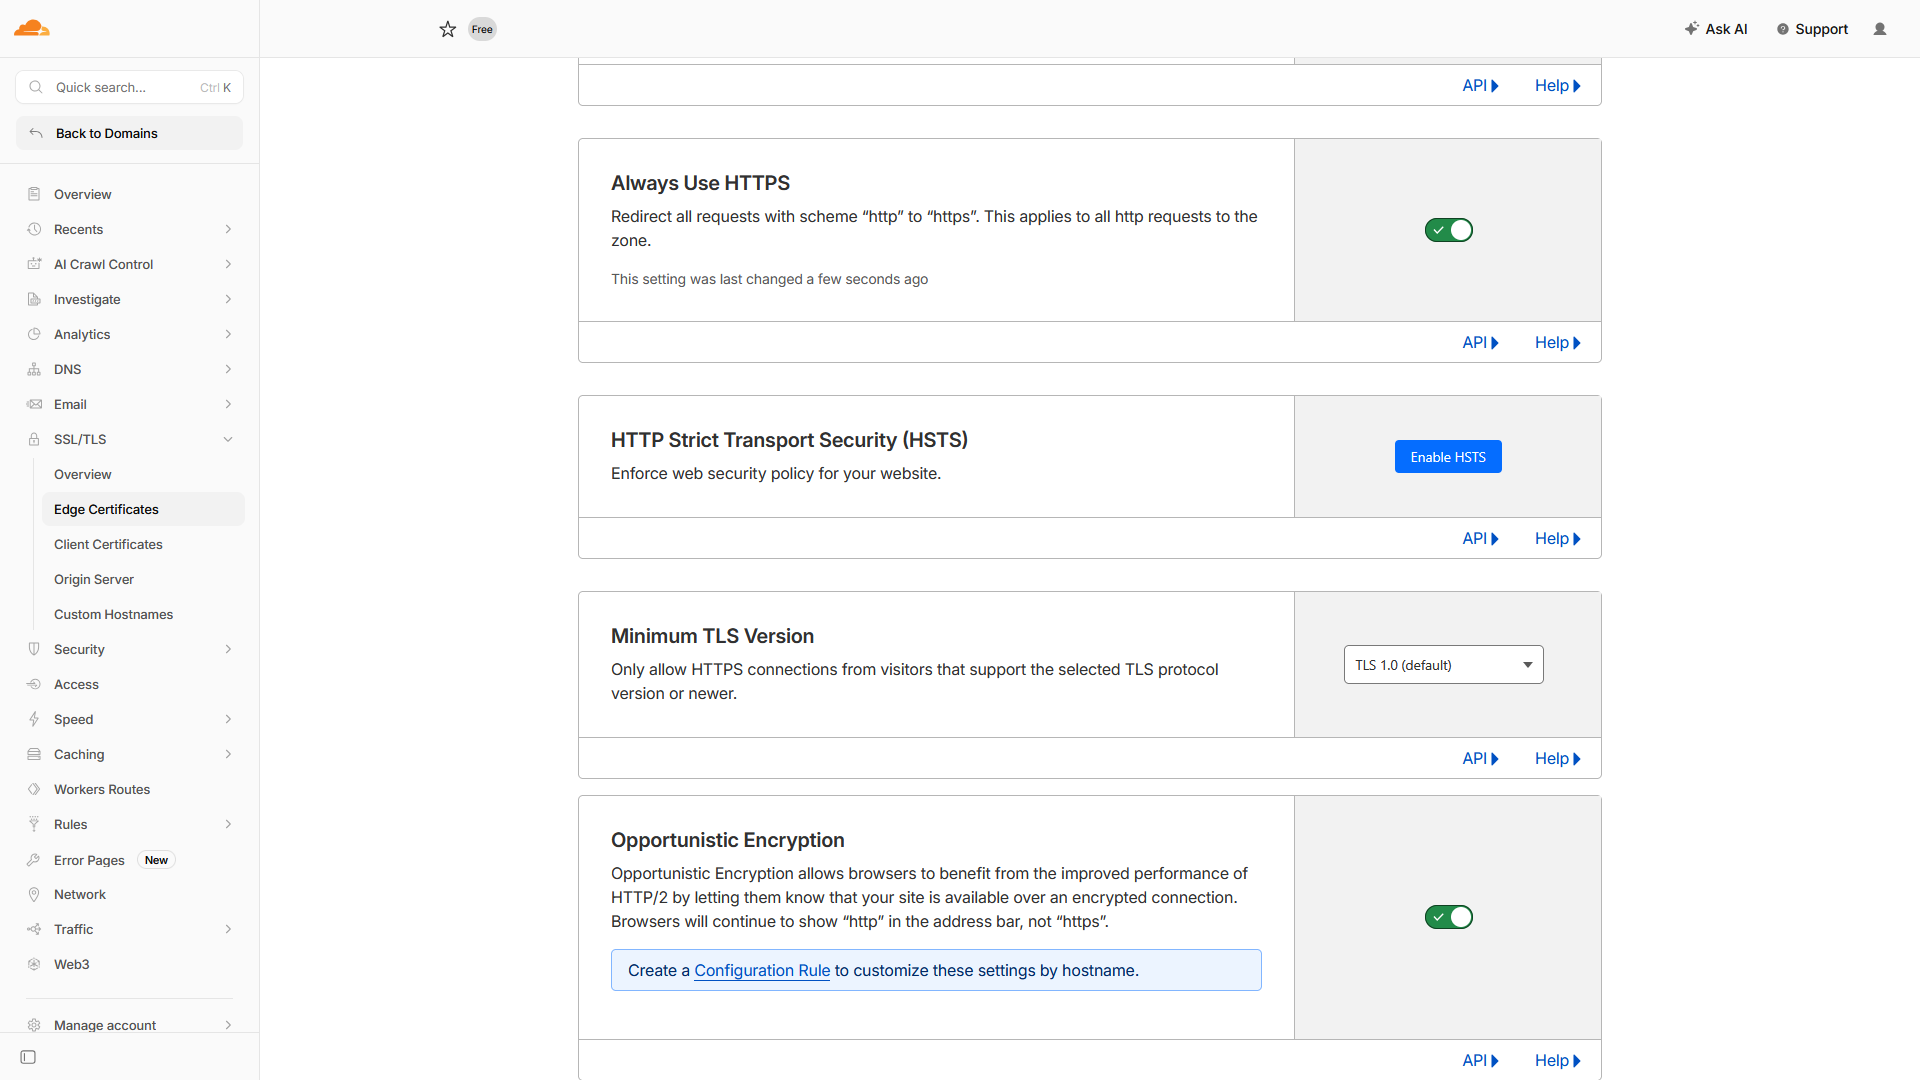
- Back in the Cloudflare dashboard, enable Always Use HTTPS under SSL/TLS → Edge Certificates so all traffic is encrypted.
Making Wordfence and Cloudflare work together
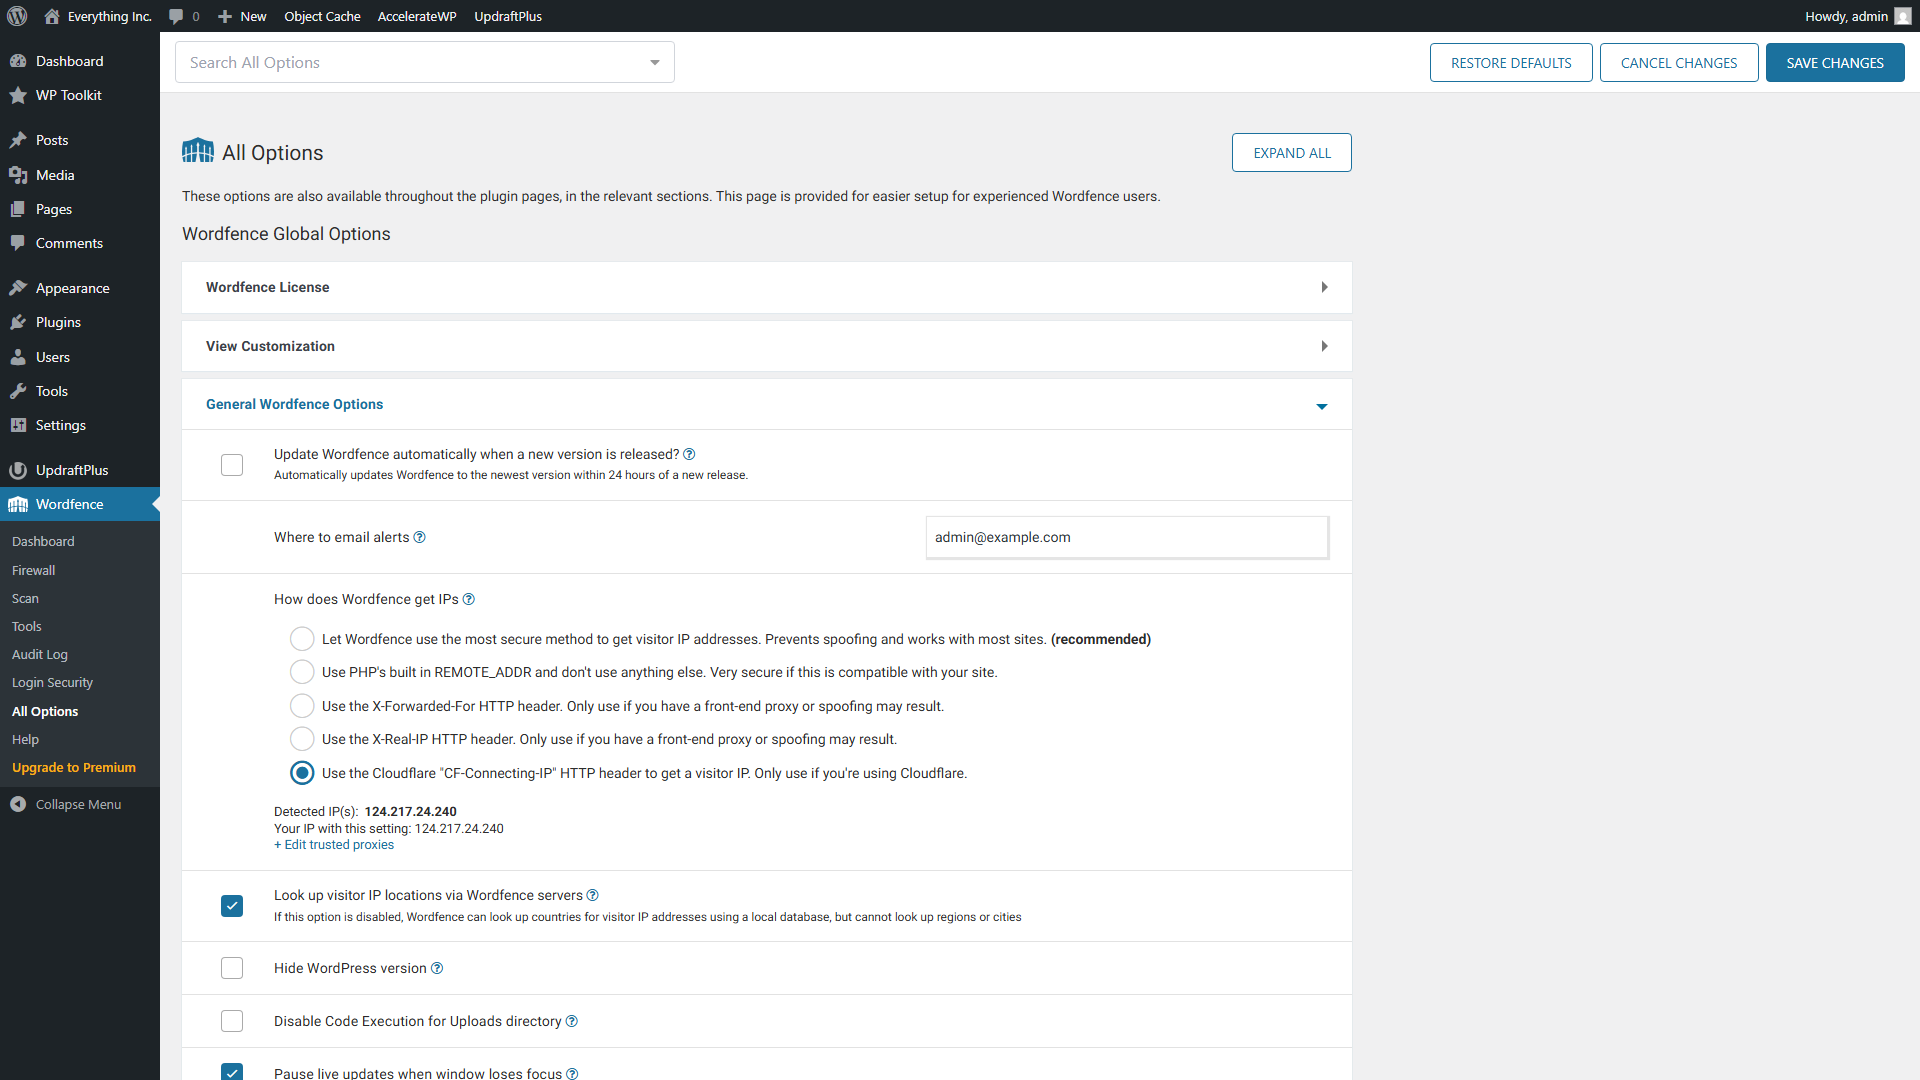
Because Cloudflare sits between your visitors and your server, your server sees all incoming traffic as coming from Cloudflare’s IP addresses rather than the actual visitor’s address. Without a fix, Wordfence can’t tell visitors apart. One failed login attempt from one person could trigger a lockout that affects everyone, because Wordfence thinks all traffic is coming from the same place.
To fix this, go to Wordfence → All Options → General Wordfence Options and find How does Wordfence get IPs. Choose the option to use the Cloudflare CF-Connecting-IP header if Wordfence doesn’t detect Cloudflare correctly on its own. Cloudflare adds this header to every request it forwards, containing the real visitor’s IP address. With this setting enabled, Wordfence can identify individual visitors correctly again.
Alternatives to WordFence
Wordfence is a common recommendation for WordPress sites because it covers the most ground in a single plugin and has a strong free tier, but there are other credible options depending on your priorities.
- MalCare copies file signatures to its own servers for analysis, so the scan uses almost no CPU or memory on your hosting. If your hosting plan is tight on resources and you find that Wordfence scans cause slowdowns during busy periods, MalCare is worth considering.
- Solid Security (formerly iThemes Security) focuses more on hardening WordPress configuration than on active scanning. It’s strong on login protection, user role management, and disabling legacy features that bots now frequently abuse to bypass login limits. Solid Security uses Patchstack’s vulnerability database for its filtering rules.
- Patchstack monitors the WordPress plugin ecosystem for newly disclosed security flaws and deploys filtering rules to block exploits targeting those flaws, sometimes days before the plugin developer releases a fix. Patchstack is popular with developers and agencies managing multiple sites. It doesn’t include file scanning or malware cleanup, so it pairs with a scanning tool rather than replacing one.
Any of these can work as a primary security plugin. The key is to pick one and configure it properly rather than layering several together.
Habits That Matter More Than Plugins
A security plugin can’t fix weak fundamentals. These practices do more for your site’s security than any plugin, because they reduce the number of openings available to attackers in the first place.
- Use a strong, unique password for your WordPress admin account. If your password is reused from another site and that site gets breached, attackers will try it on every WordPress login they can find. A password manager like Bitwarden or 1Password generates and stores strong passwords so you don’t have to remember them.
- Don’t use “admin” as your username. Automated bots try that username first on every WordPress site they find. Pick something less guessable.
- Keep plugins and themes updated. Most WordPress security incidents exploit known vulnerabilities in outdated plugins. Part 22 covers how to perform updates safely.
- Keep PHP updated. Older PHP versions eventually stop receiving security patches, which leaves known vulnerabilities open. Part 23 of this tutorial series explains how to check and change your PHP version safely.
- Remove plugins and themes you aren’t using. Even an inactive plugin still has its code files on your server, and those files can still contain exploitable vulnerabilities. Part 25 covers cleanup.
Conclusion
A WordPress security plugin filters malicious requests, scanning files for unauthorized changes, hardening the login page, and alerting you to known plugin vulnerabilities. Wordfence covers all of that in a single installation. Cloudflare adds an optional network-level layer in front of your server for sites that need it. And the fundamentals, strong passwords, two-factor authentication, current software, and a clean plugin list, do more heavy lifting than most people expect.
The next part of this tutorial series covers the other half of keeping your site safe: backups. Even with solid security in place, the ability to restore your site from a known good state is what saves you when something goes wrong.
Next steps: