

Introduction
WordPress is built on the PHP programming language. Every page load, plugin call, and admin screen runs through the PHP version installed on your hosting server. If you let that version fall too much behind, you’re running your site on code the PHP project has stopped fixing, and you’re missing out on the performance gains that come with each new branch.
In the previous tutorial we covered keeping WordPress core, plugins, and themes up to date. PHP needs a different kind of update because it happens at the hosting level, not inside the WordPress admin. You’ll change it in your hosting control panel, not through the WordPress Updates screen.
This guide covers what PHP does for WordPress, how to check your current version, and how to safely move to a newer one using Plesk on STW WordPress hosting. The same general process applies on other web hosting providers, though the control panel may look slightly different.
What PHP Does for WordPress
PHP is the main programming language WordPress is written in. When someone visits your site, PHP reads your theme files, queries the database, processes your plugin logic, and assembles the finished page that gets sent to the visitor’s browser. It runs on the server, not in the visitor’s browser.
Each PHP version improves on the last, with newer branches running the same WordPress code faster because the PHP engine itself has been optimized. They also fix security vulnerabilities that older branches will never receive patches for.
WordPress can report which version it’s running, but it can’t change it. That’s a hosting-side decision.
PHP Versions
PHP uses a branch-based release cycle, and each branch (e.g. 8.2, 8.3, 8.4, 8.5) gets two years of active support with bug fixes and new features, followed by one year of security-only fixes. After that, the branch is “end-of-life” and receives no further patches.
Here’s what the PHP support calendar looked like at the time of writing:
| PHP branch | Active support until | Security support until | Status |
|---|---|---|---|
| 8.2 | Ended | December 31, 2026 | Security fixes only |
| 8.3 | Ended | December 31, 2027 | Security fixes only |
| 8.4 | December 31, 2026 | December 31, 2028 | Active support |
| 8.5 | December 31, 2027 | December 31, 2029 | Active support |
WordPress can technically run on older PHP branches than it recommends. “Can run on” and “should run on” are different things. Check the WordPress requirements page for the current recommended baseline. A site on an end-of-life PHP branch may work today, but it’s running on code that no longer receives security patches.
The right target is a branch that’s still supported by the PHP project, fully compatible with your WordPress version, and tested with your active plugins and theme.
Checking Your Current PHP Version
Before changing anything, find out what you’re running. WordPress makes this easy through Site Health.
- In your WordPress admin, go to Tools → Site Health.
- Select the Info tab.
- Expand the Server section.
- Look at the PHP version row.
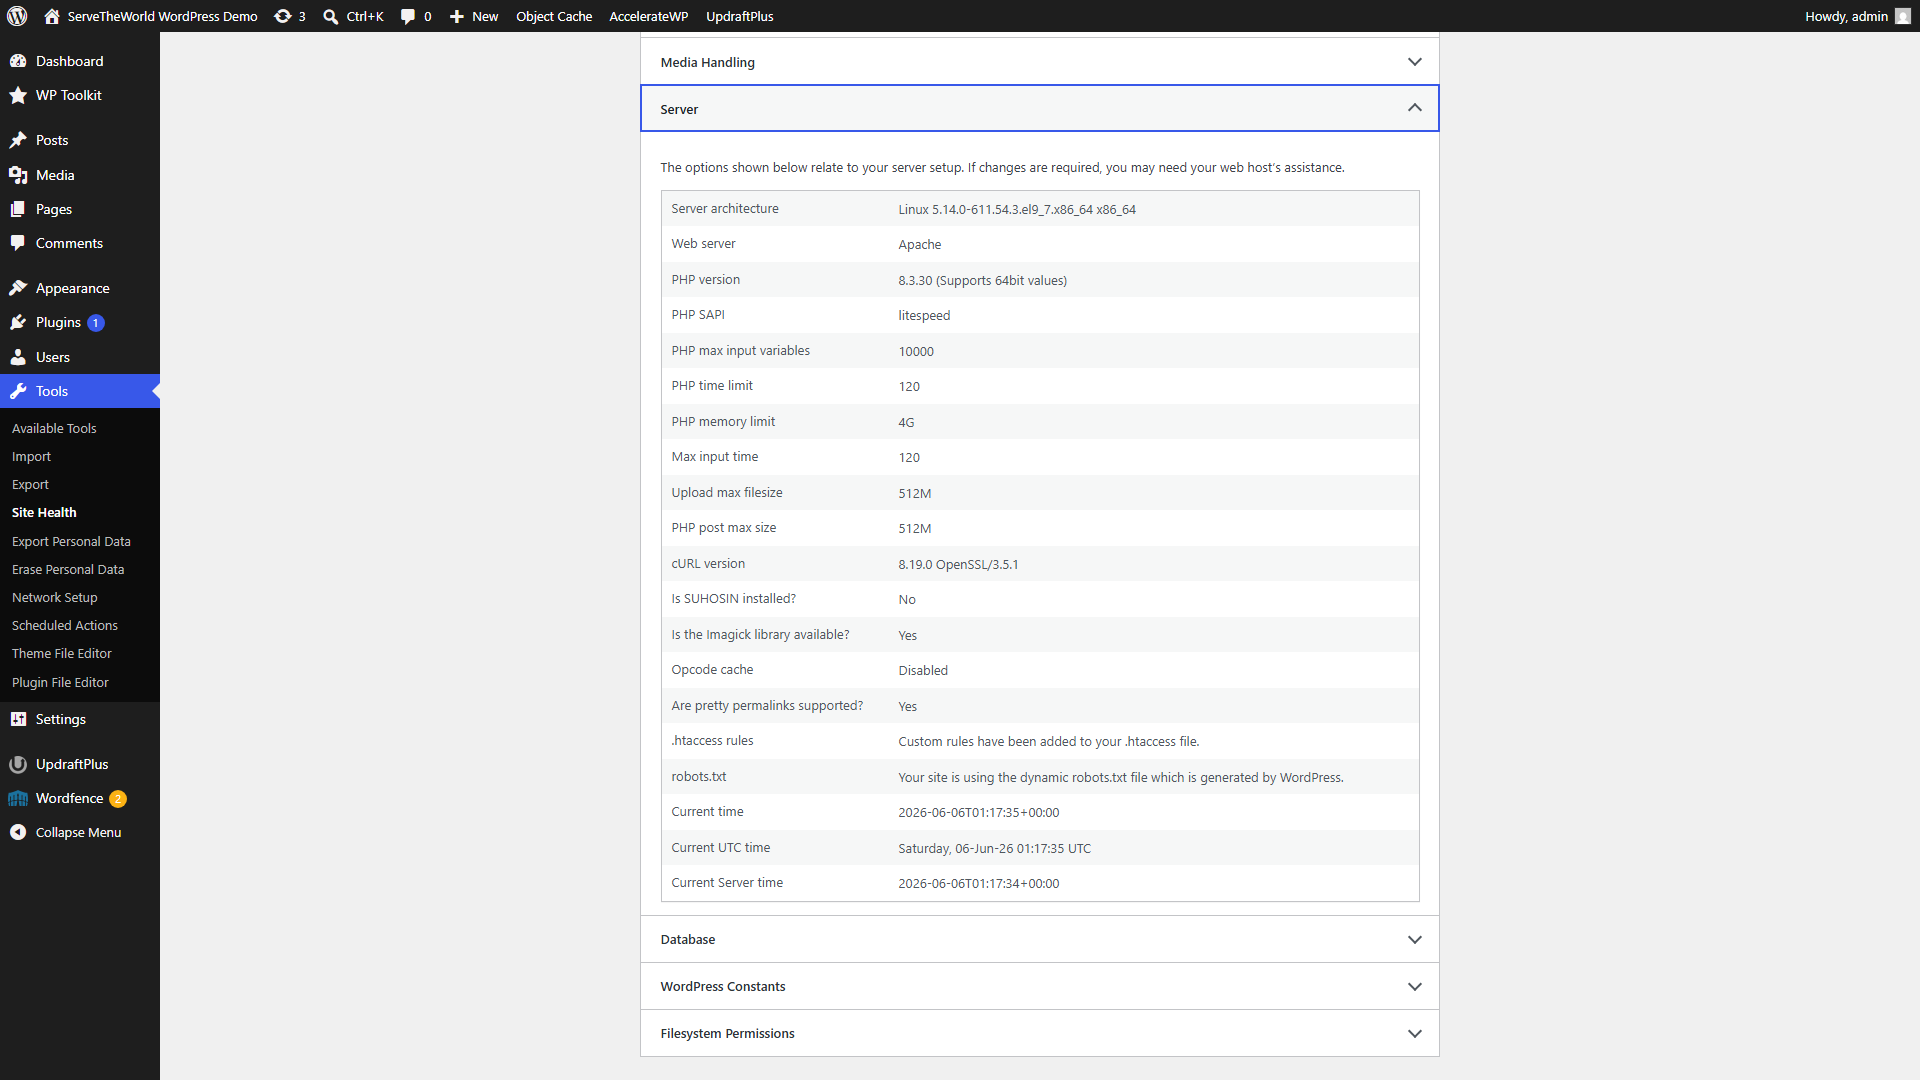
In this example, the site is running PHP 8.3. If a newer supported branch is available on your server, it’s worth considering the update. If your site shows an end-of-life branch, you’ll want to prioritize updating.
Site Health also flags outdated PHP versions as a critical issue, so you may have already seen a warning on the Status tab. We saw exactly that in Part 22 when the same site flagged its PHP version alongside pending theme updates.
Before You Update PHP
Changing PHP versions is a small change that can have a big effect. Most modern plugins and themes work across all currently supported PHP branches, but occasionally an older plugin or a theme with custom code will break on a newer version.
Back up first
If you followed Part 21, you already know the backup routine. Create a fresh WordPress Toolkit snapshot in Plesk or run a manual UpdraftPlus backup before touching PHP. You want a clean restore point that reflects your current working site.
Update WordPress, plugins, and themes first
Run your WordPress software updates before changing PHP. Plugin and theme developers release compatibility fixes alongside new PHP branches, and you want those in place before the switch.
Check plugin and theme compatibility
For most popular plugins, compatibility with the newest available versions of PHP is a given. If you’re running something niche, older, or custom-built, check the plugin’s changelog, support forum, or documentation for PHP compatibility notes.
Write down your current version
Note your current PHP version before changing it. If you need to roll back, knowing whether you were on 8.3.30 or 8.2.28, for example, saves you from guessing in the Plesk menu.
Updating PHP in Plesk
PHP is managed at the hosting level, so you’ll make this change in Plesk rather than in WordPress. On ServeTheWorld hosting, for example, you can reach Plesk through the customer portal.
Step 1 — Open your hosting product
- Log in to my.servetheworld.net.
- Go to Products → My Products.
- Open your WordPress hosting product.
- Scroll to One Click Login and click Plesk.
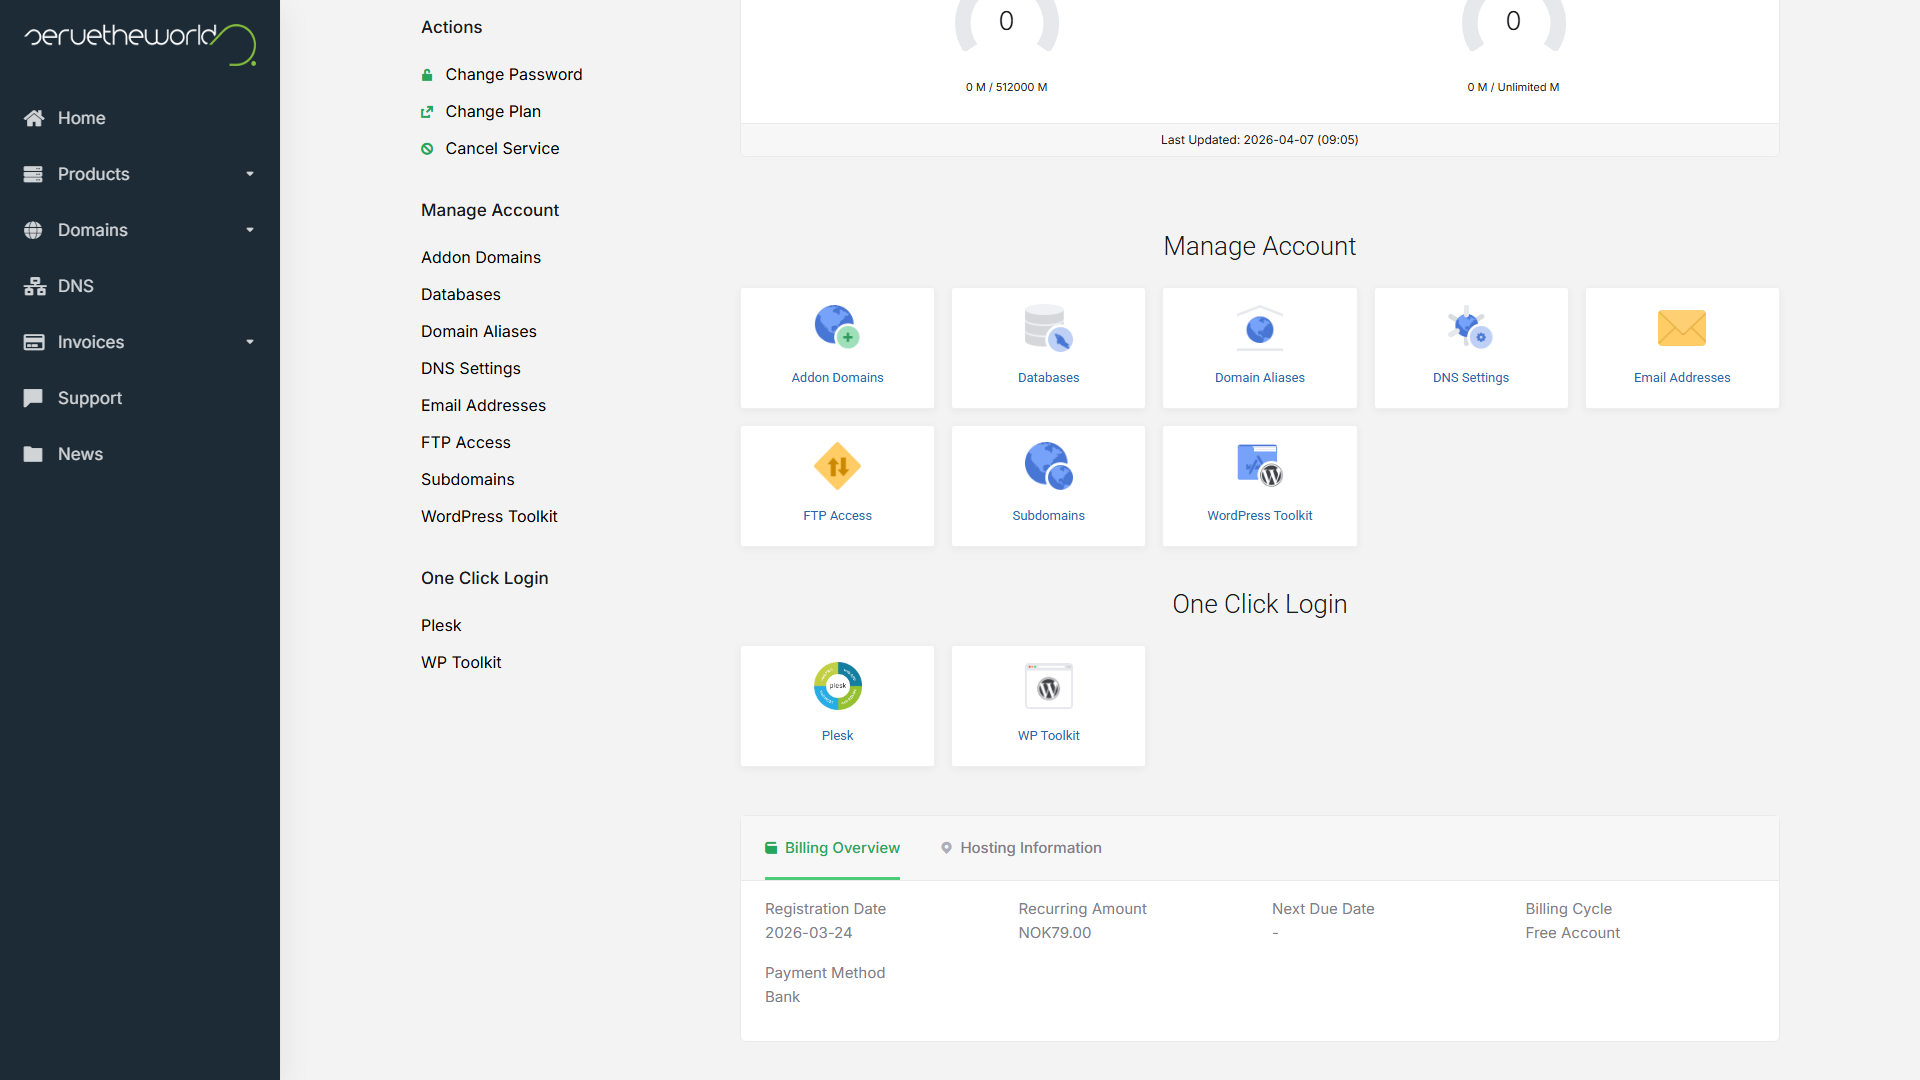
Step 2 — Check the current version in Plesk
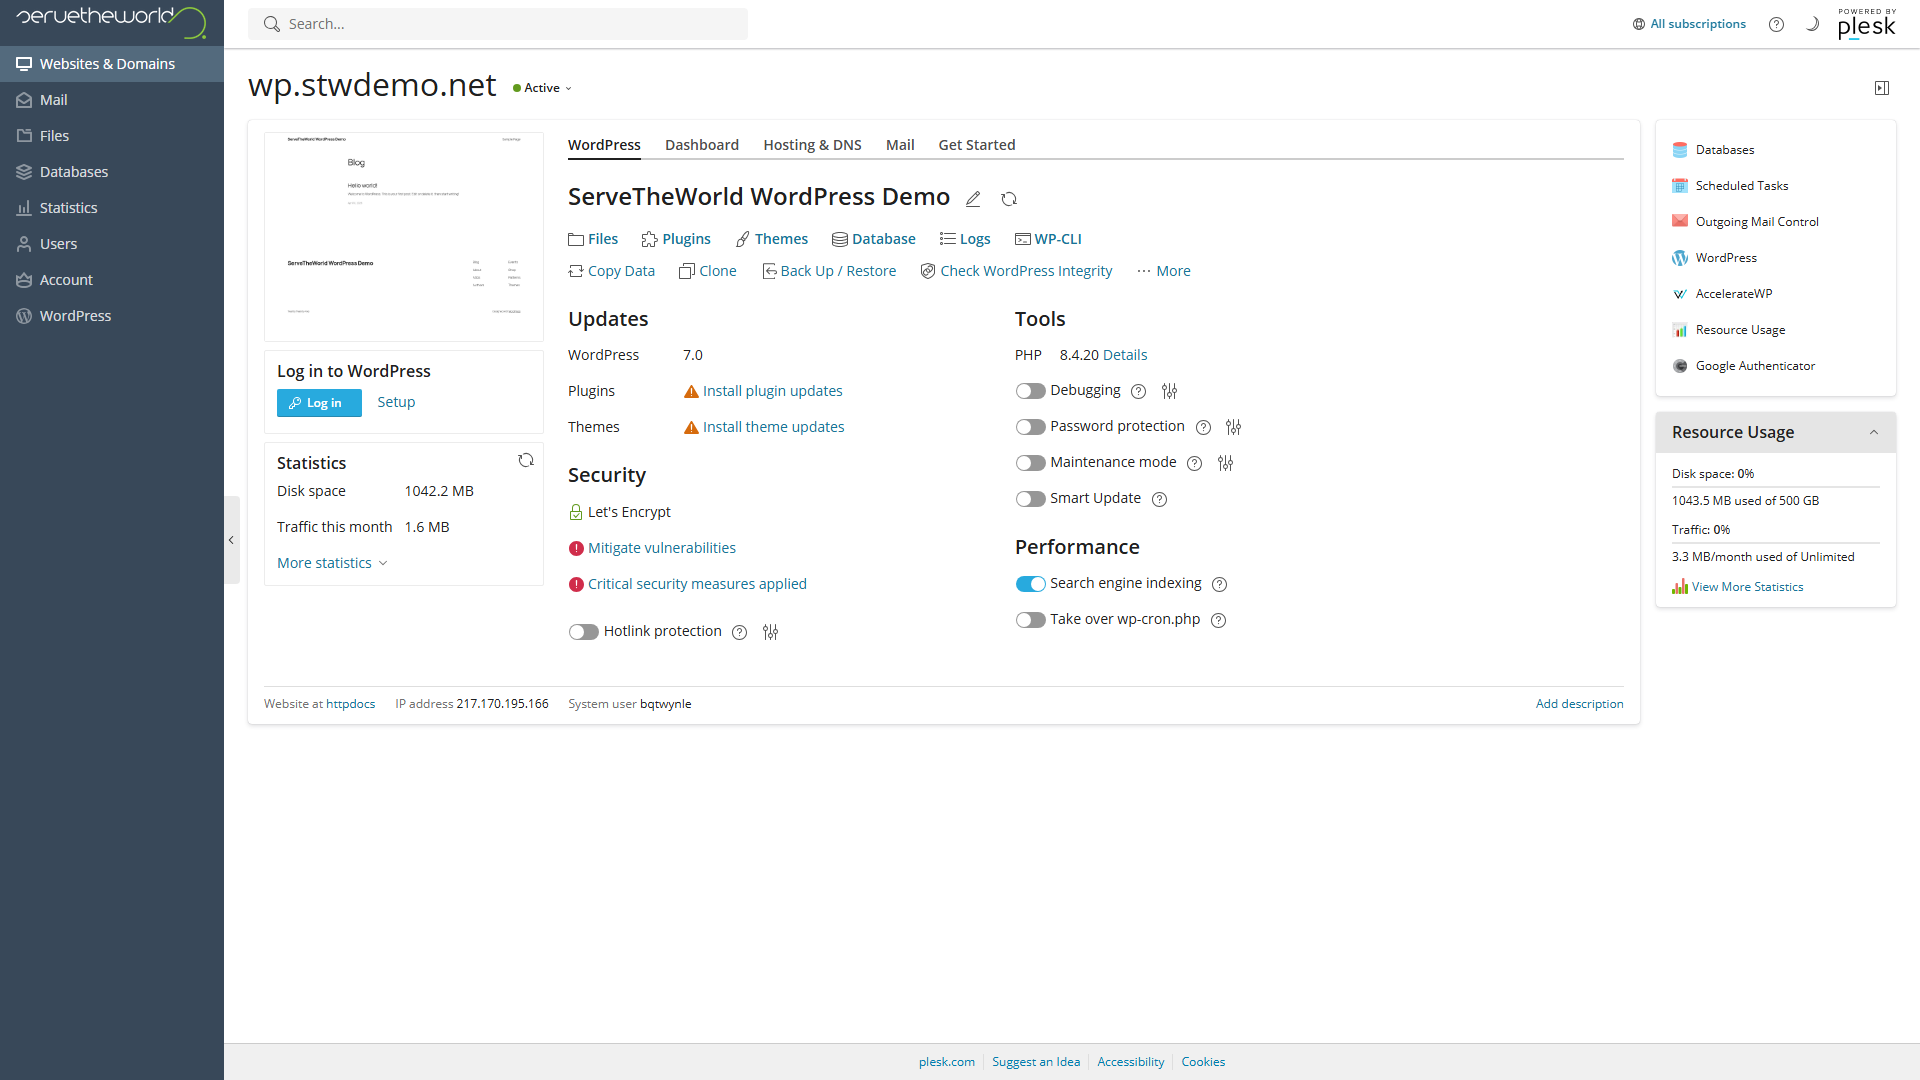
Once you’re in Plesk, open Websites & Domains and find your domain. The domain overview shows your current PHP version in the Tools section next to PHP.
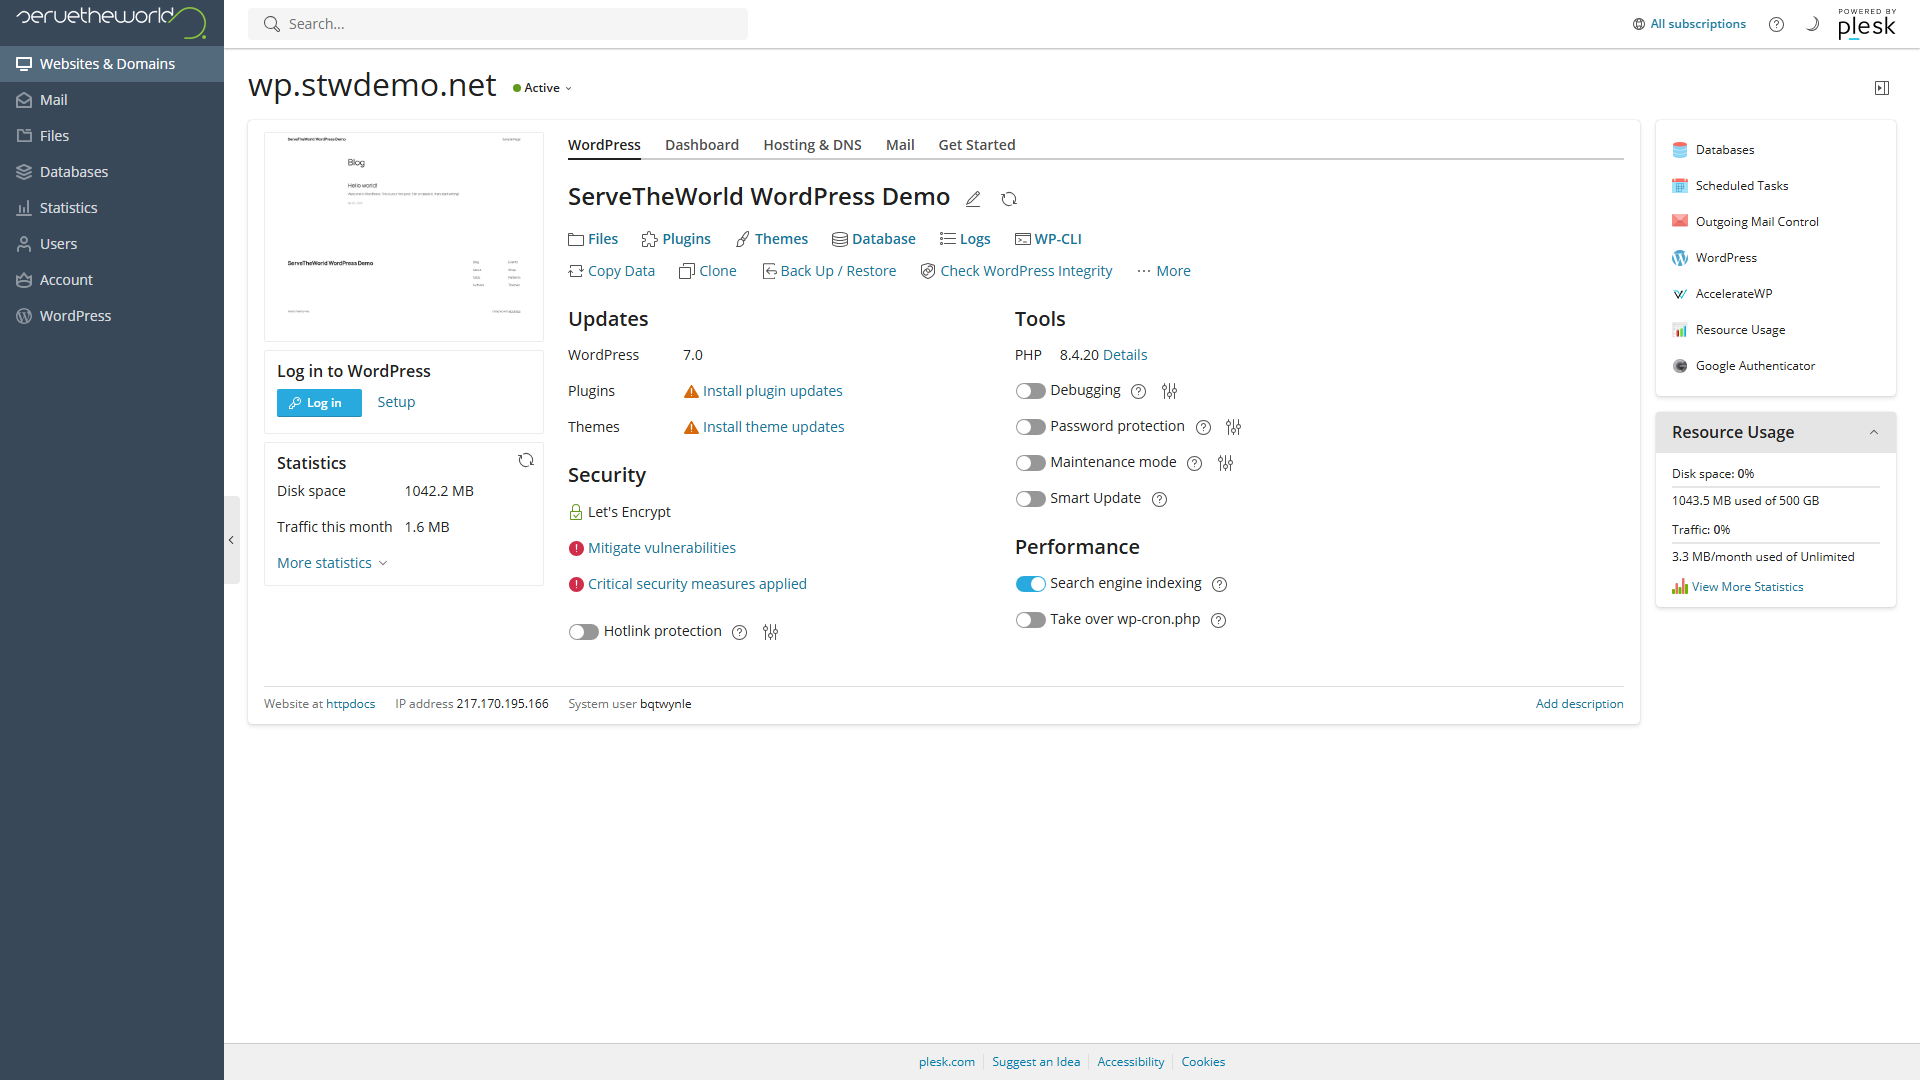
You can also click Details next to the PHP version for more information about supported versions on this server.
Step 3 — Open PHP settings
Click on Dashboard and then PHP to get to the PHP Settings page. This shows the current version in a dropdown menu, the PHP handler type, and the various configuration values below.
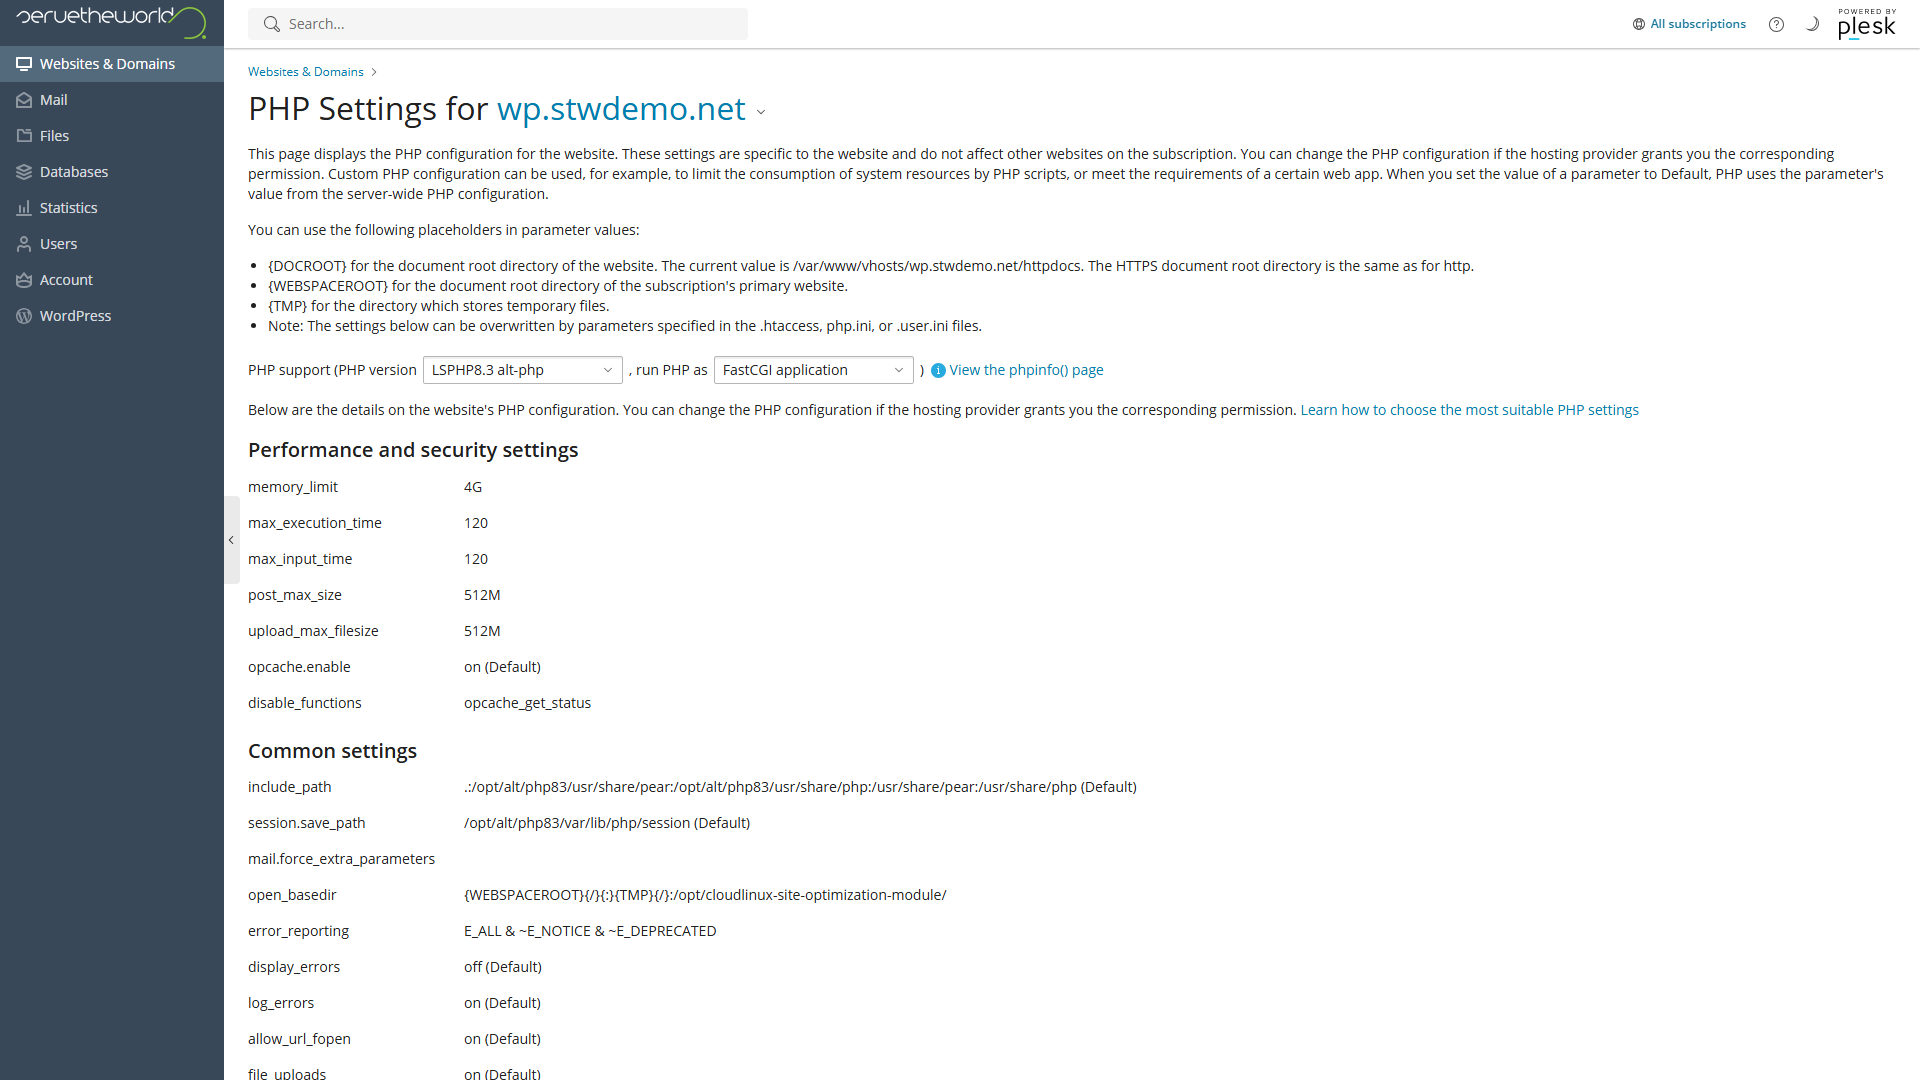
The two controls that matter here are PHP support (PHP version) and run PHP as. Leave the handler set to whatever it already is (in this case, FastCGI application).
If your host allows you to change the performance, security, and common settings below, they should also stay at their current values during this process. You’re updating PHP, not reconfiguring the whole PHP environment.
Step 4 — Select the new version
Open the PHP version dropdown. You’ll see every PHP branch your hosting server supports. The available versions depend on what your hosting provider has installed, so you may not see the absolute newest PHP release if it hasn’t been deployed to your server yet.
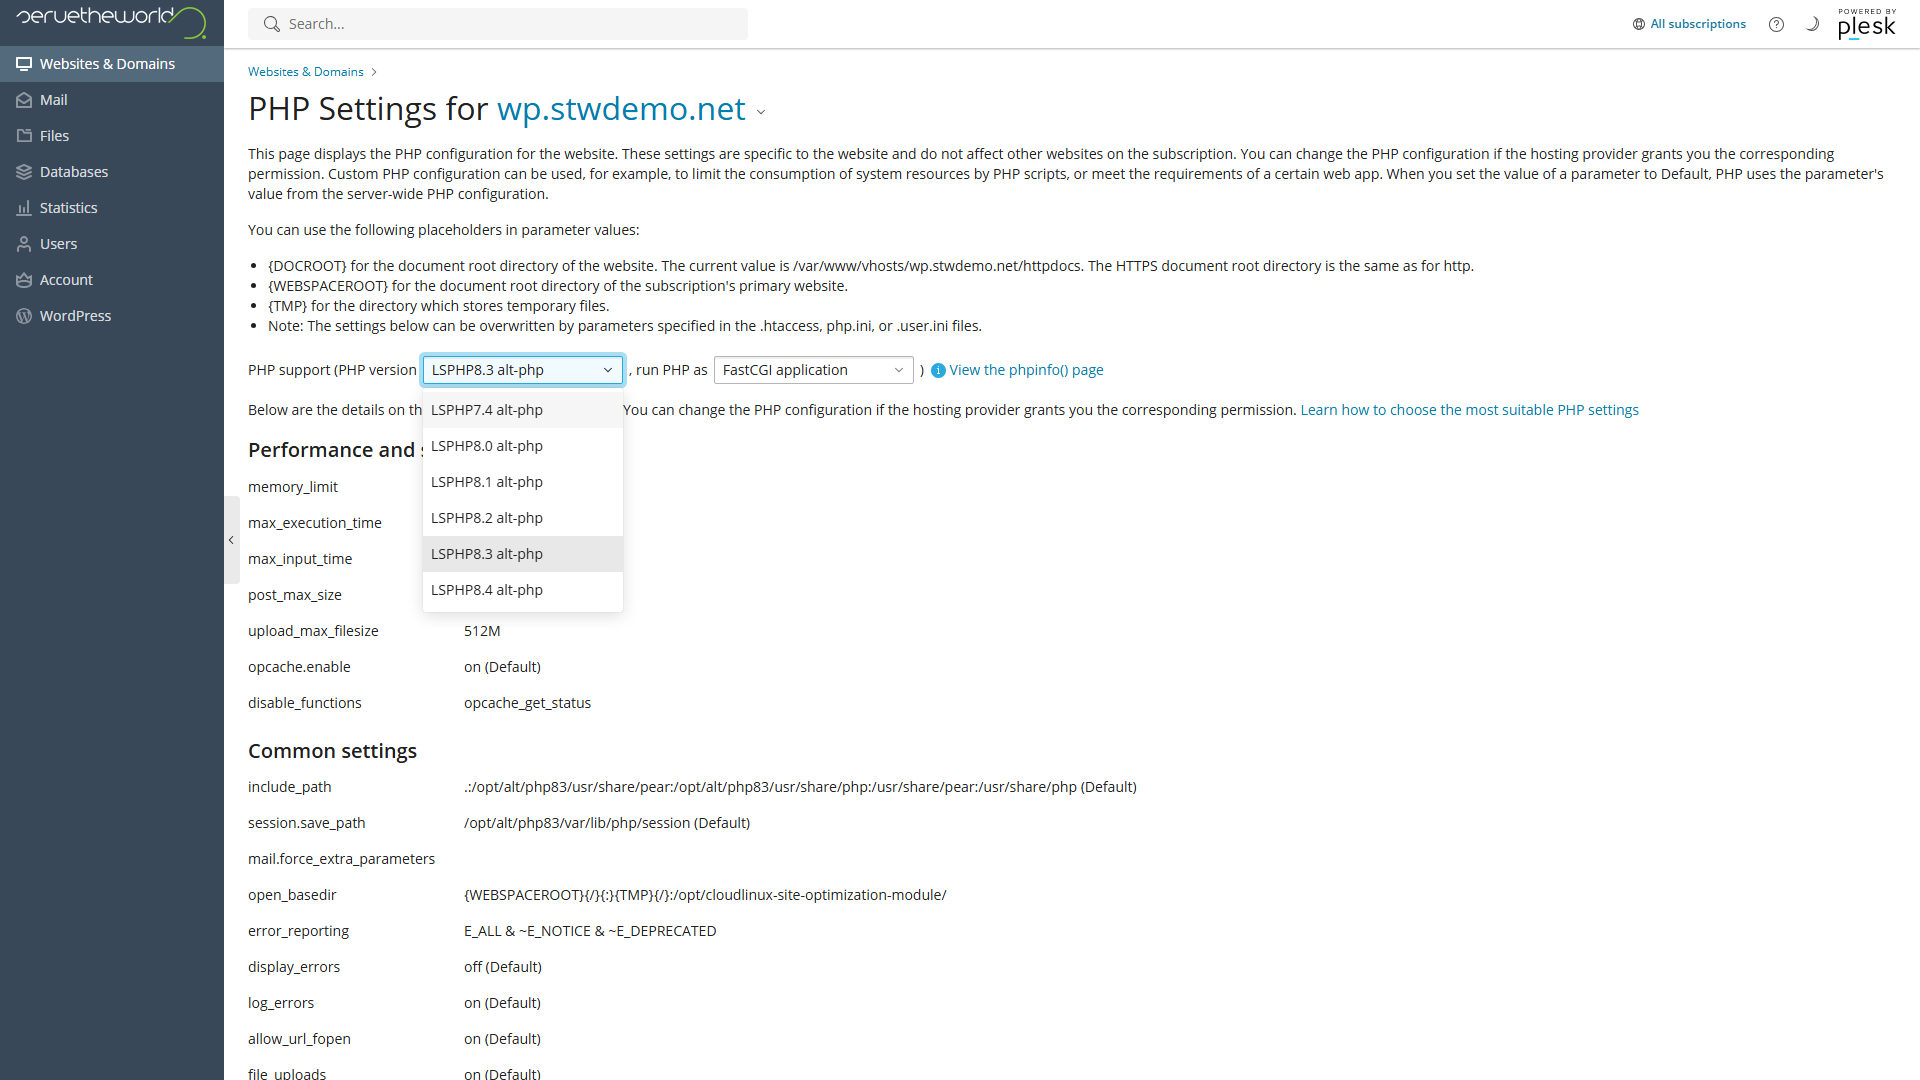
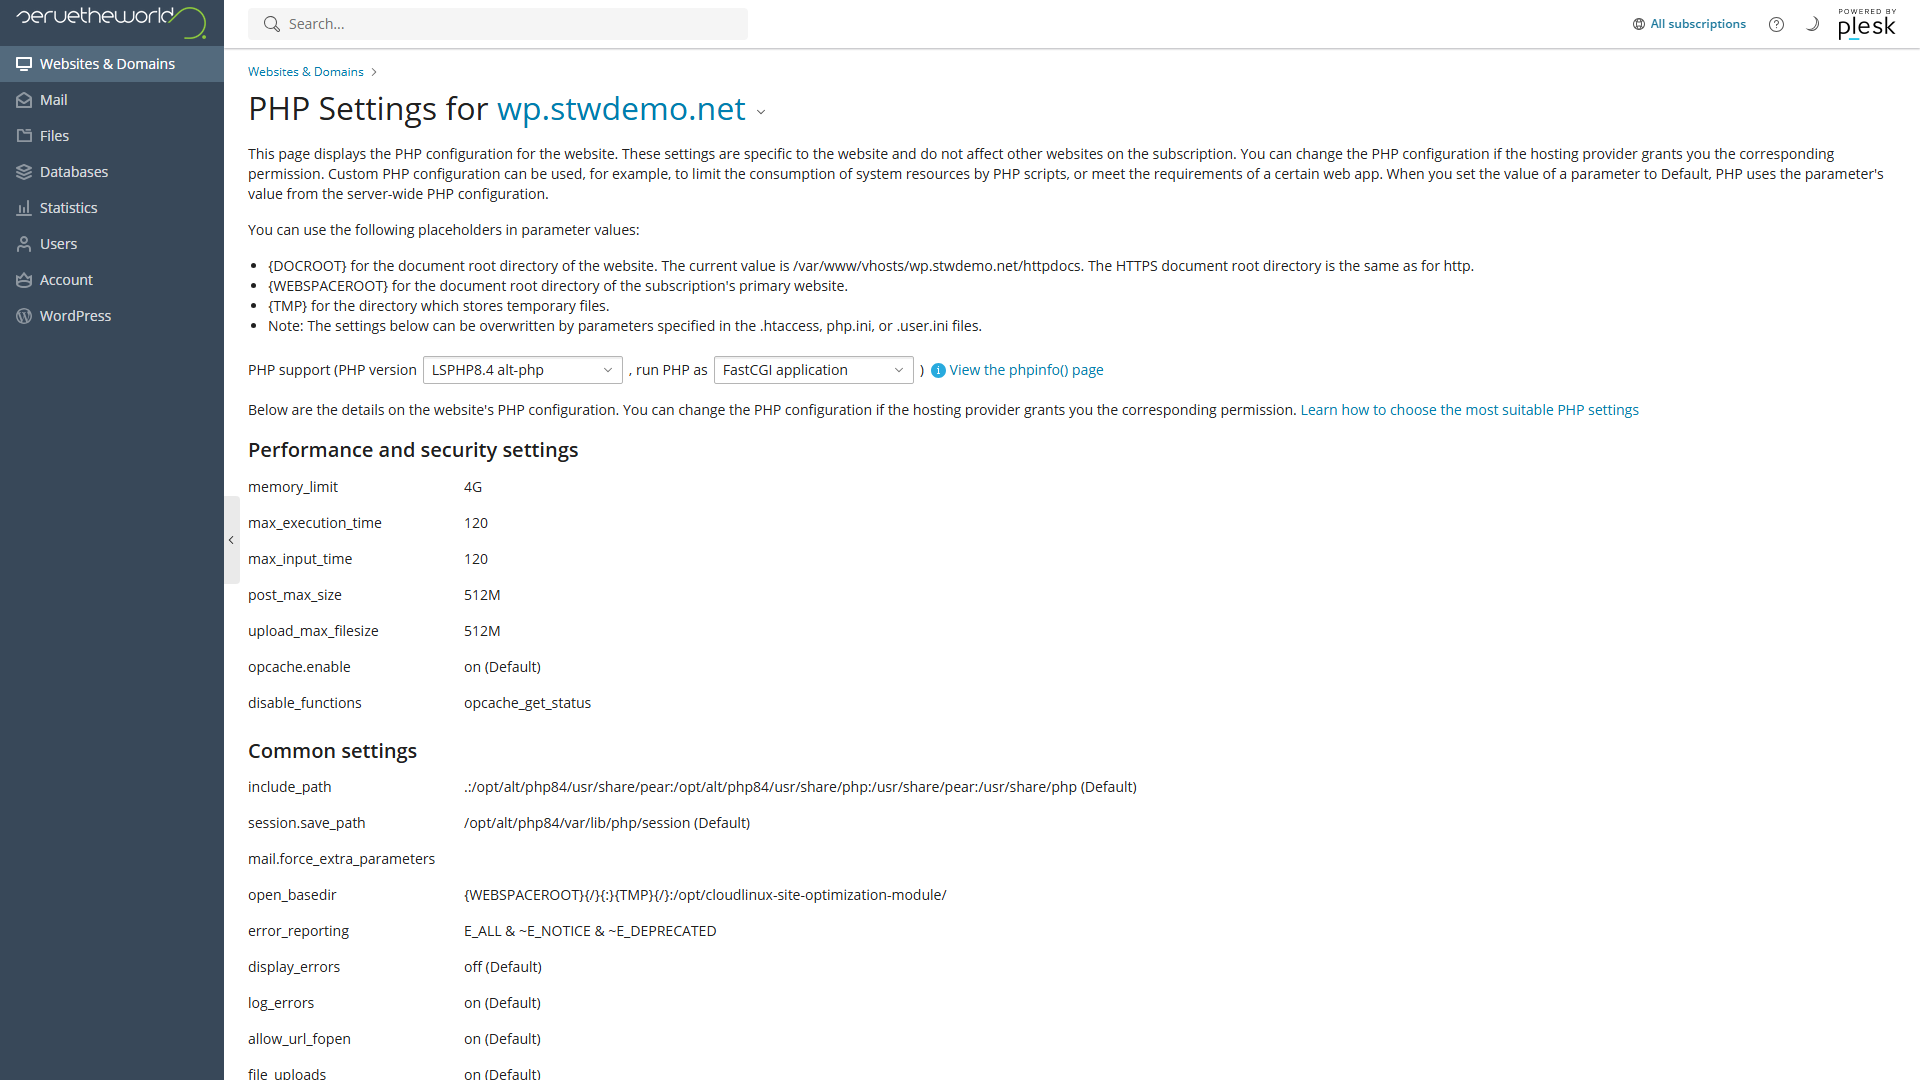
Select the version you want to update to. In this walkthrough, we’re moving from LSPHP8.3 alt-php to LSPHP8.4 alt-php.
If the version you’re looking for isn’t in the list, that means it hasn’t been made available on your server yet and you should contact support to ask about availability. Hosting customers can’t install additional PHP branches from this screen.
Step 5 — Apply and verify in Plesk
Click Apply at the bottom of the PHP Settings page. Plesk saves the change immediately. The page stays open so you can confirm the new version is reflected in the dropdown.
Go back to Websites & Domains and check the domain overview. The PHP version under Tools should now show the updated version.
Verifying the Update in WordPress
Plesk says the change has happened on the hosting side, but you should also confirm that WordPress sees the same version.
- Log in to your WordPress admin (you can use the Log in button from WP Toolkit in Plesk, or go to your site’s
/wp-admindirectly). - Go to Tools → Site Health.
- Select the Info tab and expand Server.
- Check the PHP version row.
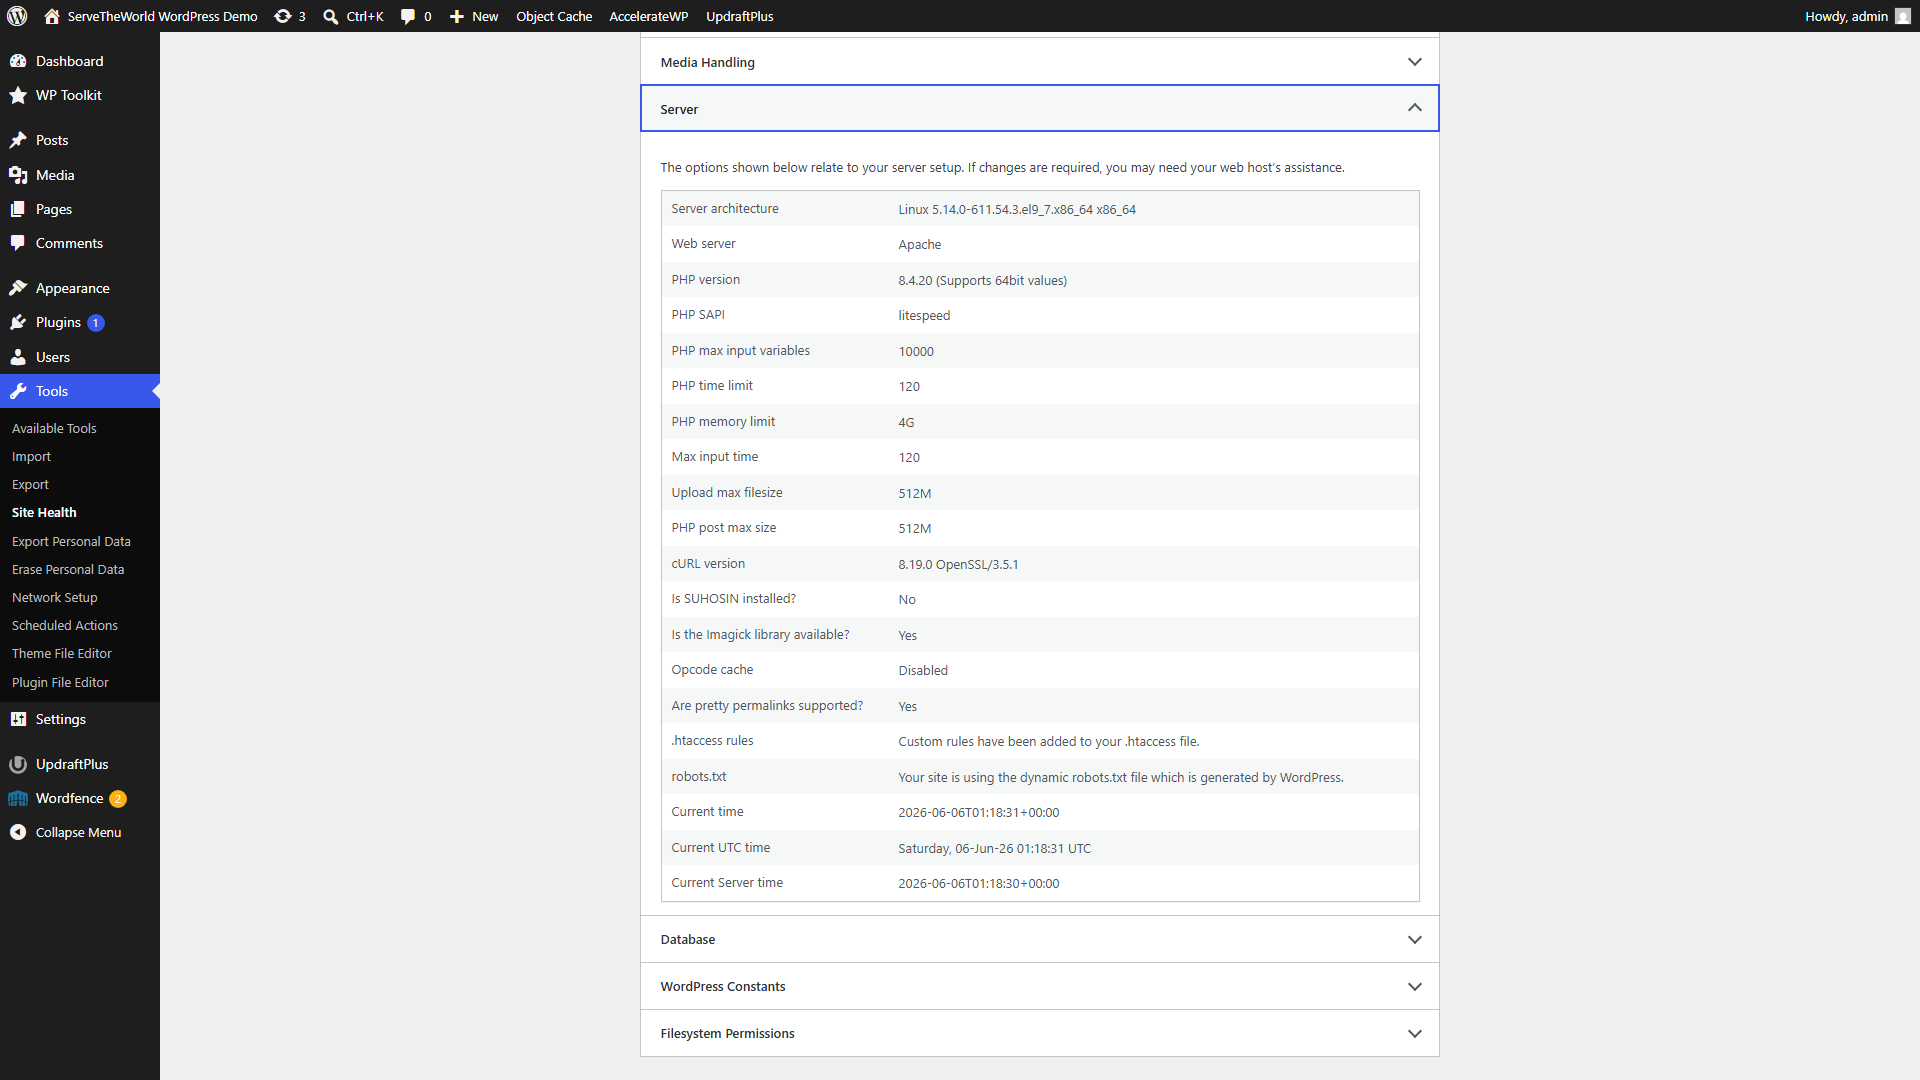
The PHP version should now match what Plesk reported. If Site Health was previously flagging your PHP version as a critical issue, that warning should be gone from the Status tab.
Testing Your Site After the Change
Since the version number checks out in both Plesk and WordPress, the last step is making sure your site still works properly for visitors.
Open your home page in a browser. Load a few key pages, especially any that rely on plugin-heavy functionality. If your site has contact forms, submit a test entry. If you run WooCommerce, load a product page and check the cart. If you use Elementor, open one of your Elementor-built pages and confirm it renders correctly.
If everything looks normal, you’re done. The update is complete.
Rolling Back If Something Breaks
If your site shows errors or a blank page after changing PHP, the fix is usually fast. Go back to the same Plesk settings page and select your previous PHP version from the dropdown.
- In Plesk, open Websites & Domains and select your domain.
- Open the PHP settings.
- Change the PHP version dropdown back to your previous version.
- Click Apply.
- Test the site again.
Switching back to the old PHP version takes effect immediately. In most cases, the site comes back exactly as it was before you made the change, because all you’ve changed is the PHP runtime, not any files or database content.
If reverting the PHP version doesn’t fix the issue, restore from the backup you created before the update. Follow the process in Part 21 for WordPress Toolkit or UpdraftPlus restores.
Once you’ve identified which plugin or theme caused the conflict, check for an update from the developer, look for a compatibility fix in their support forum, or consider an alternative plugin that supports the PHP version you want to run.
Conclusion
A PHP update keeps your site on a branch the PHP project is actively patching, and it usually makes the site faster in the process. The actual change is as simple as choosing the new version from a dropdown menu and a confirmation click, but the preparation (a backup, current software, and a compatibility check) is what makes it safe.
If you’ve been following along through the series, your site is now backed up, updated, and running on a supported PHP branch. Next up, we’ll look at what to do when something goes wrong.
Next steps: