
Introduction
If you followed along with Part 4, you’ve picked a hosting plan and you’re ready to get WordPress running. This is the fun part where your hosting account turns into an actual website.
There are a few ways to install WordPress:
- WordPress hosting plans include the WP Toolkit in Plesk, a one-page installer built specifically for WordPress.
- Shared hosting plans include Softaculous, a script library that can install WordPress and hundreds of other web applications.
- Manual installation is also an option on any plan. This means creating the database yourself, uploading the files, writing the configuration, and stepping through the installer by hand.
If you just want WordPress up and running fast, using WP Toolkit or Softaculous will get you there in a few minutes. If you want to understand what those tools actually do behind the scenes, the manual section walks through every piece.
This tutorial covers all three methods.
- Method 1 — Installing WordPress with WP Toolkit
- Method 2 — Installing WordPress with Softaculous
- Method 3 — Installing WordPress manually
Method 1 — Installing through WP Toolkit
WP Toolkit is built into the Plesk control panel on STW’s WordPress hosting plans. It’s a dedicated WordPress management tool that handles the full installation, and later gives you quick access to updates, backups, staging, security hardening, and other site management features.
If you’re on shared hosting, your Plesk panel has Softaculous instead of WP Toolkit. Skip ahead to Method 2.
Getting to WP Toolkit
- Log in to my.servetheworld.net.
- Go to Products → My Products.
- Find your hosting plan and click Manage.
- In the One Click Login, click WP Toolkit.
This takes you directly into the WP Toolkit inside your Plesk control panel.
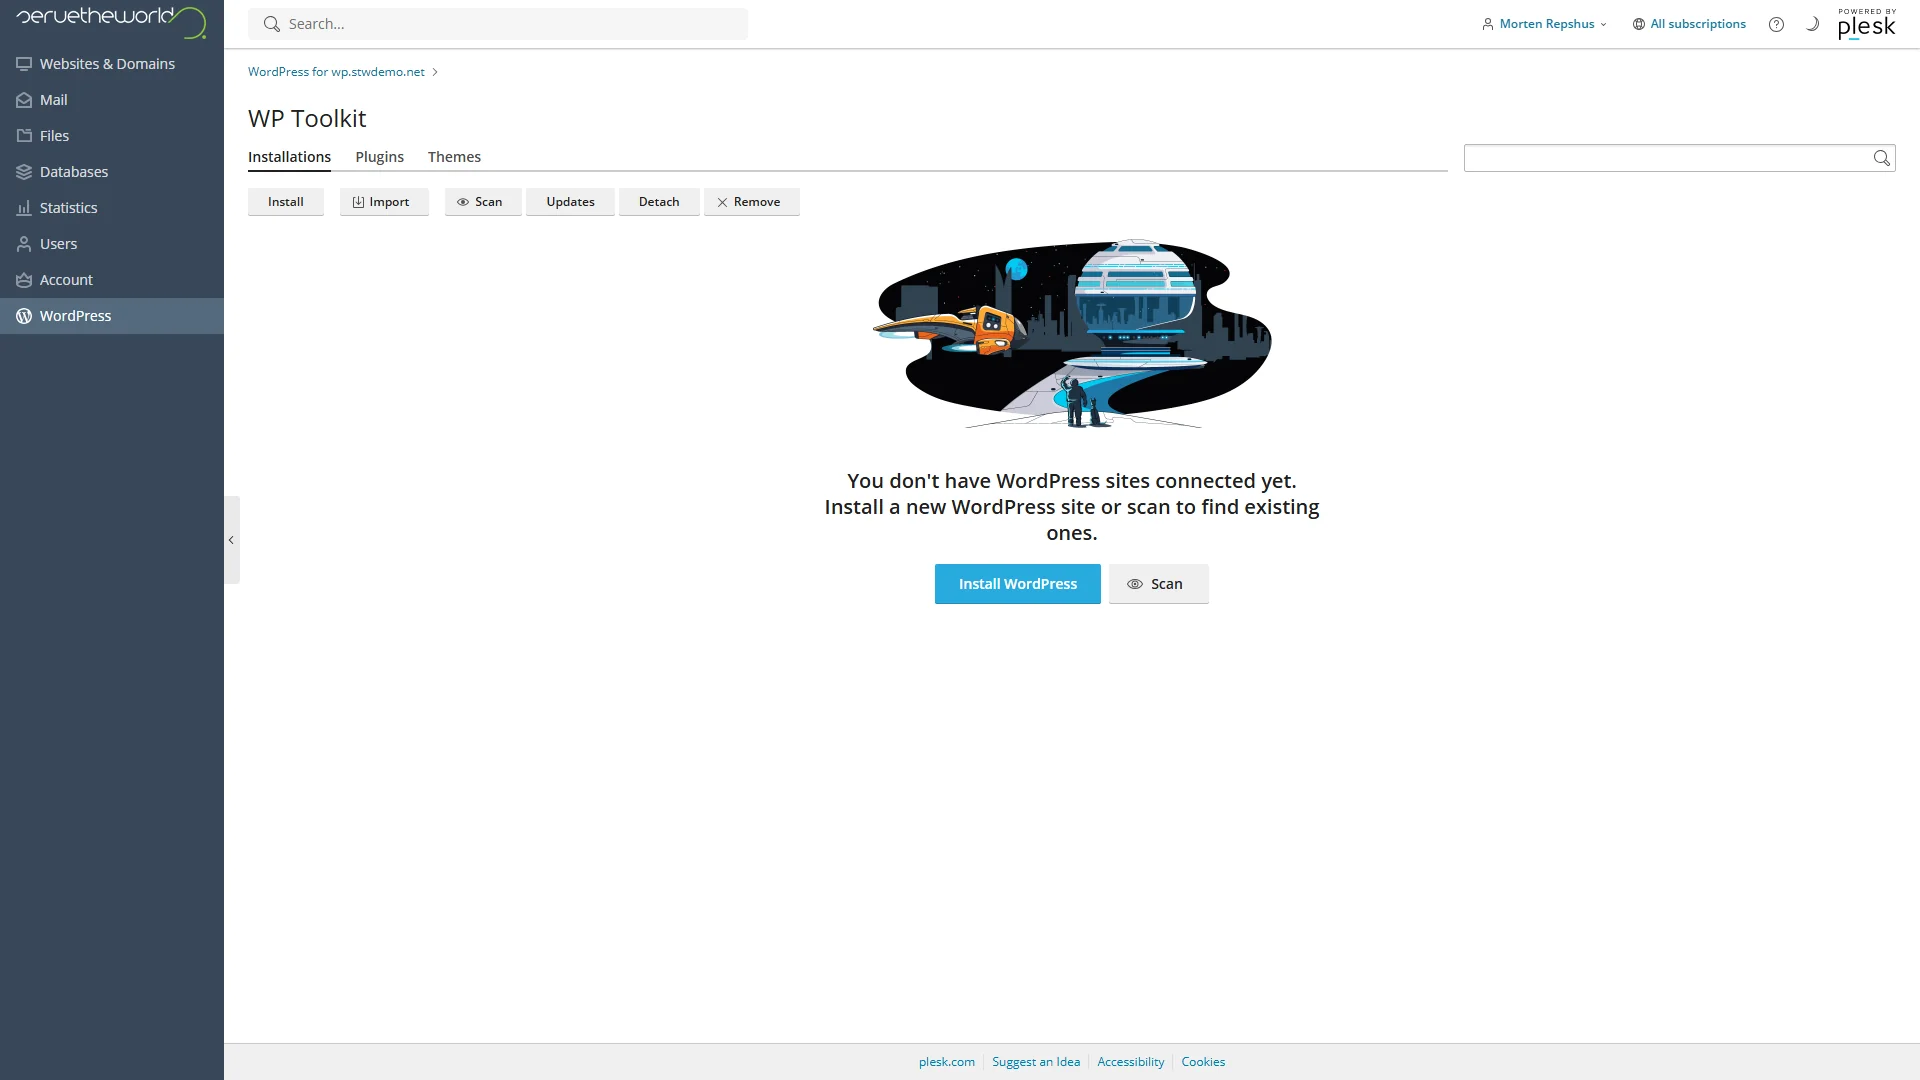
You’ll see the WP Toolkit dashboard. If this is a fresh hosting account with no WordPress installation yet, the page shows an empty state with a blue Install WordPress button.
Running the install
Click Install WordPress. A panel slides in from the left with the installation options.
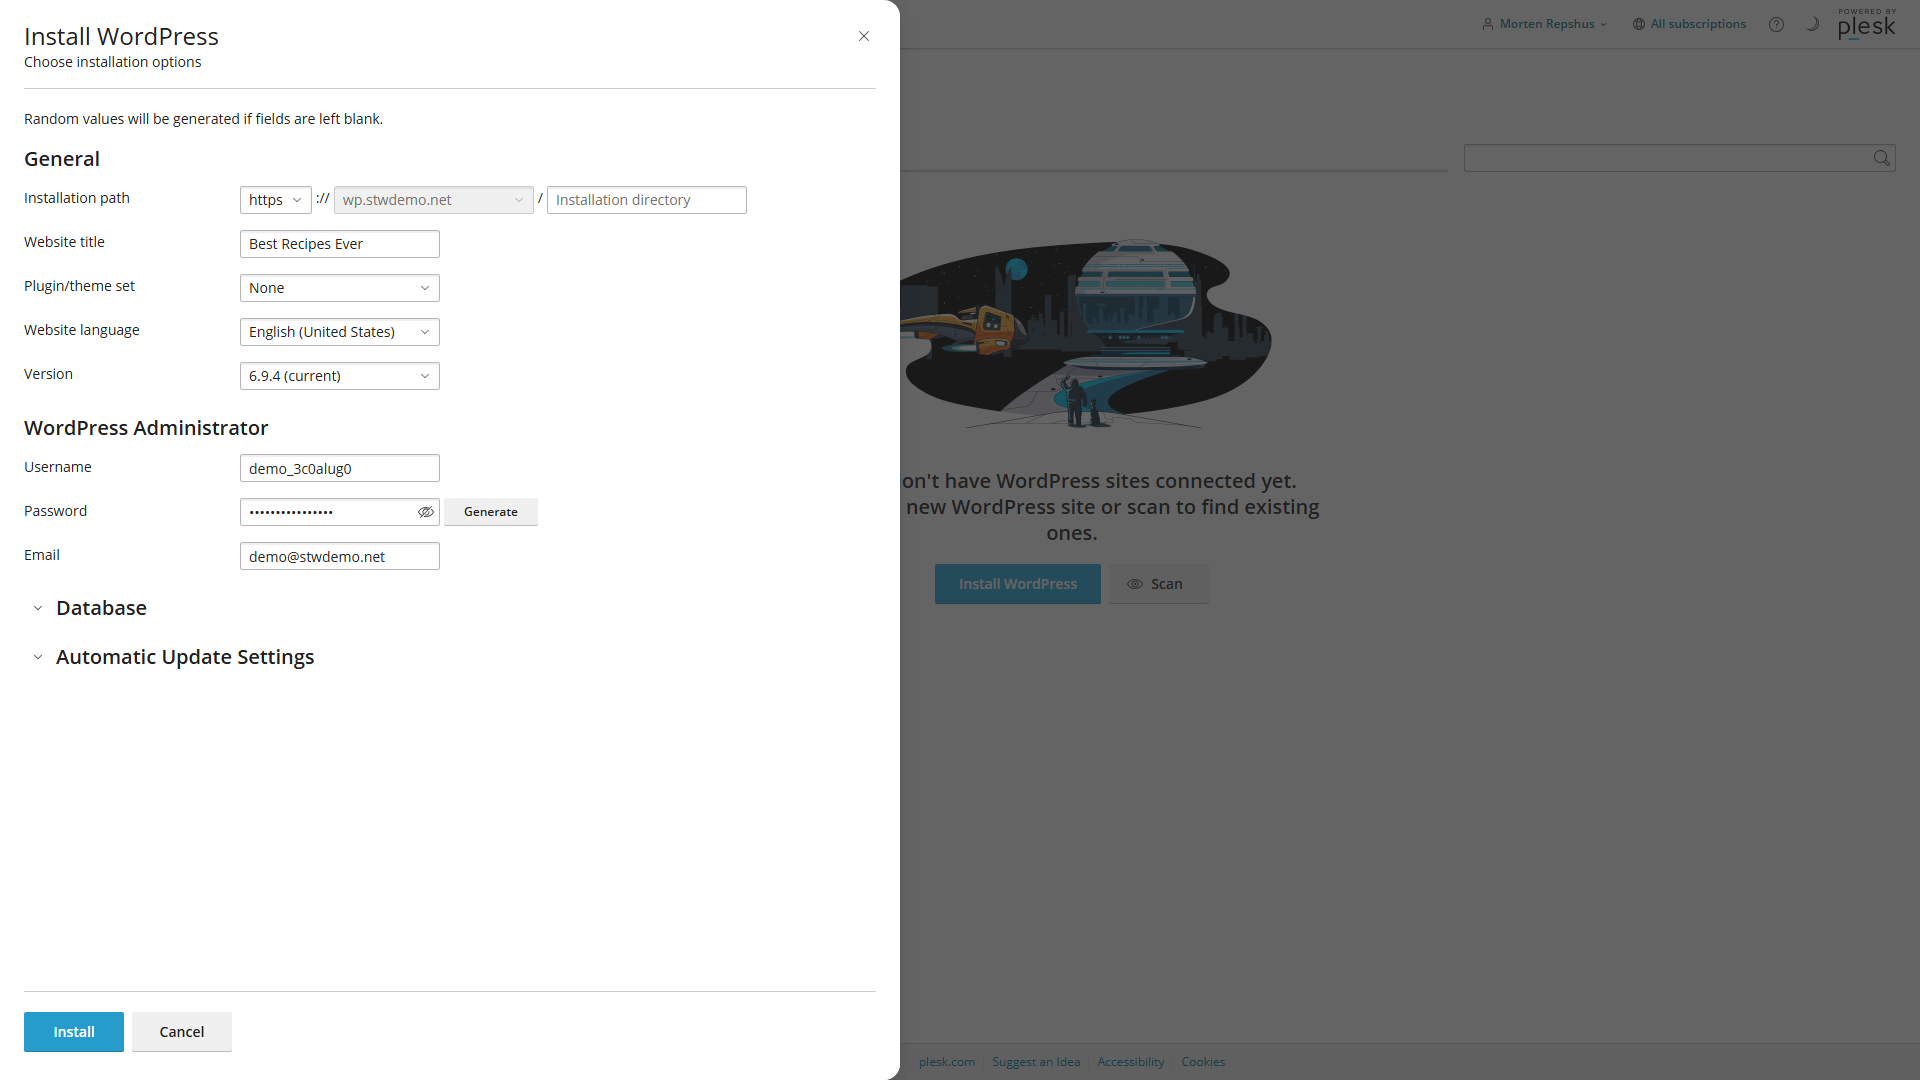
WP Toolkit pre-fills most of the fields with sensible defaults. Here’s what each section covers:
- General sets the installation path, site title, plugin/theme set, language, and WordPress version. For a normal site at the root of your domain, leave the installation directory blank. If you type a folder name, WordPress will be installed in a subfolder, so the site would load at
yourdomain.com/bloginstead of the root, for example. - WordPress Administrator sets the username, password, and email for the admin account. WP Toolkit auto-generates a secure password and random username. Change the username to something you’ll remember, but avoid “admin” because automated login bots try that name first on every WordPress site they can find. Use a real email address you check, because WordPress uses it for password resets and admin notices.
- Database and Automatic Update Settings are collapsed by default and can usually be left alone for a first install. WP Toolkit generates the database credentials automatically.
When you’re happy with the settings, click Install at the bottom of the panel.
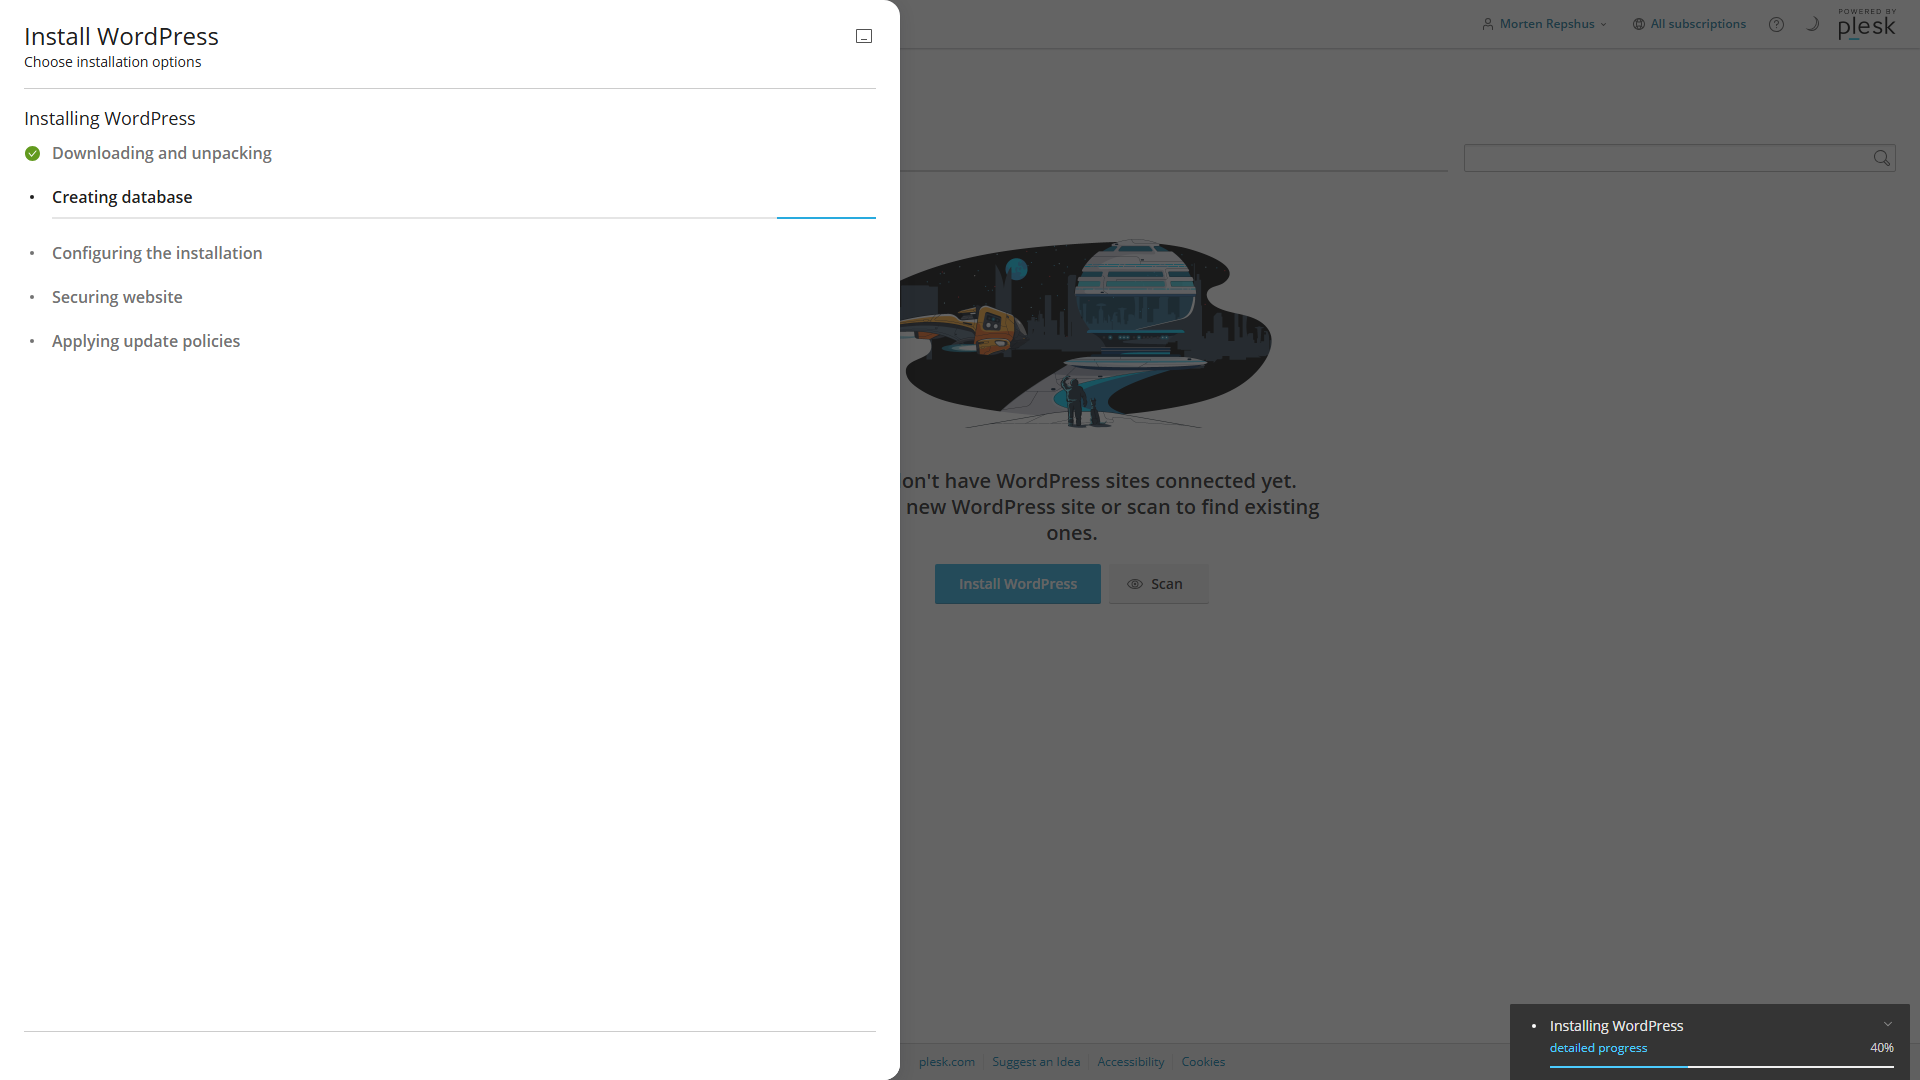
WP Toolkit walks through the installation in five steps: downloading and unpacking WordPress, creating the database, configuring the installation, securing the site, and applying update policies. A progress bar at the bottom-right tracks the overall completion, and the whole process usually takes under a minute.
After the install finishes
Once the installation is complete, WP Toolkit shows a management card for your new site.
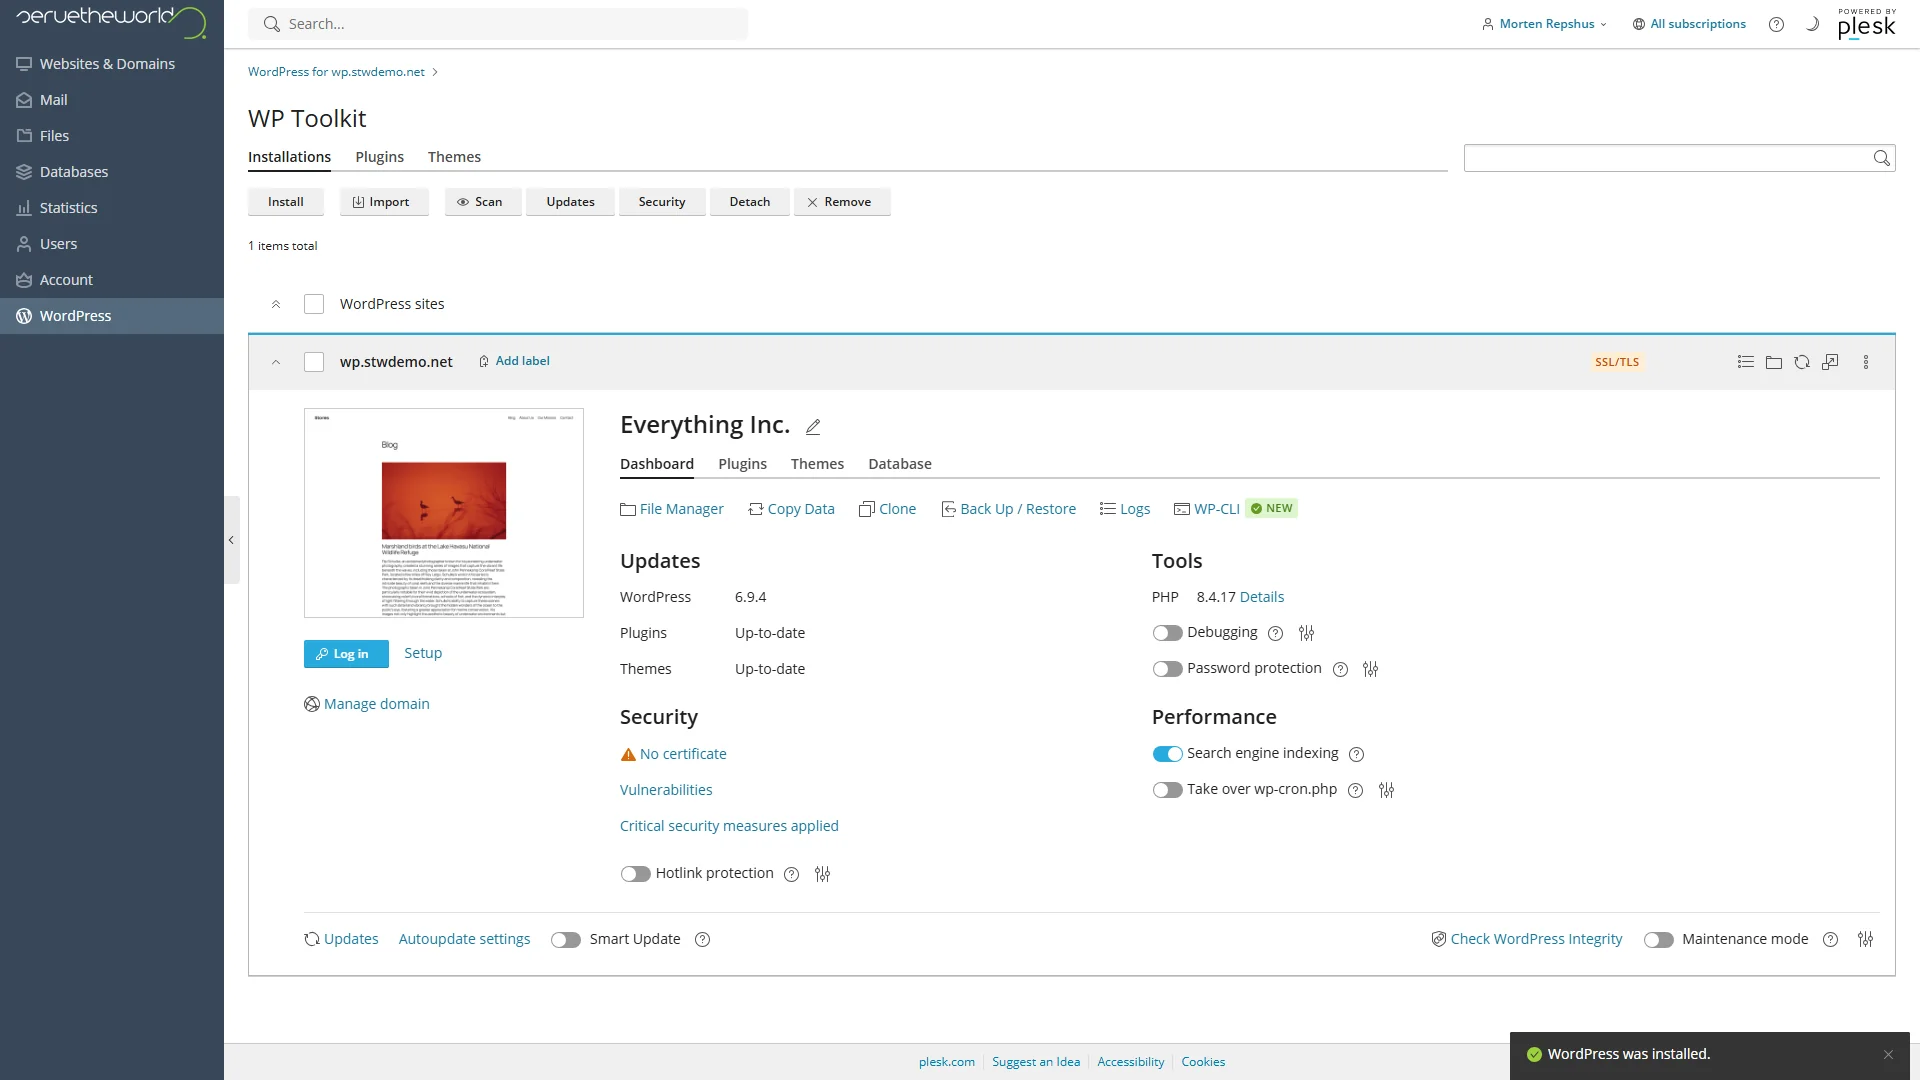
This card is your home base for managing WordPress at the hosting level. You’ll see tabs for Dashboard, Plugins, Themes, and Database, along with quick links to File Manager, Clone, Back Up / Restore, and Logs.
The right side shows the current WordPress version, plugin and theme update status, PHP version, security checks, and performance toggles.
Click Log in to go straight into the WordPress admin dashboard, or visit yourdomain.com/wp-admin and log in with the username and password from the install form.
Write down your username and password before you move on. WordPress won’t show that password again later. If you lose it, you can reset it by email, as long as the email address on the site is real and working.
That same WP Toolkit management area in Plesk also gives you quick access to features you’ll use later in the series, including plugin and theme updates (Part 22), staging copies for testing changes safely, and security hardening. For now, the install is done and your site is live.
Method 2 — Installing with Softaculous
Softaculous is a script installer that comes with STW shared hosting. It supports hundreds of web applications, and WordPress is the most popular. The workflow is slightly different from the WP Toolkit install, but the end result is the same.
Getting to Softaculous
- Log in to my.servetheworld.net.
- Go to Products → My Products.
- Find your hosting plan and click Manage.
- Click Plesk.
- In the left-hand menu, click Softaculous.
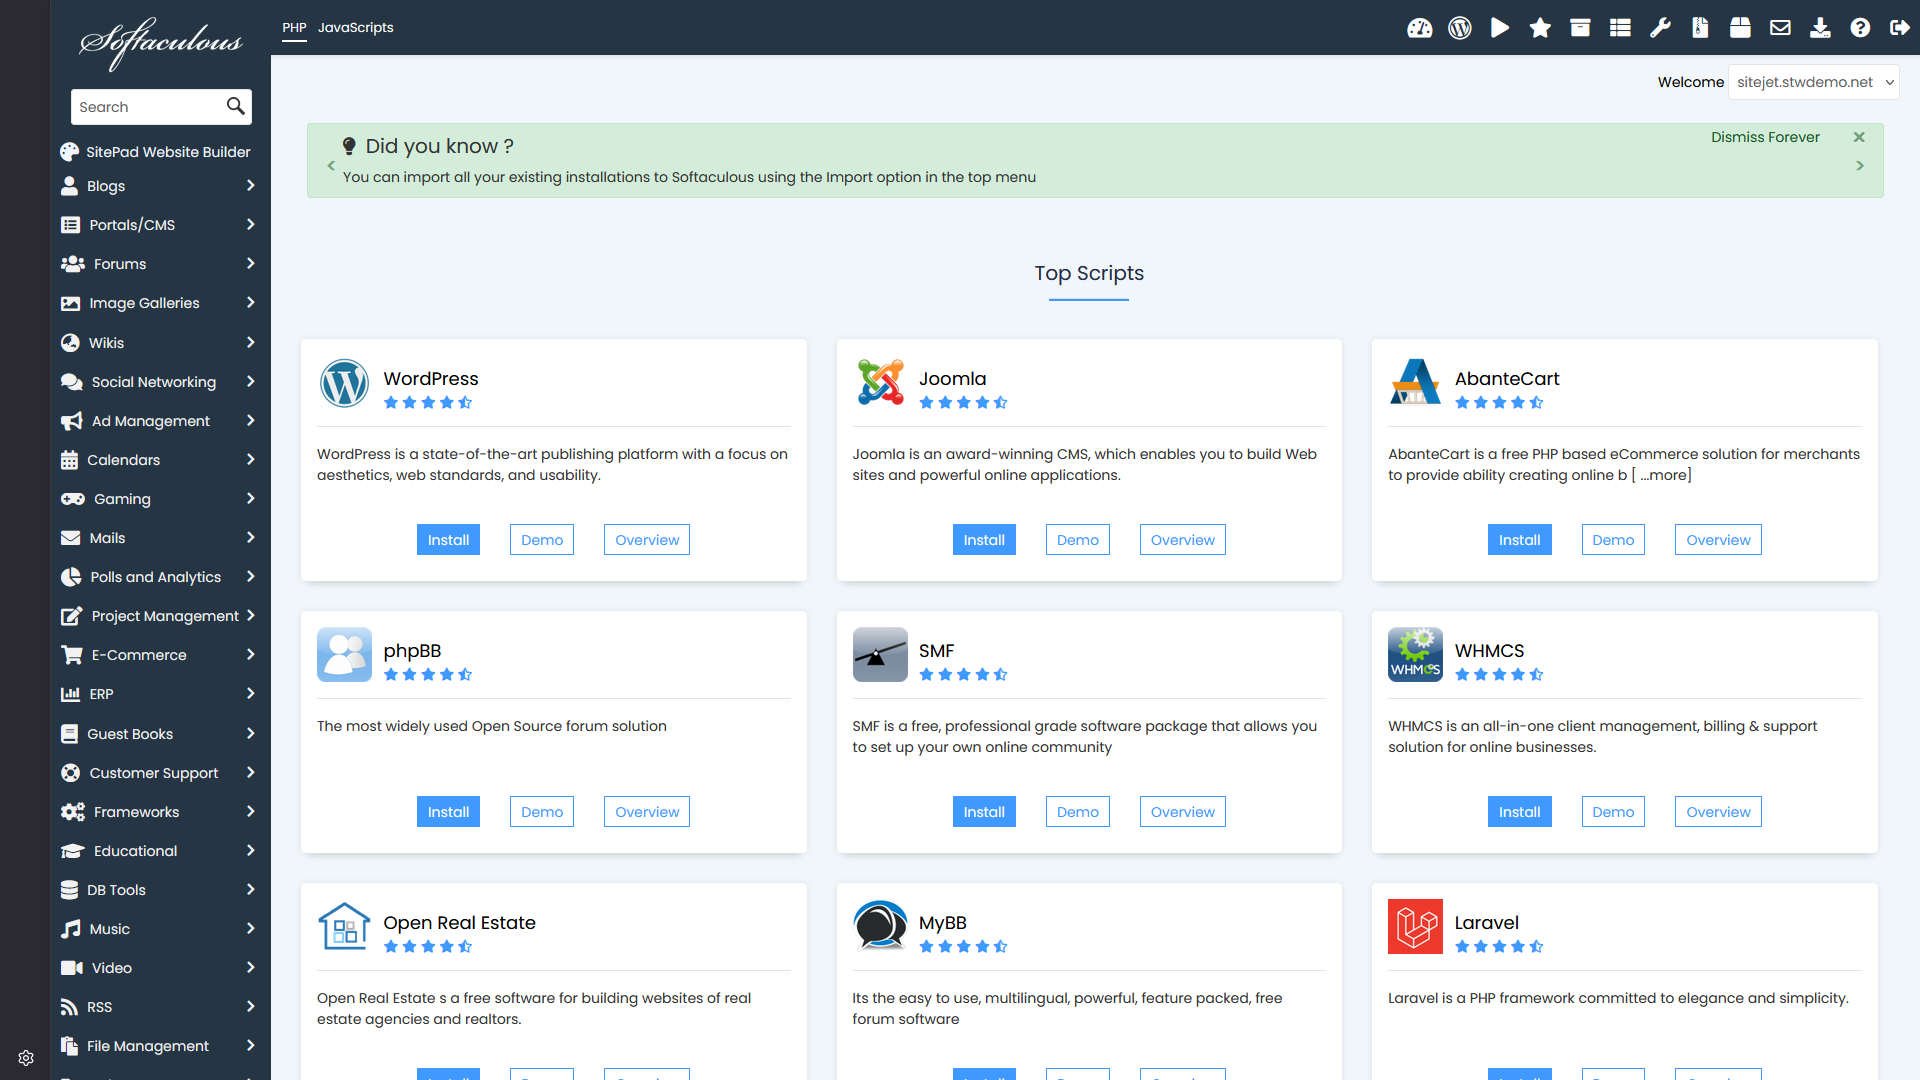
The Softaculous dashboard shows popular applications. WordPress is usually featured on the main page. If you don’t see it, use the search bar on the left.
Running the install
Click Install on the WordPress card. Softaculous opens the full WordPress install form first.
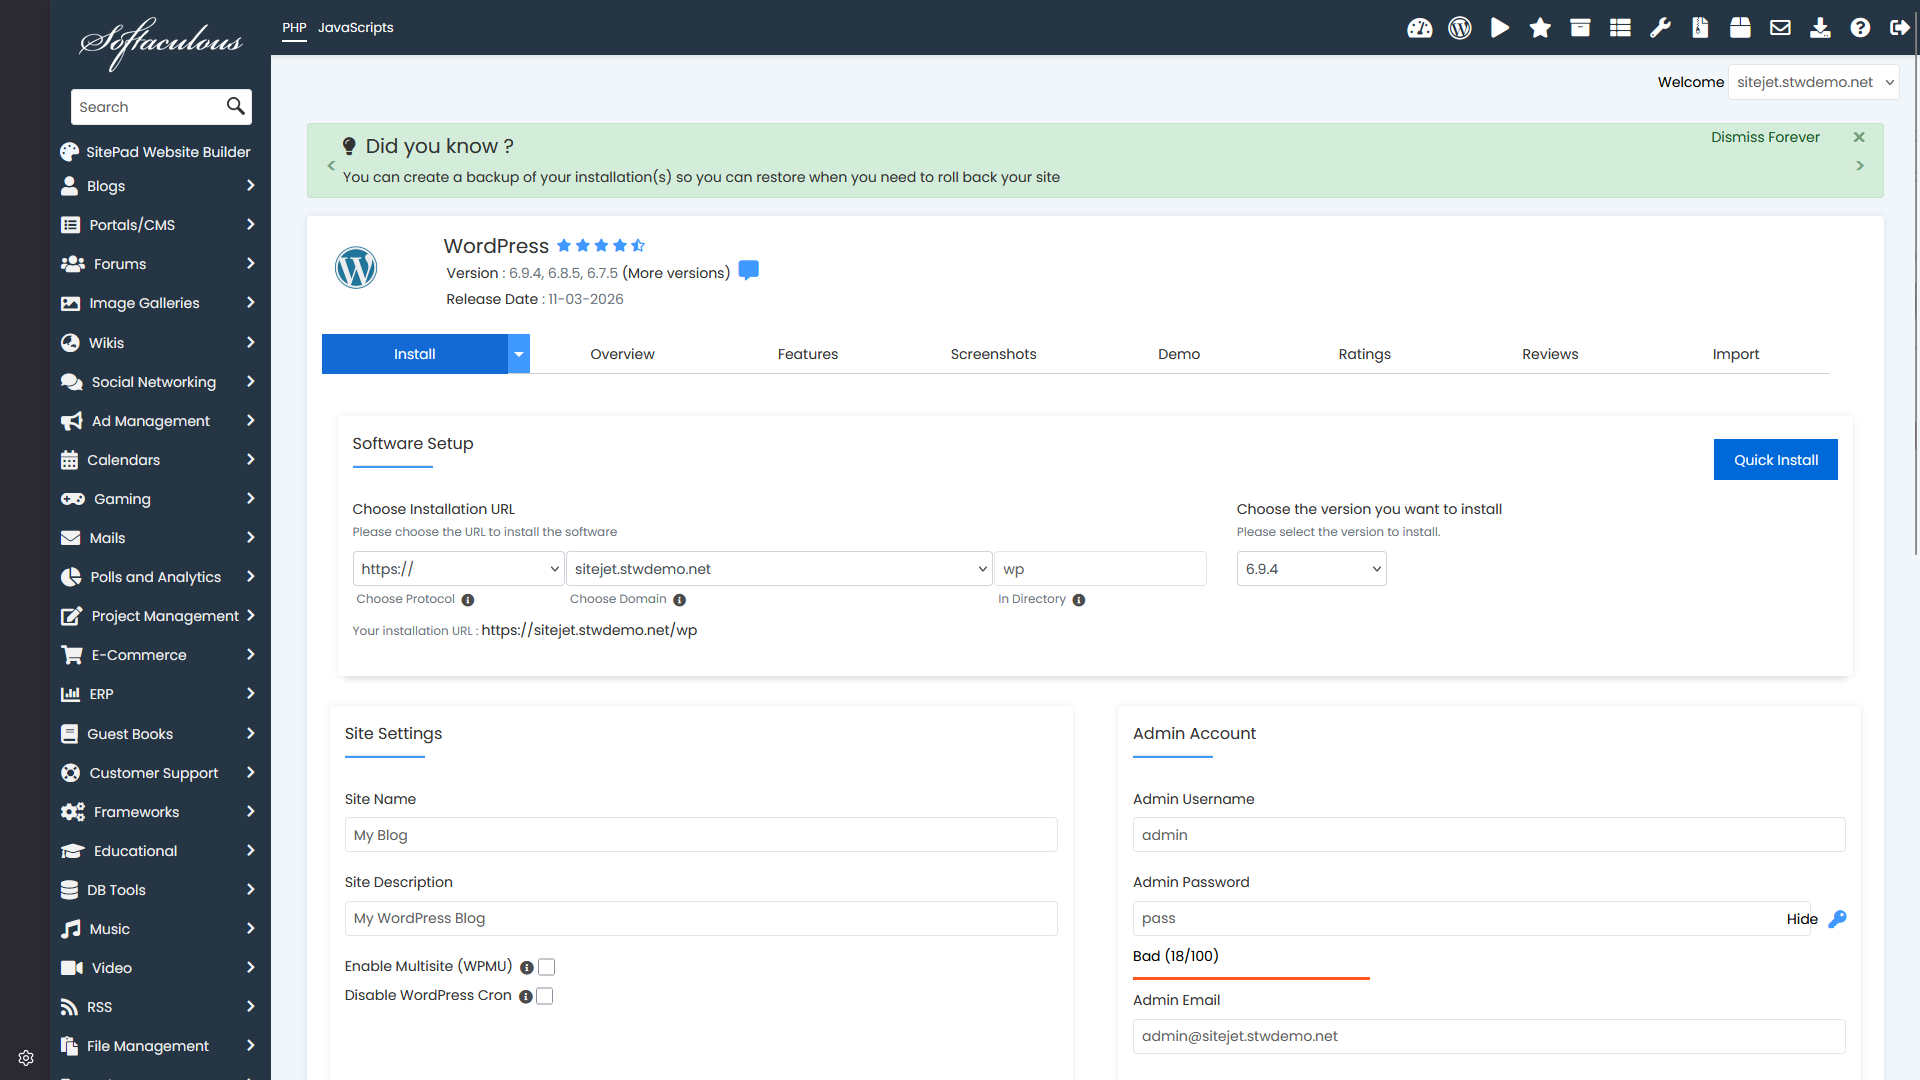
You’ll see a Quick Install button. If your goal is a normal WordPress site at the root of your domain, that is usually the better choice. It removes most of the optional fields and leaves you with the settings that actually matter for a first install.
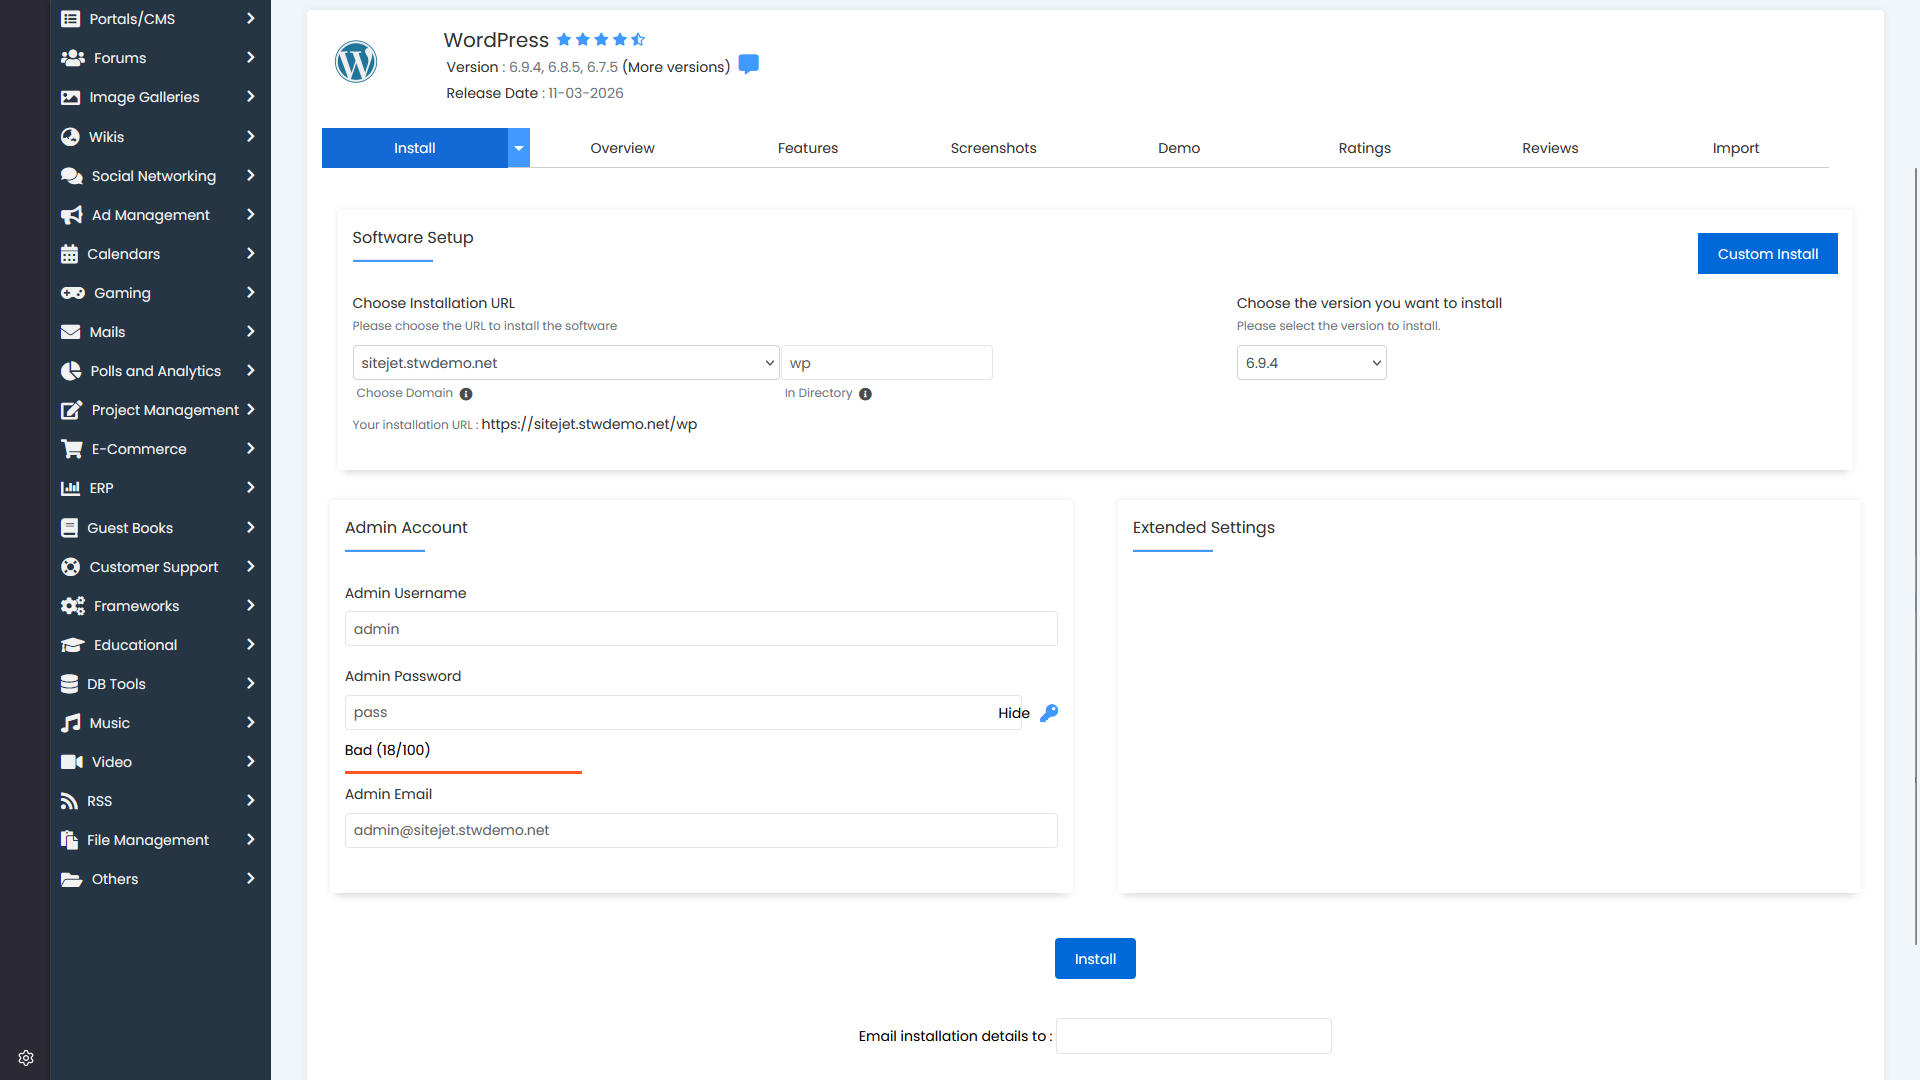
Start with the installation location. Choose your domain, then look closely at In Directory. For a normal site at yourdomain.com, leave that field blank. If it contains wp, wordpress, blog, or anything else, Softaculous will install WordPress into a subfolder such as yourdomain.com/wp. That can be useful for testing or a secondary site, but it is the wrong choice for most main websites.
Change the default admin username to something other than “admin.” Set a strong password instead of keeping the weak example password shown in the form. And use a real email address you check, because WordPress uses it for password recovery and site notices.
Click Install.
Softaculous handles the database, files, and configuration automatically. When it finishes, you’ll see a success screen with your admin URL, usually yourdomain.com/wp-admin.
After the install finishes
Write down your admin URL, username, and password from the success screen. You can now log in to WordPress and start building. Softaculous also has a management dashboard where you can see all your installed applications, but for day-to-day WordPress work, you’ll mostly use the WordPress admin panel itself.
Method 3 — Manual Installation
Manual installation means doing each step yourself. You create the database, upload the files, write the configuration, and run the WordPress installer. This takes a little longer than the automated tools, but it helps you to orientate yourself on where everything is. When something breaks later and you need to check whether the database is connected, or where the files actually are, or what’s in wp-config.php, this is the knowledge that gets you through it.
This section is also useful if you’re installing WordPress on hosting from another provider that doesn’t include the WP Toolkit in Plesk or Softaculous. While we’ll focus on the installation steps using ServeTheWorld as the hosting provider, the process will be similar on any other host.
What you need before you start
- An active hosting account with a domain pointed at it.
- The latest WordPress download from wordpress.org/download (a zip file).
- Access to your hosting control panel (you’ll use either File Manager in the browser or an FTP client like FileZilla).
- About 20 to 30 minutes.
Step 1 — Create the database
WordPress stores everything in a database. Posts, pages, user accounts, settings, comments, plugin data. Before WordPress can do anything, the database needs to exist. We’ll create the database and its user through Plesk.
- Log in to my.servetheworld.net.
- Go to Products → My Products.
- Find your hosting plan and click Manage.
- On the product details page, click Plesk.
- Click Databases in the menu on the left.
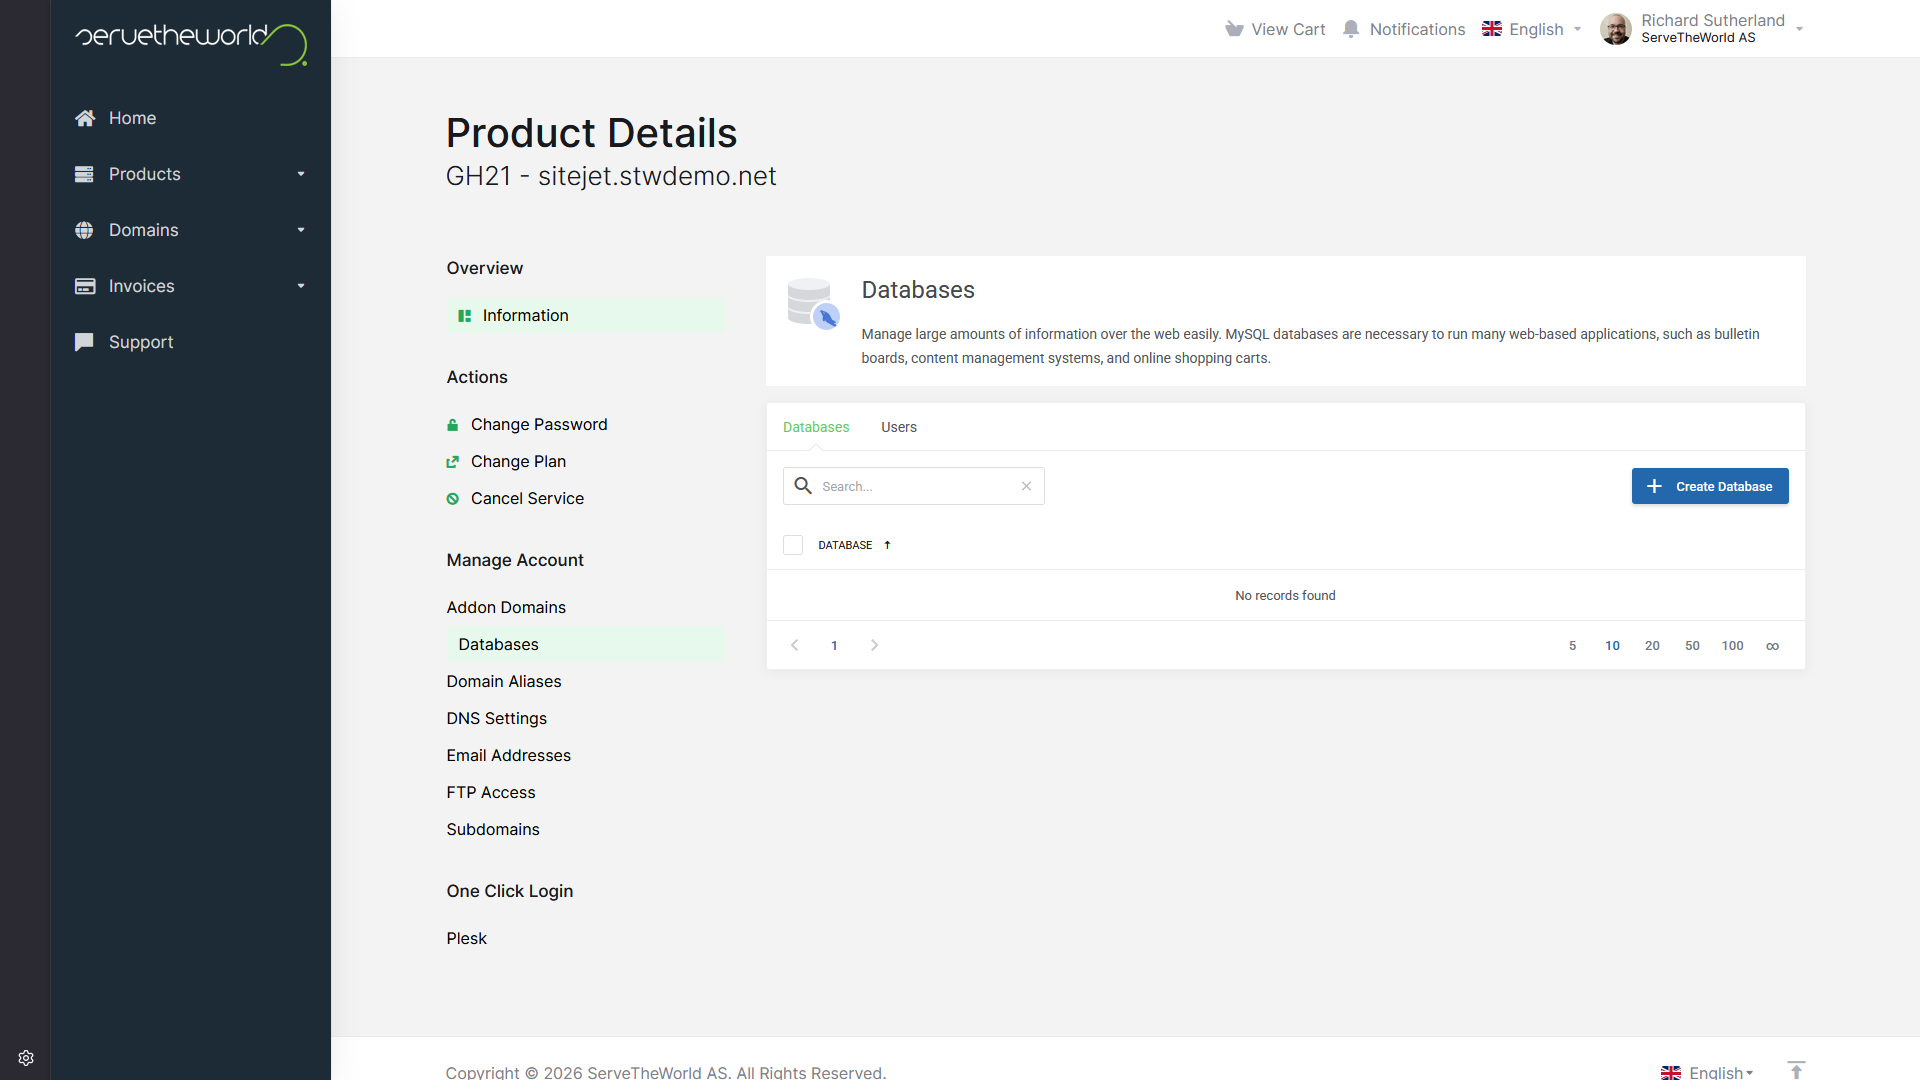
Click Add Database. Plesk opens a form where you create both the database and its user in one pass.
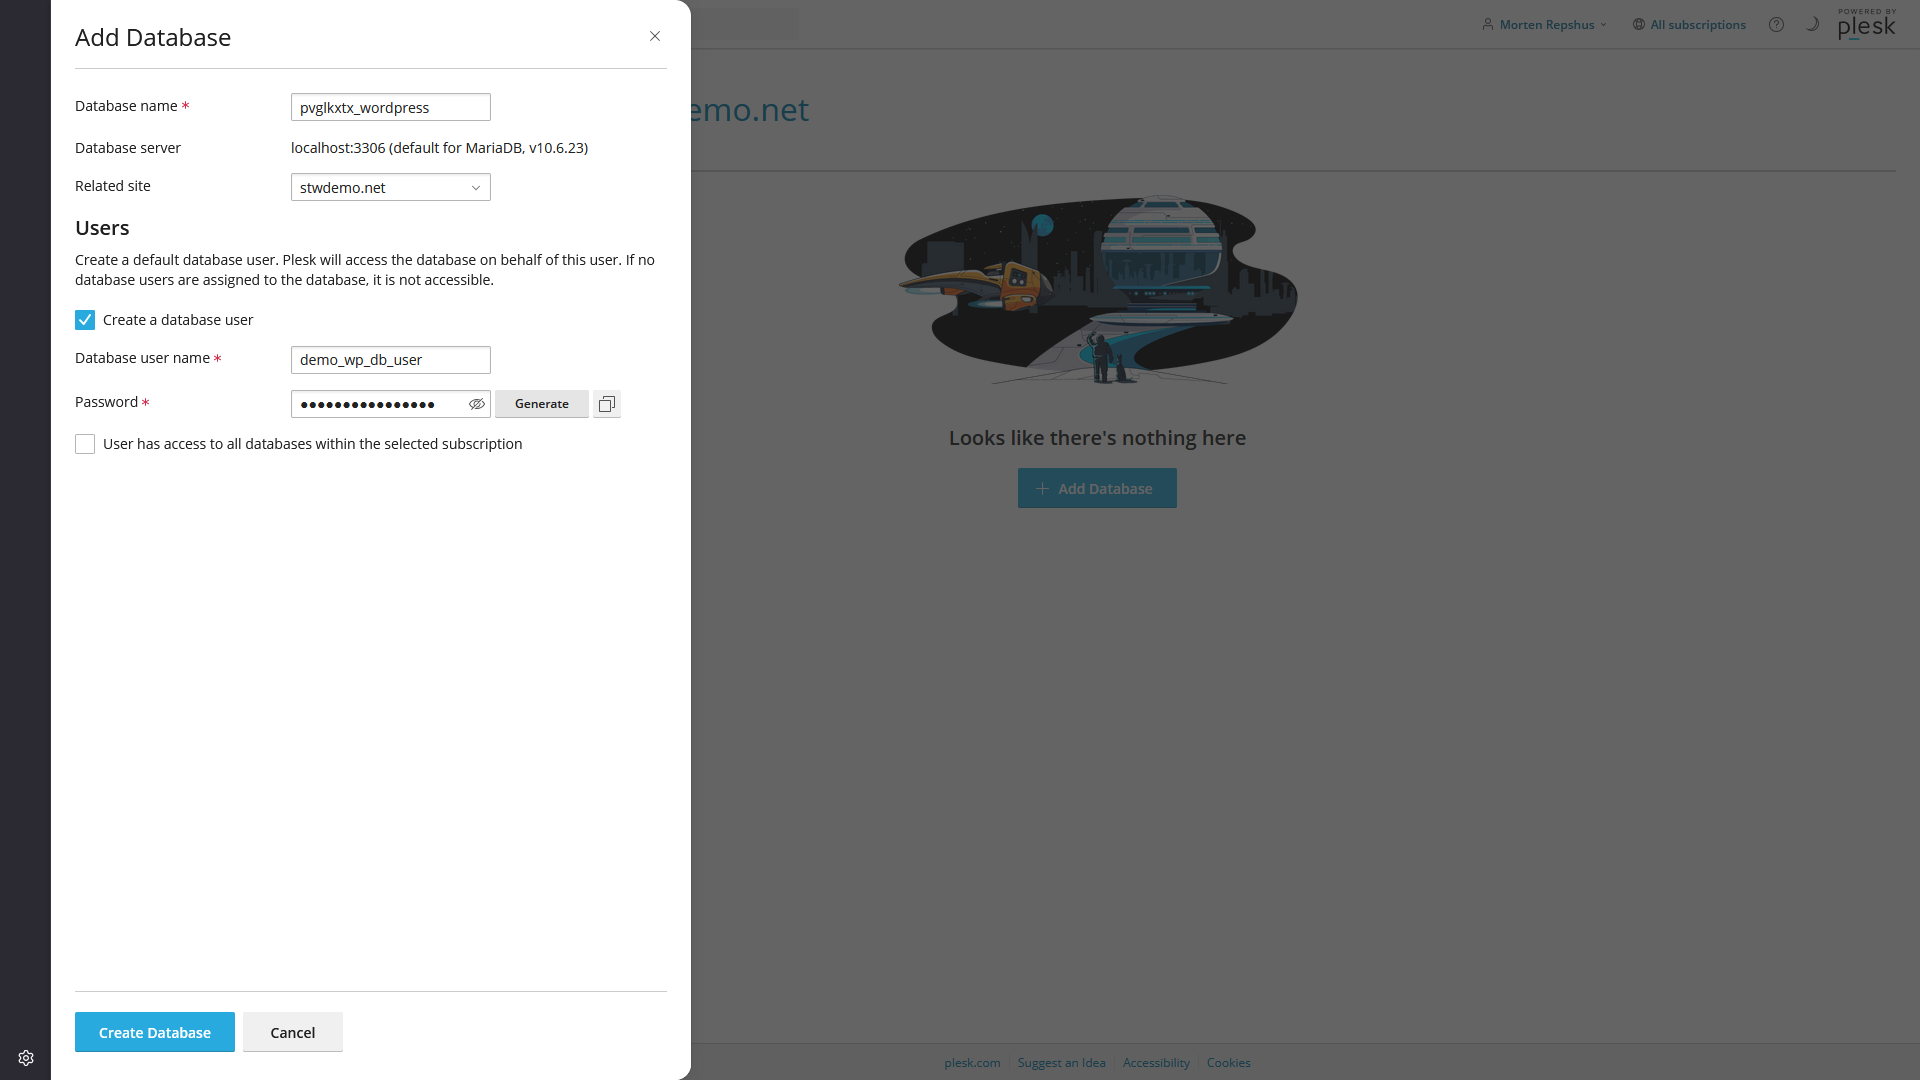
Use a database name that tells you what site it belongs to. A name like sales_site_wp or support_blog_wordpress is easier to recognise later than something vague. Leave Create a database user checked, set a clear username, and generate or enter a strong password. Keep a note of all these values, because you’ll need them in Step 3 when you write the wp-config.php file.
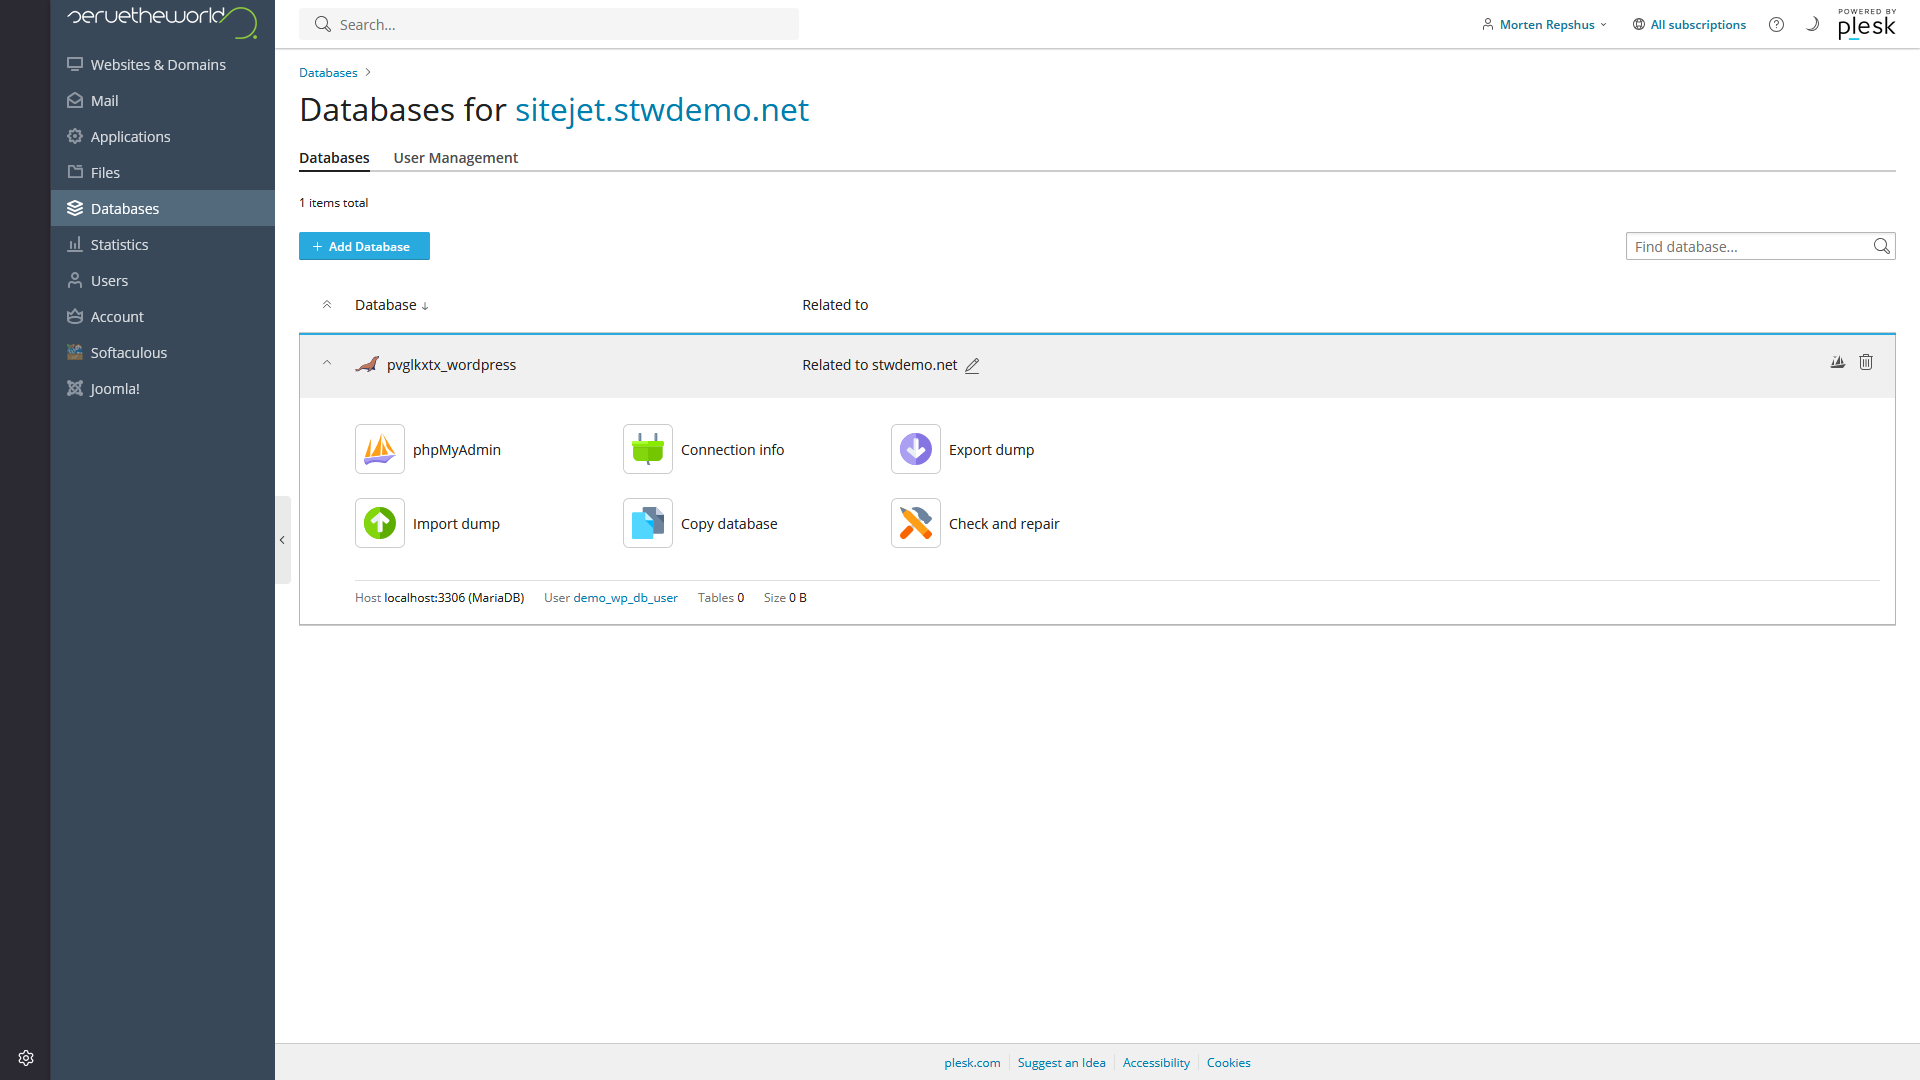
After you click Create Database, Plesk shows the new database entry along with shortcuts to phpMyAdmin (a popular database management tool) and Connection info. If you ever need to look at the contents of the database directly, you can use phpMyAdmin to browse the tables, run queries, and manage the data.
Step 2 — Upload the WordPress files
WordPress is PHP software that runs on your web server. The files need to be in the right place before anything works.
Your website files are stored in a path on your hosting. Everything within that file path will be available to the public, whereas files placed outside that folder stay private and can’t be reached through a browser.
The WordPress zip file you downloaded earlier itself contains a folder called wordpress. When you extract the WordPress download, you get a folder called wordpress containing all the WordPress files. You want the contents of that folder inside your public folder, not the wordpress folder itself. If you upload the wordpress folder as-is, your site ends up at yourdomain.com/wordpress instead of yourdomain.com.
Using File Manager (browser-based)
File Manager is built into Plesk and works entirely in your browser. No extra software needed.
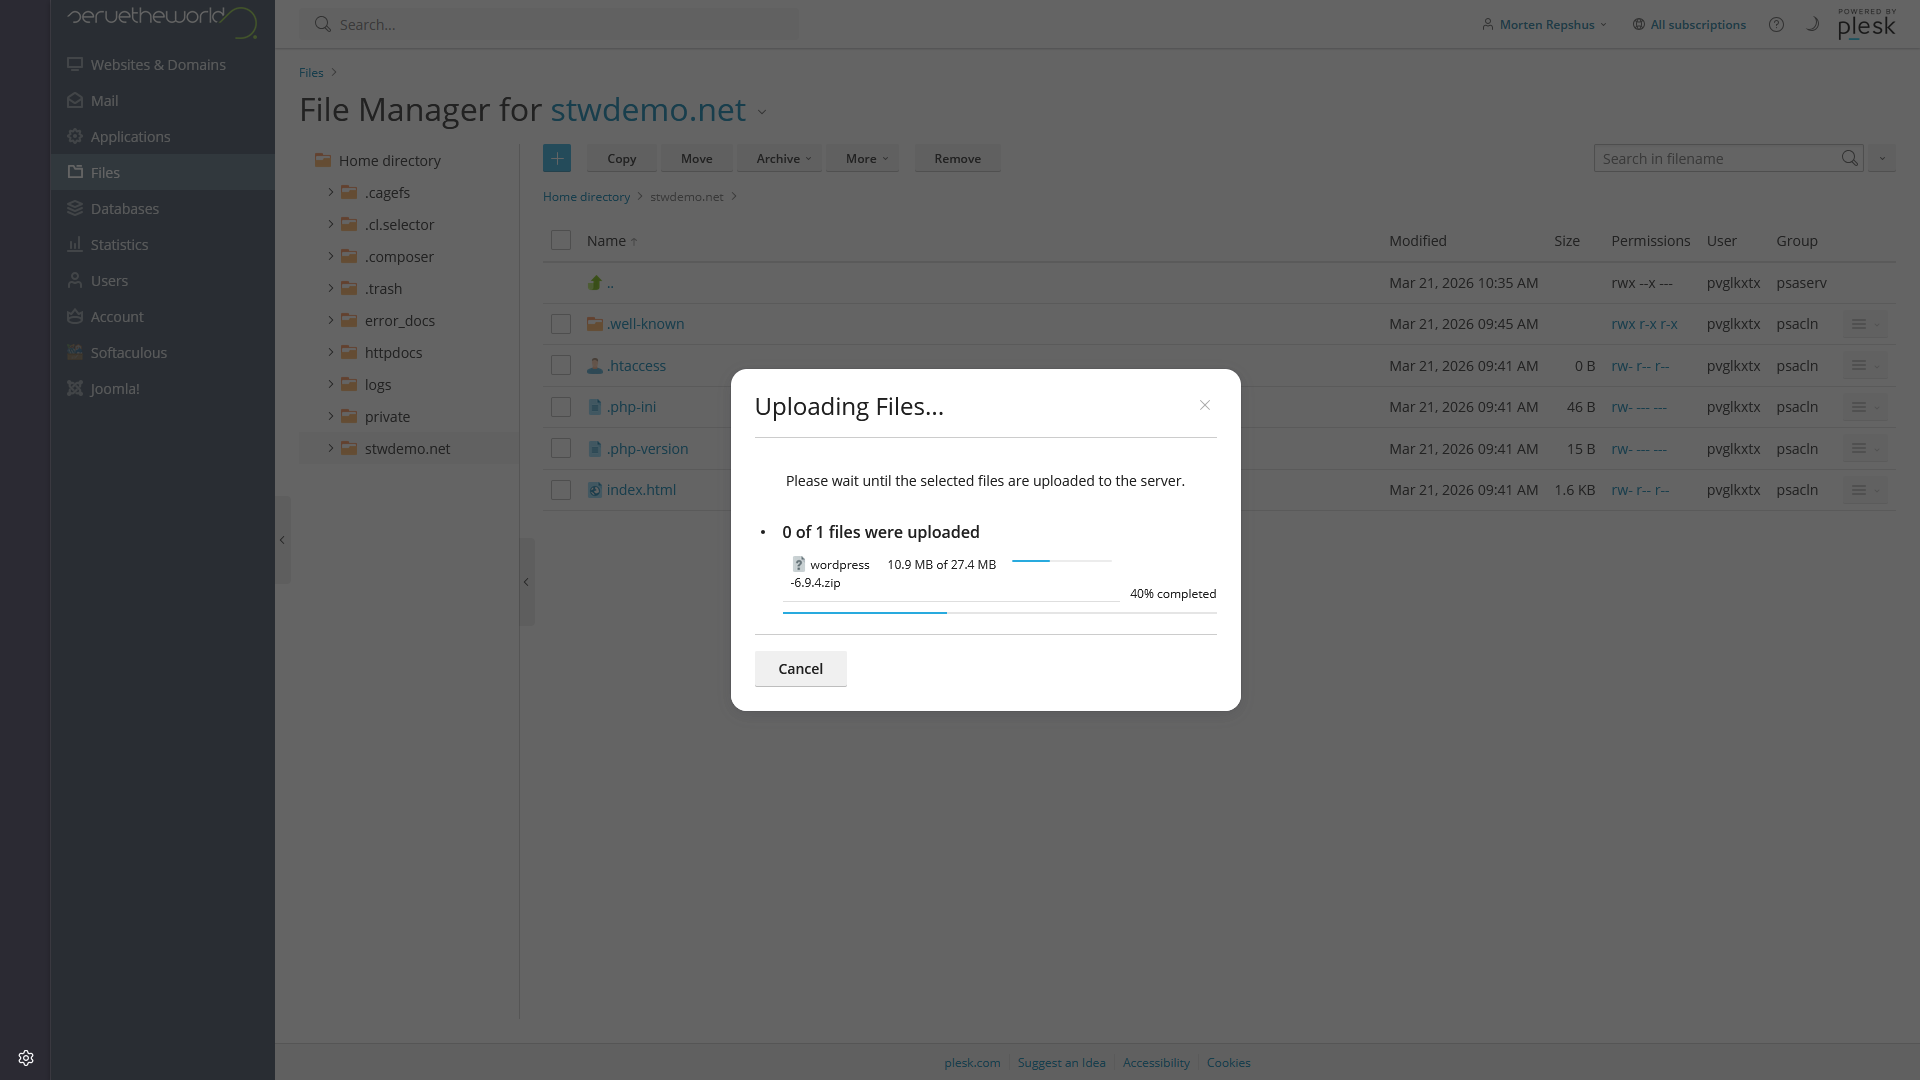
You can get to the correct web folder in Plesk by clicking Files in the left menu, then opening your domain folder if needed. Once you are in the folder where the site’s files belong, click the blue + button and choose Upload File.
Select the WordPress zip file you downloaded from wordpress.org and wait for the upload to finish.
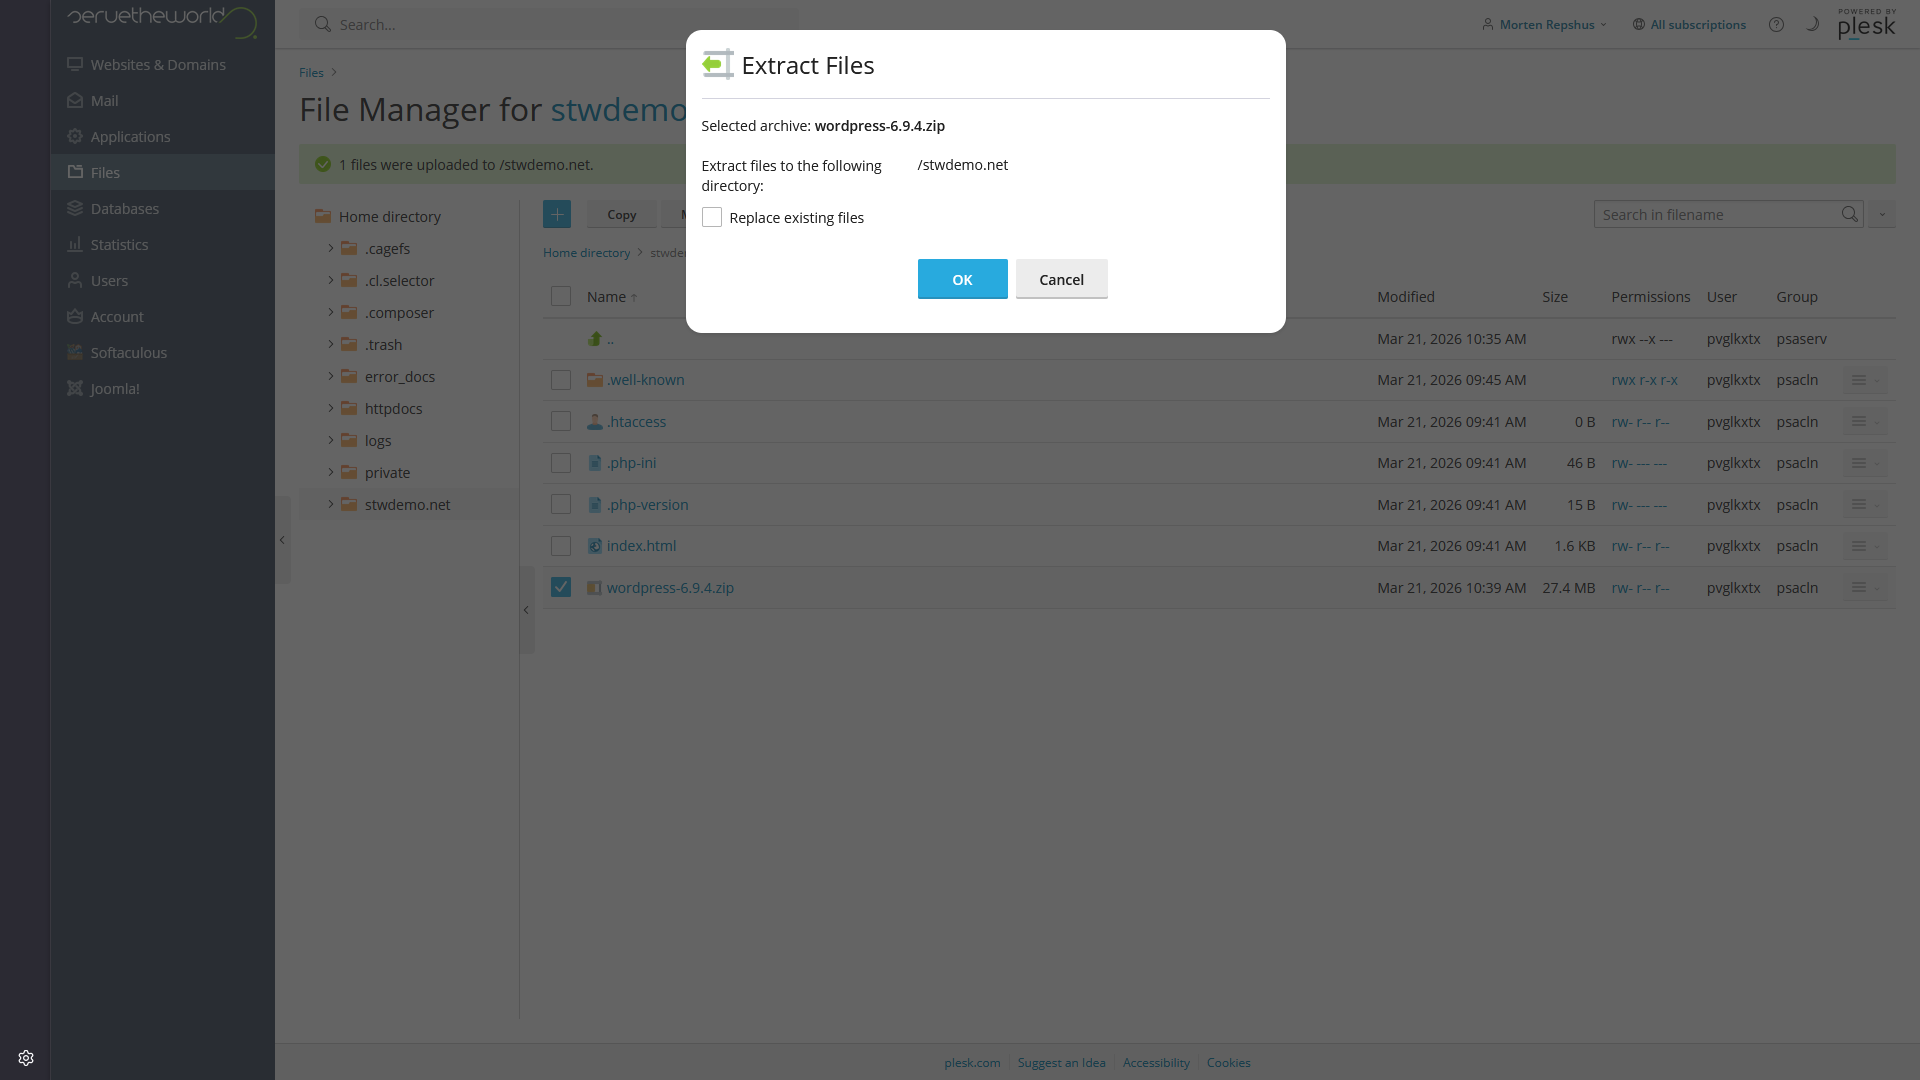
After the zip appears in File Manager, select it and open the action menu on the right. Choose Extract Files.
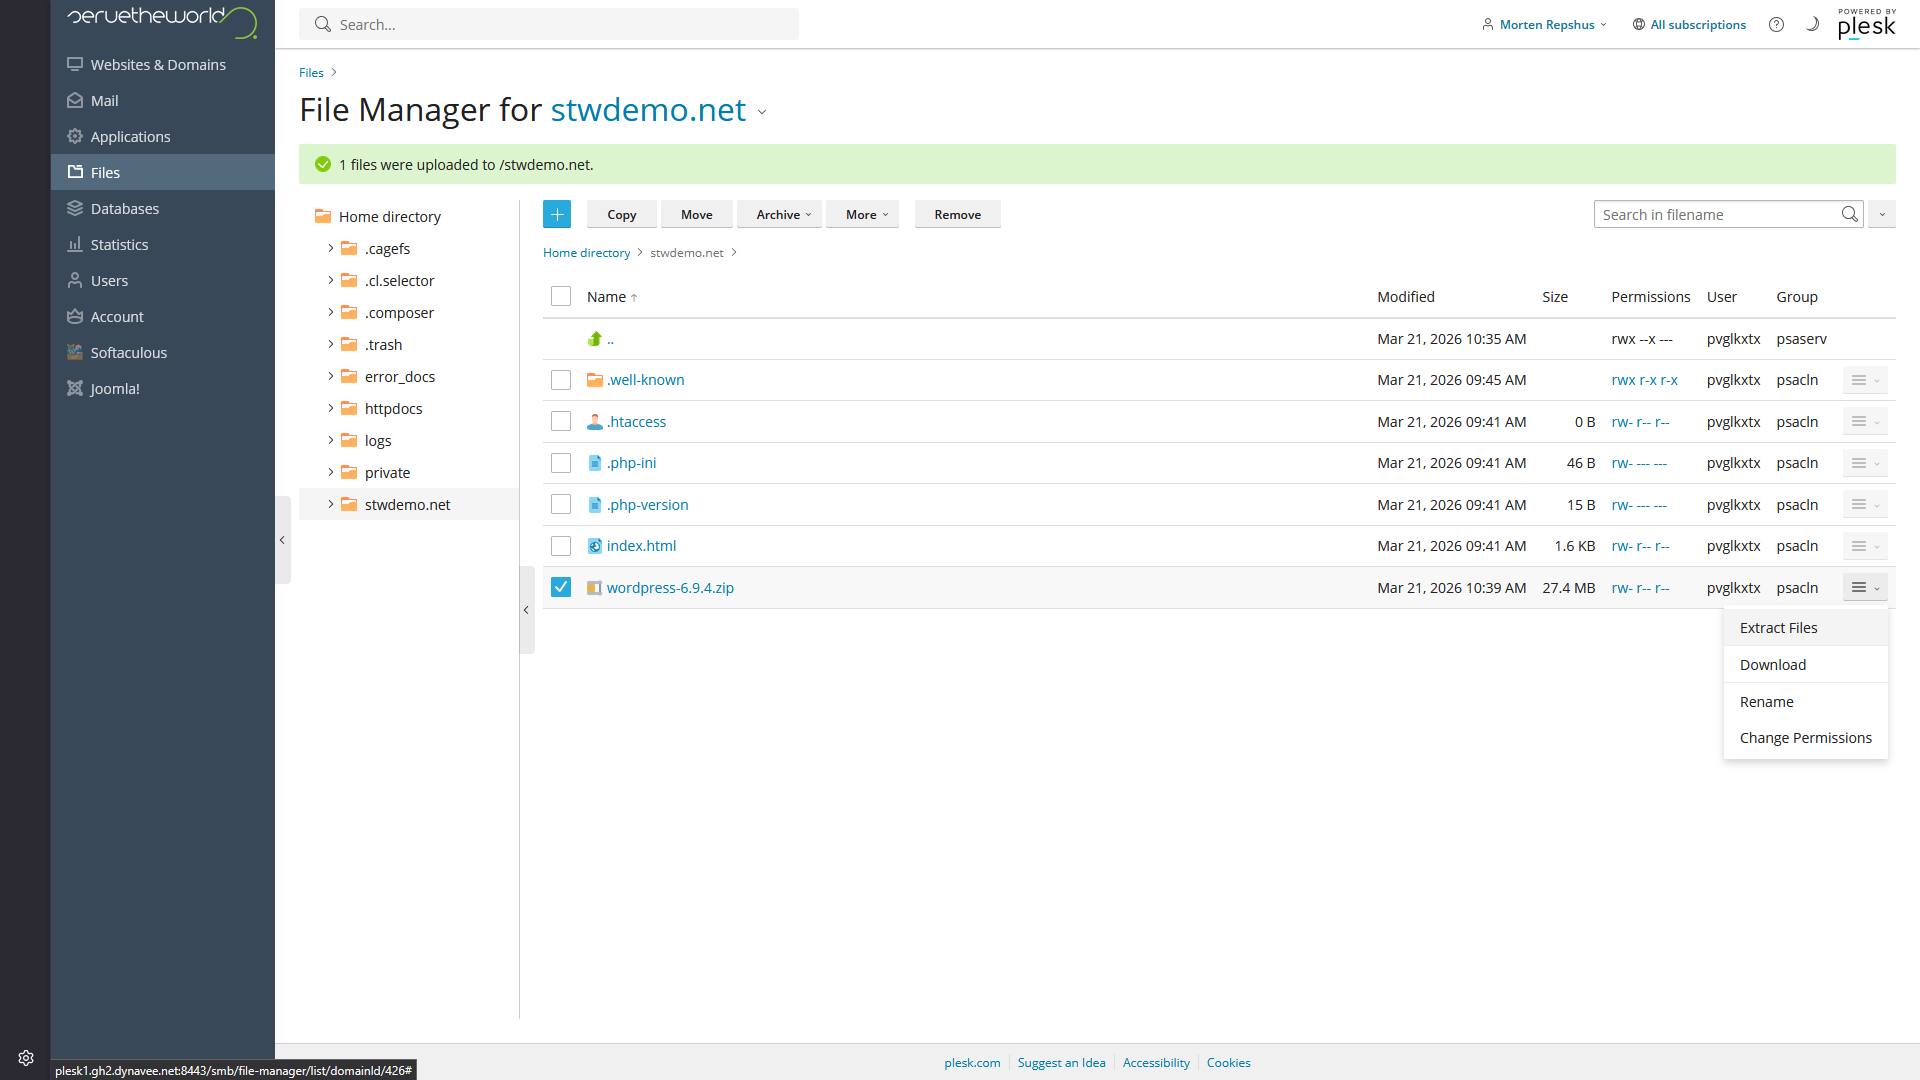
Plesk asks where to extract the archive. Leave it in the current folder and click OK. That creates a new folder called wordpress.
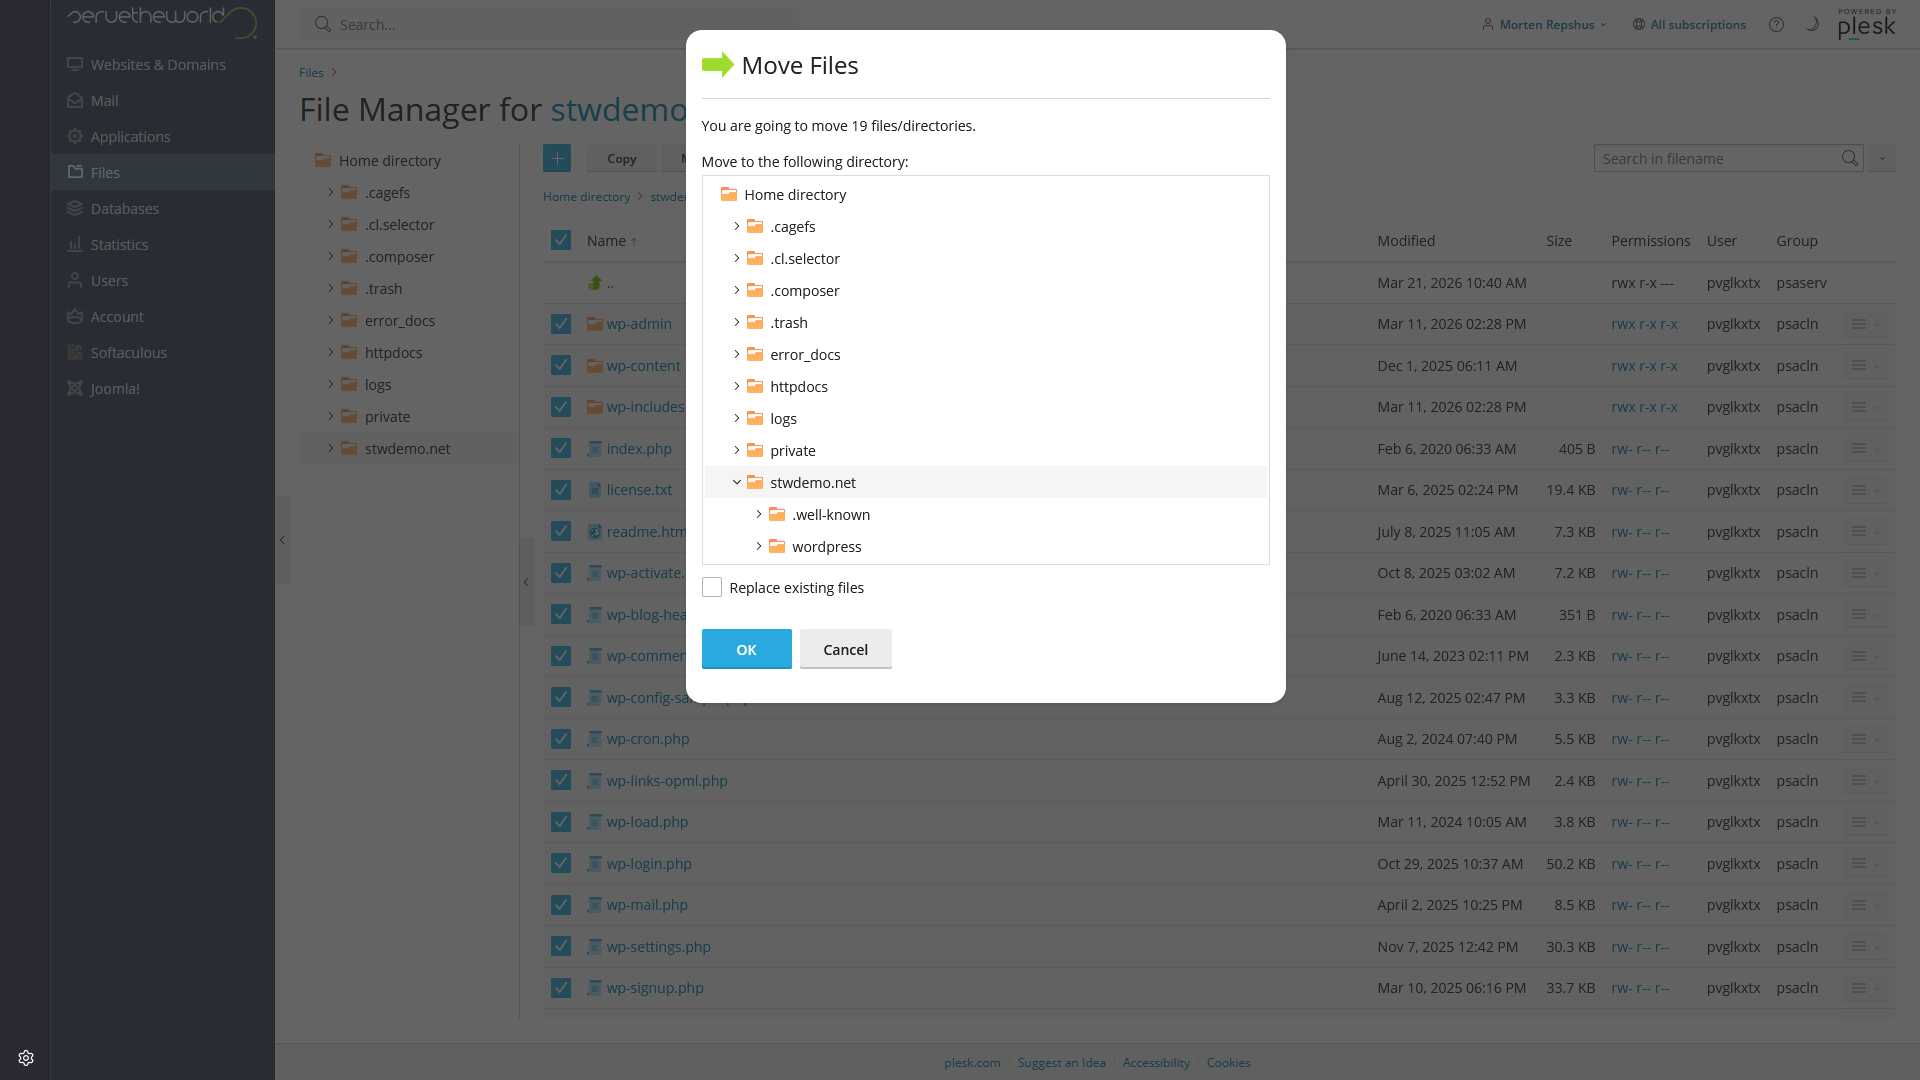
Open the new wordpress folder. Use the checkbox at the top to select everything inside it, then click Move. In the move dialog, choose the parent directory, which is the folder you started in, and confirm.
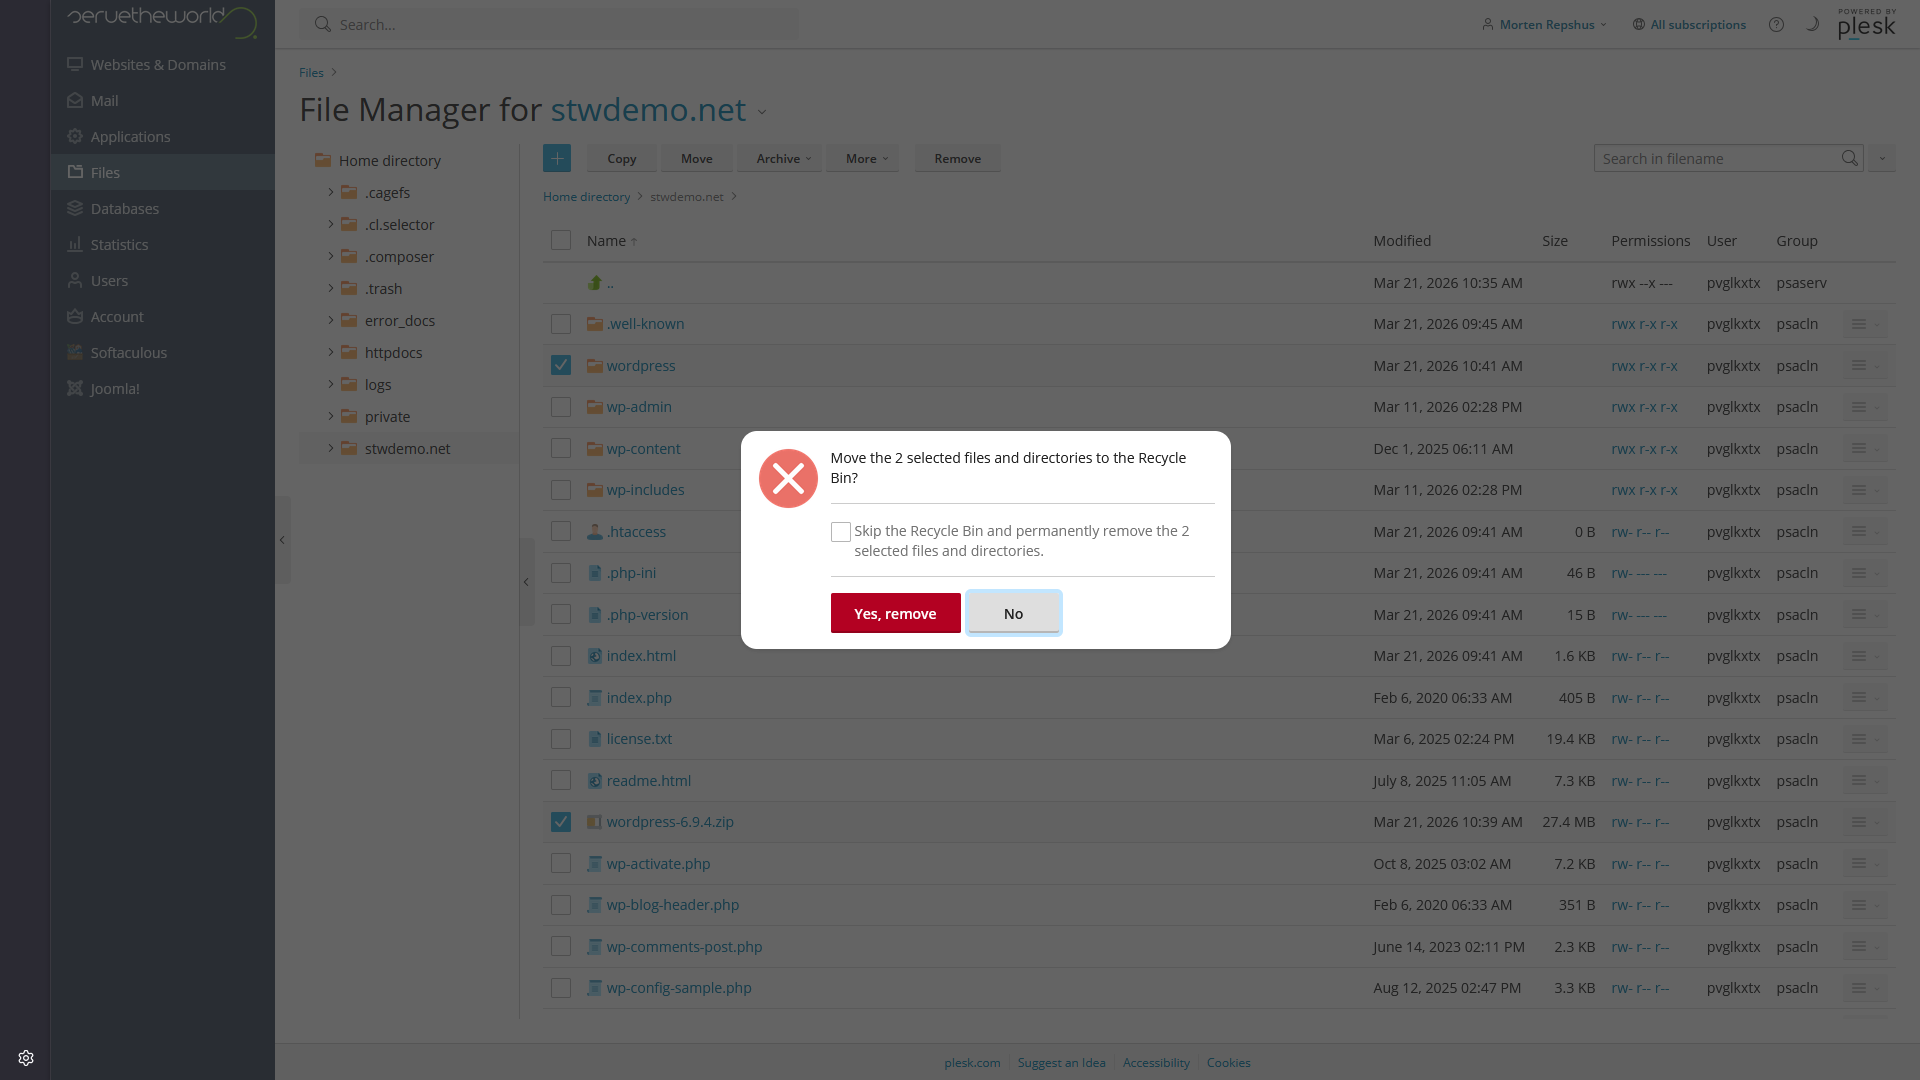
After the move finishes, go back to the parent directory. You should now see the WordPress files there, along with the leftover wordpress folder and the zip file. Select those two leftovers and click Remove.
Step 3 — Configure wp-config.php
WordPress needs to know the database credentials before the installer can run. That information is set in a file called wp-config.php.
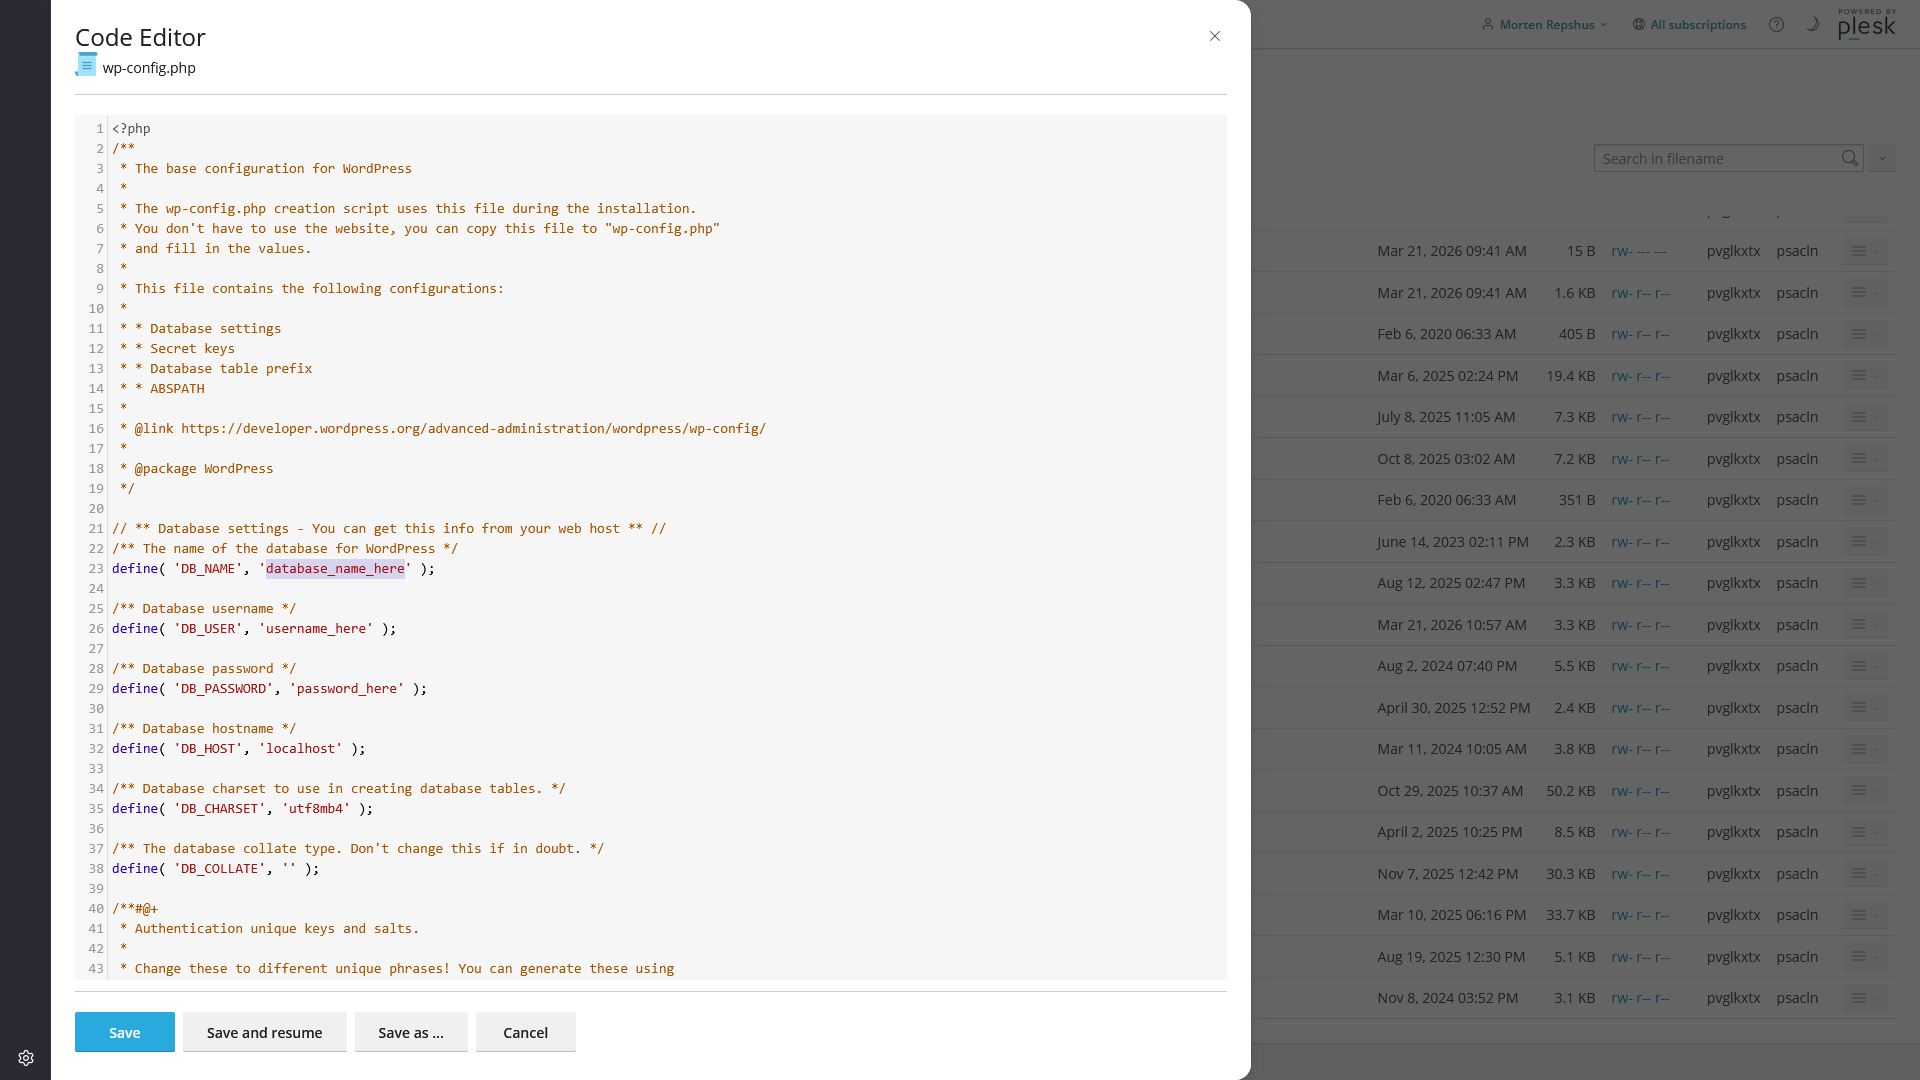
WordPress ships with a sample file called wp-config-sample.php. In File Manager, select this file and choose Copy, saving your copy to your home directory. Navigate to your home directory, select your copy, and from the dropdown select Rename. Rename the file wp-config.php. Select the file again, choose Move, and move it to the public directory.
Clicking on wp-config.php will open the code editor, which you can use to edit its contents. Find these four lines:
define( 'DB_NAME', 'database_name_here' );
define( 'DB_USER', 'username_here' );
define( 'DB_PASSWORD', 'password_here' );
define( 'DB_HOST', 'localhost' );
Replace the placeholder values with the database name, username, and password you wrote down in Step 1. The host stays as localhost.
Security salts
Scroll down in wp-config.php and you’ll find a block of lines labeled “Authentication Unique Keys and Salts.” These are random strings that WordPress uses to secure your login sessions. The sample file contains placeholder text that you need to replace with real values.
Go to the WordPress salt generator:
https://api.wordpress.org/secret-key/1.1/salt/
Every time you load that page, it generates a fresh set of random keys. Copy the entire output and paste it over the existing placeholder block in wp-config.php. You only need to do this once during installation. The only reason to regenerate salts later is if you suspect your site was compromised and want to force all existing login sessions to expire.
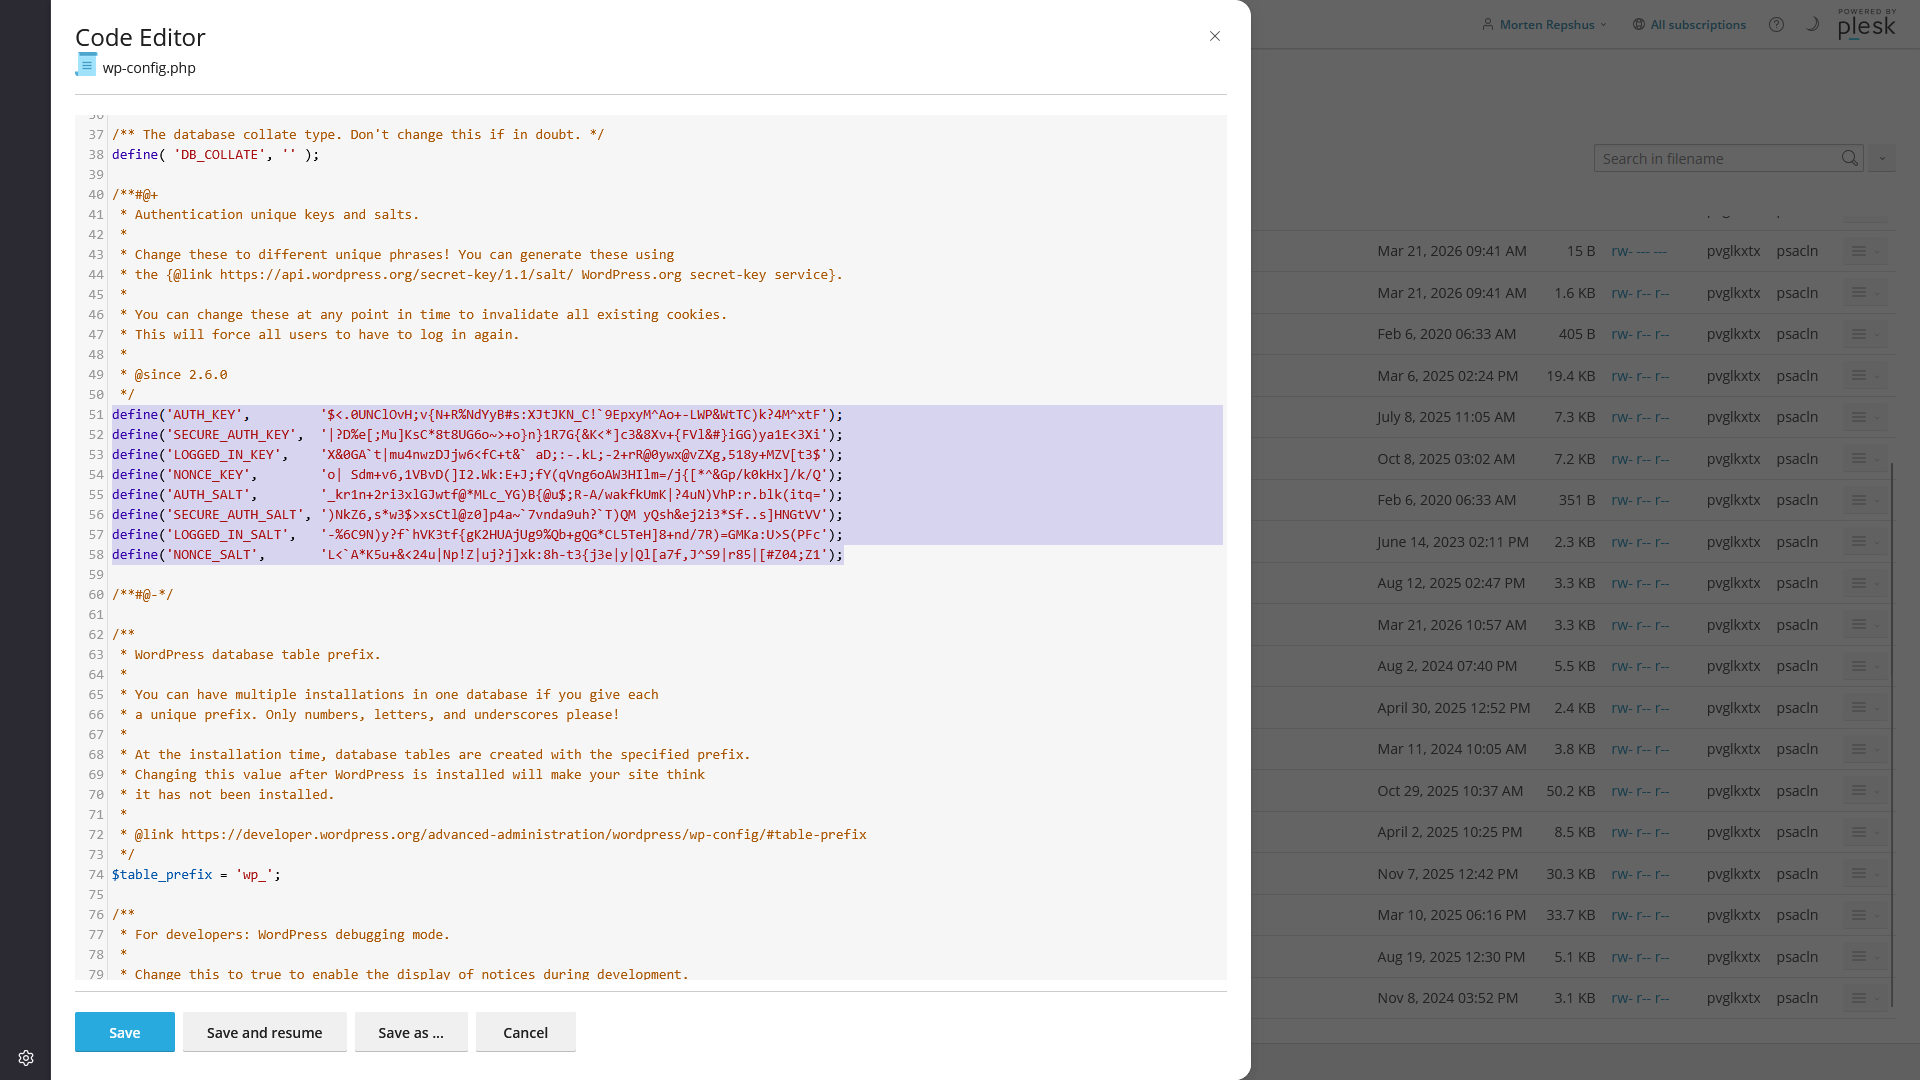
Keep your wp-config.php file private. It contains your database password and security keys in plain text. If you ever need to share site files for debugging, strip those values first.
Click Save to save the file.
Step 4 — Run the WordPress installer
With the files uploaded and wp-config.php in place, open your domain in a browser. WordPress will detect the configuration file, connect to the database, and launch the installation wizard.
If you see Plesk’s default placeholder page instead of the WordPress installer, check whether an
index.htmlfile is still in the folder. If so, delete or rename that file, then reload the page. WordPress usesindex.php, and the placeholderindex.htmlcan take priority until you remove it.
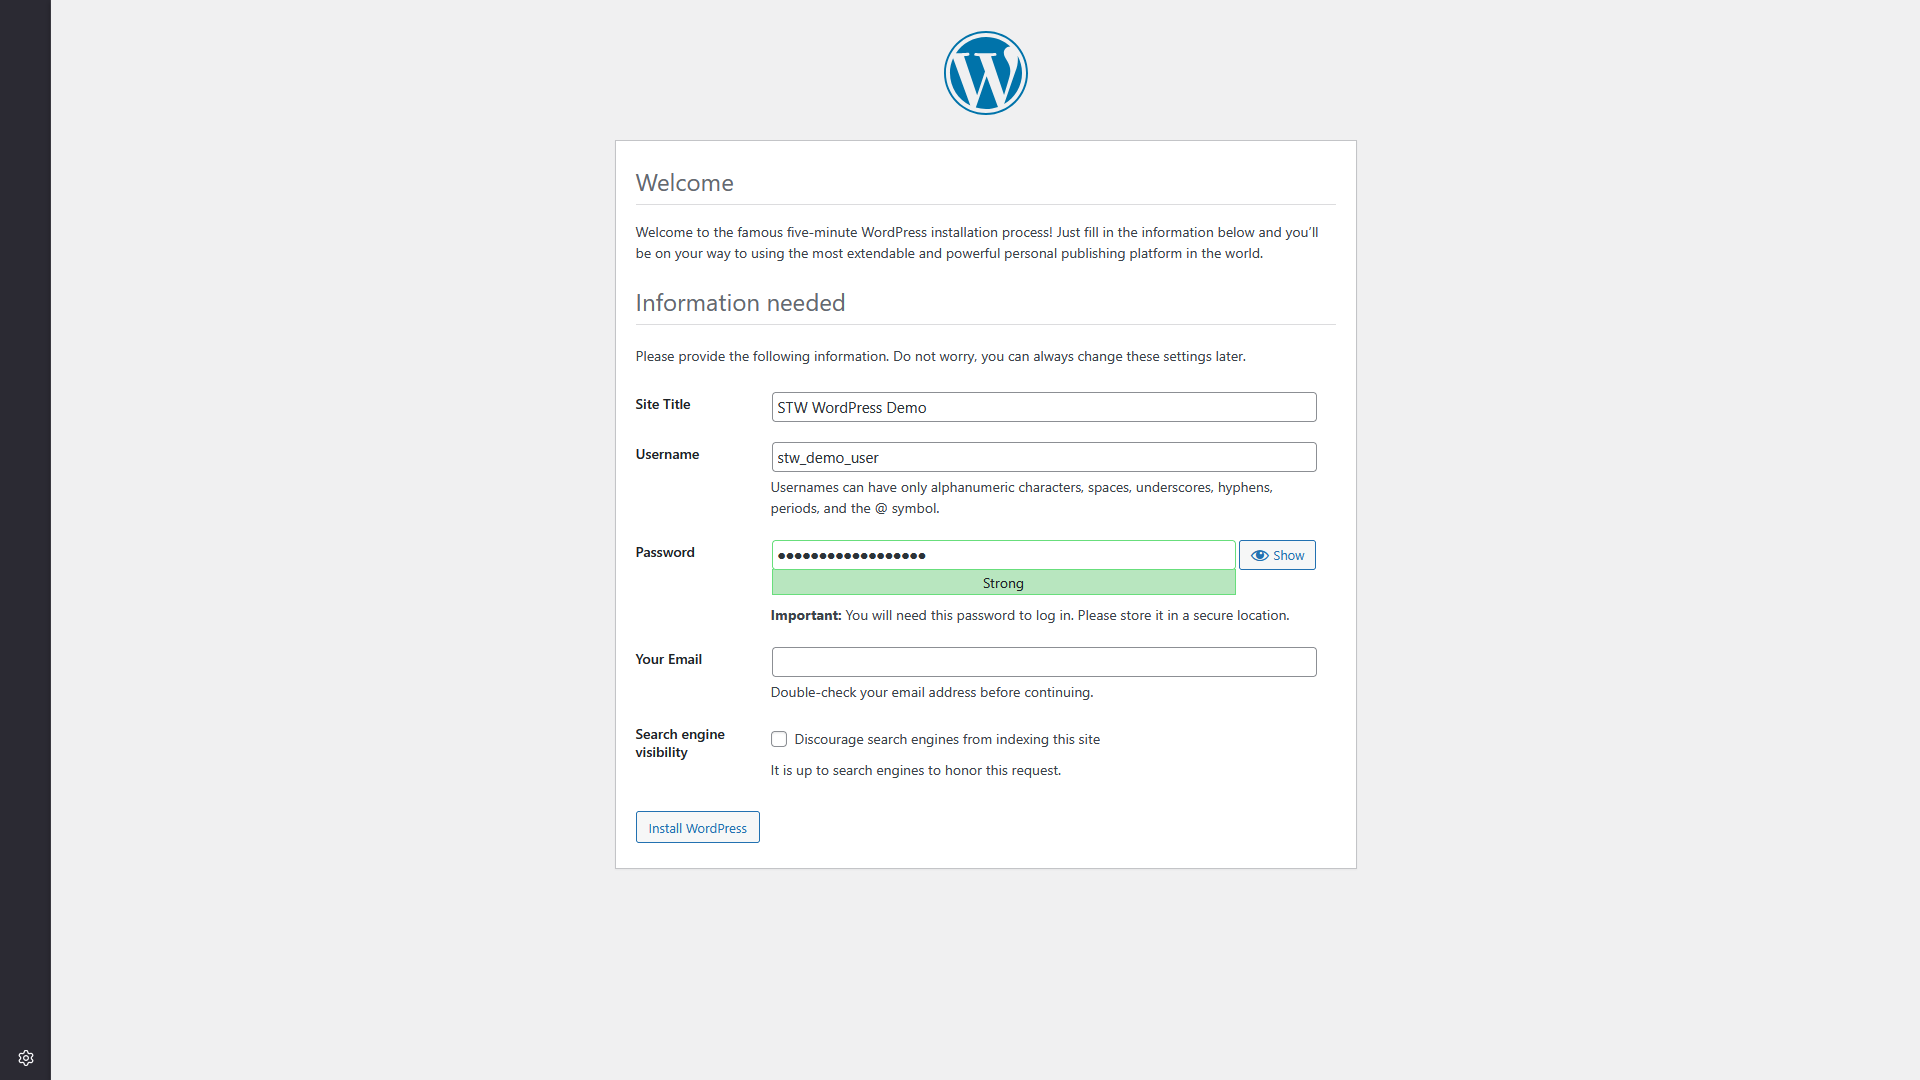
After you’ve set the language in the first step, WordPress shows the welcome screen and asks you to set the site title, admin username, password, and email address. This is the same information you’d enter in the WP Toolkit or Softaculous Quick Install form, but now you’re doing it directly in WordPress instead of through an installer tool.
The wizard asks for five things:
- Site title: The name of your site as it appears in browser tabs and the admin header. You can change this later.
- Username: Your admin login name. Automated bots try “admin” as the first username on every WordPress site they scan, so choose something else.
- Password: WordPress shows a strength meter. Aim for something it rates as strong. This password protects your entire site, so make it long and unique.
- Email address: Used for password recovery and admin notifications. Use a real address you check.
- Search engine visibility: Check the “Discourage search engines from indexing this site” box while you’re building. This tells search engines to hold off on listing your site. When you’re ready to go live, uncheck it in Settings → Reading inside the WordPress admin. Forgetting to uncheck this is a common reason sites stay invisible to search engines weeks after launch.
Click Install WordPress. The installer creates the database tables, stores your settings, and creates your admin account. The whole process takes just a few seconds.
You’ll see a success screen with a link to log in. Click the link or go to yourdomain.com/wp-admin to log in with the username and password you just set.
After the Install
Regardless of which method you used, the result is the same. WordPress is running, and you can log in at yourdomain.com/wp-admin using the credentials you set during installation.
All three methods created the same underlying pieces. A database holds your content and settings. WordPress files in your hosting directory power the site. A wp-config.php file connects them. And your admin account gives you control over everything through the WordPress dashboard.
Going forward, you’ll typically work in two places. The WordPress dashboard (at /wp-admin) is where you manage your site’s content, design, plugins, and settings. Plesk (through the One Click Login on your STW account page) is where you manage the hosting environment, including databases, files, PHP settings, backups, and server-level tools. The two panels serve different purposes, and Part 6 covers what to do first inside the WordPress dashboard.
Conclusion
You now have a working WordPress site on STW hosting. Whether you used WP Toolkit, Softaculous, or manual installation, the same four pieces are in place and your site is ready for its first real configuration. The manual knowledge is especially useful later when you need to check database connections, verify file locations, or understand what wp-config.php controls.
Next steps: