
Introduction
Over the course of this series, you’ve built a solid understanding of DNS, from fundamental lookups (Part 1) through record types, email configuration, and propagation mechanics. All of that assumes one thing: that the DNS answers you receive are trustworthy. But what happens when they’re not?
DNS was designed in the 1980s for a cooperative internet. It has no built-in way to verify that an answer is genuine. An attacker who can forge a DNS response can redirect your visitors to a fake website, intercept email, or impersonate your domain, and the victim’s browser won’t know the difference.
This final article covers the three main threats to DNS security, what protections exist, and the practical steps you can take to harden your domain against them.
The Three Threats
1. Cache poisoning
Cache poisoning (also called DNS spoofing) is an attack where a malicious actor injects forged DNS responses into a resolver’s cache. Once poisoned, the resolver serves the fake answer to everyone who asks, redirecting legitimate traffic to an attacker-controlled server.
Here’s how it works in simplified terms:
- An attacker sends a flood of fake DNS responses to a resolver, each claiming to be the authoritative answer for a domain.
- If the timing is right and the resolver accepts one of these fakes, it caches the forged answer.
- Every user whose DNS goes through that resolver now gets the wrong IP address for the domain.
- The attacker’s server at that wrong IP can serve a convincing copy of the real website, harvest credentials, or deliver malware.
The danger is that users may still see the expected domain name in their browser’s address bar, so a malicious page can look trustworthy at first glance.
Cache poisoning attacks are difficult to pull off against modern resolvers (which use randomized ports and query IDs to make spoofing harder), but the risk isn’t theoretical. It has been exploited in the wild, including well-documented large-scale incidents.
2. Domain hijacking
Domain hijacking is when someone takes unauthorized control over your domain name itself, typically by accessing your registrar account or exploiting the domain transfer process. Once they control the domain, they can change the nameservers, redirect all traffic, and effectively steal your online identity.
This is less a DNS protocol vulnerability and more an account security issue. Common attack vectors include:
- Phishing or credential theft: the attacker gets your registrar login credentials.
- Social engineering: convincing the registrar’s support team to grant access.
- Unauthorized domain transfer: initiating a transfer to another registrar without the owner’s knowledge.
Domain hijacking is particularly damaging because it affects everything, not just the website, but email, subdomains, and any service connected to the domain.
3. Interception (man-in-the-middle)
DNS queries are typically sent in plain text over the network. This means anyone with access to the network path between you and your DNS resolver, such as your ISP, a compromised router, or an attacker on the same Wi-Fi network, can observe or modify DNS responses in transit.
This is less about attacking the DNS infrastructure and more about attacking the “last mile” between your device and the resolver. Protections like DNS over HTTPS (DoH) and DNS over TLS (DoT) address this, and are increasingly supported by major resolvers and browsers.
Let’s look at what should be done to defend against these types of attacks.
If something changes unexpectedly – Your website is redirecting somewhere wrong, email is disappearing, or you’re seeing login activity you don’t recognize? Check out If You Suspect Your Domain Has Been Hijacked below.
Step 1 — DNSSEC: Authenticating DNS Answers
DNSSEC (Domain Name System Security Extensions) is the primary defense against cache poisoning. It adds signatures to DNS records so resolvers can verify that an answer genuinely came from the authoritative source and hasn’t been tampered with.
How it works (simplified)
- The authoritative nameserver signs each DNS record with a private key.
- The corresponding public key is published in DNS (as DNSKEY and DS records).
- Resolvers that support DNSSEC check the signature before accepting an answer.
- If the signature doesn’t match because the answer was forged or modified, the resolver rejects it.
If this sounds familiar, it’s because DKIM (Part 6) uses a similar sign-and-verify approach for email. DNSSEC applies the same principle to DNS records themselves, creating a chain of trust from the root DNS servers down to your domain.
What DNSSEC doesn’t do
DNSSEC verifies authenticity and integrity. It proves the answer came from the right source and wasn’t changed. It does not provide privacy. DNS queries and responses are still visible to anyone on the network. For privacy, you’d need encrypted DNS (DoH/DoT), which is a separate concern.
Note: DNSSEC availability depends on your domain’s TLD. At the time of writing, STW does not support DNSSEC for all TLDs. Check with STW support to confirm whether DNSSEC is available for your specific domain.
Enabling DNSSEC
DNSSEC is typically enabled by your DNS host (who signs the records) and your registrar (who publishes the DS record that connects your domain to the chain of trust). If both your DNS host and registrar support DNSSEC, enabling it is often a toggle or a short setup process.
Checking DNSSEC status
You can check whether a domain has DNSSEC enabled with dig:
dig +dnssec yourdomain.comIf DNSSEC is active, you’ll see RRSIG records alongside the normal answer. If you’re querying through a validating resolver (like 8.8.8.8), you’ll also see the ad (Authenticated Data) flag in the response header, confirming the resolver verified the signatures.
For a more visual check, tools like DNSViz display the full DNSSEC chain of trust for any domain.
Step 2 — Protect Your Domain Account
DNSSEC protects the DNS protocol. But if someone gains access to your registrar account, they can bypass DNS security entirely by changing your nameservers, disabling DNSSEC, or transferring the domain away. Account security is the foundation everything else rests on.
Enable two-factor authentication (2FA)
This is the single most effective thing you can do. With 2FA enabled, even if an attacker has your password, they can’t log in without the second factor (typically a code from an authenticator app or a hardware key).
Enable 2FA on your registrar account. If your DNS host is a different provider, enable it there too.
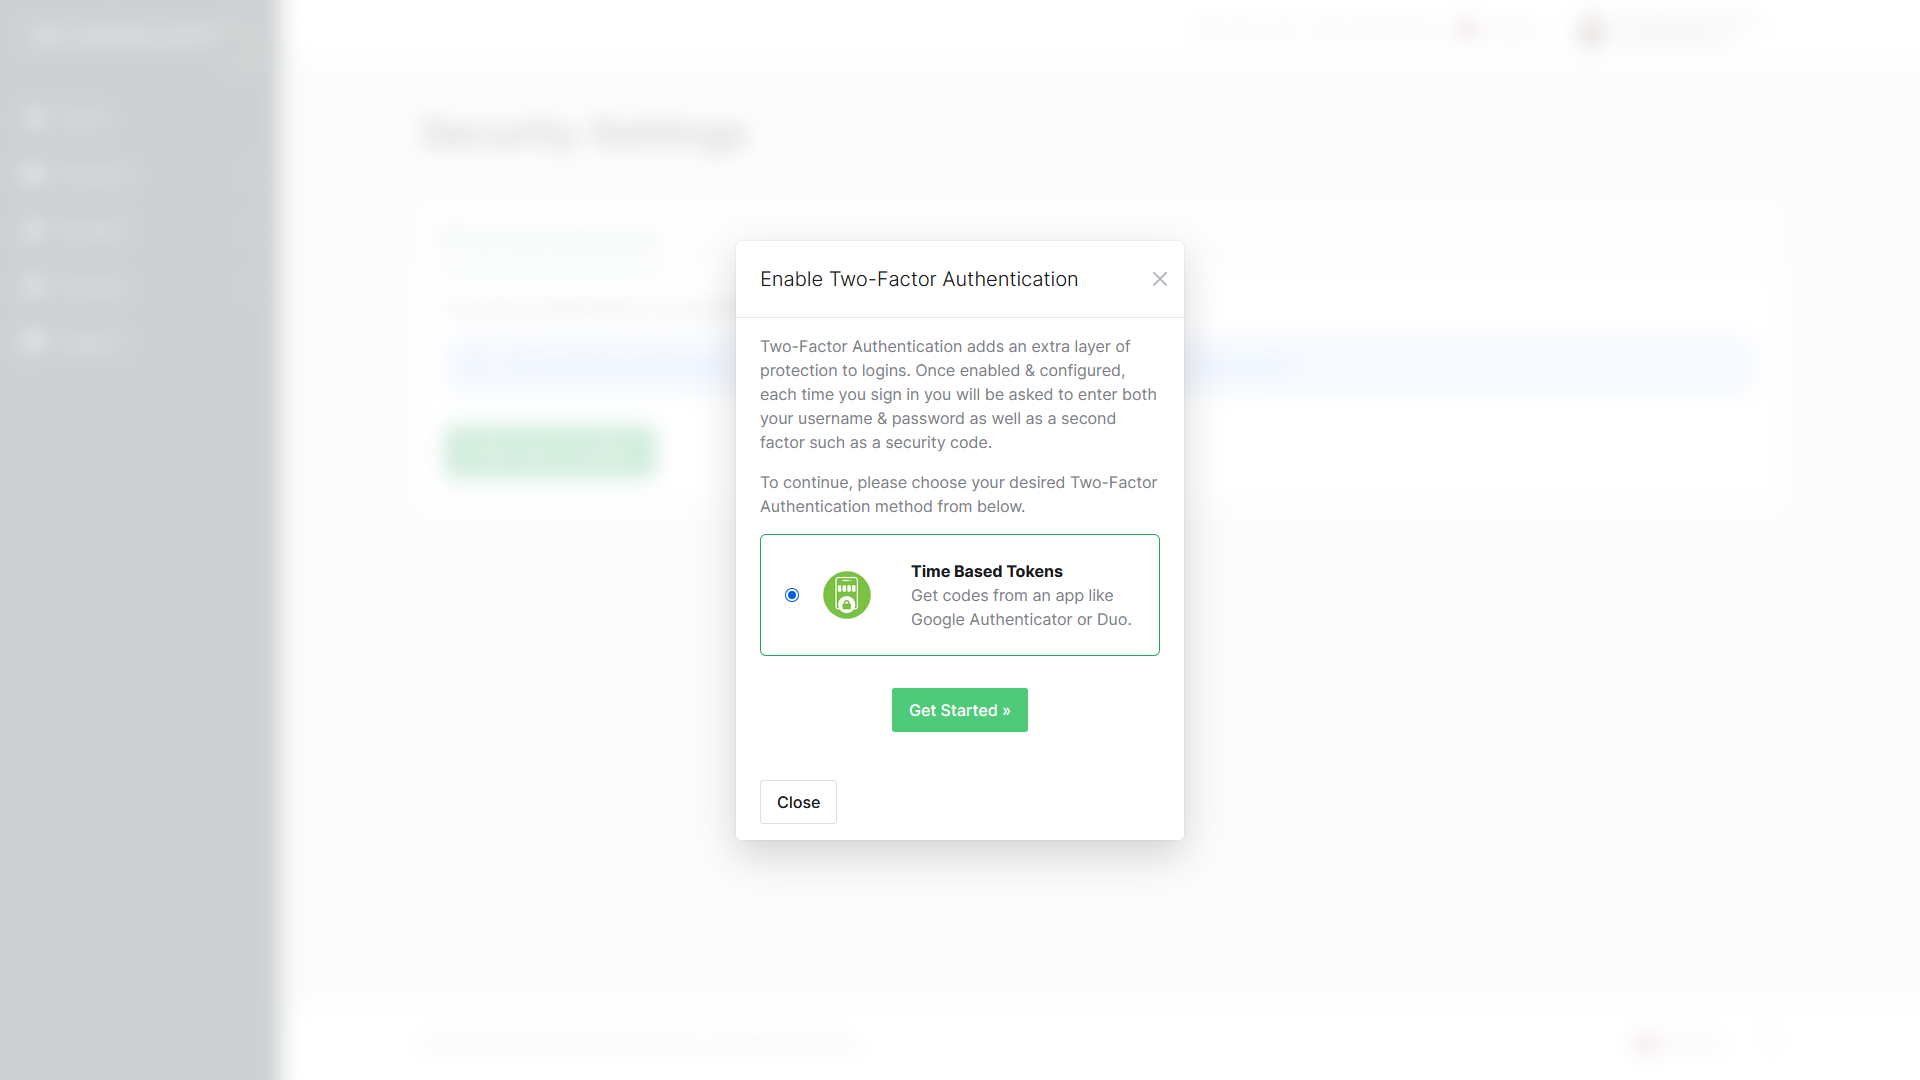
With STW, you can enable 2FA by clicking on your profile picture in the STW control panel and selecting Security Settings.
Choose Click here to Enable, then Get Started. You’ll be shown a QR code that can you scan in an authenticator app like Google Authenticator or Duo. When you’ve done so, the app will show you a six-digit code. Enter that code into the authentication box on the website, and hit Submit.
Use a strong, unique password
Your registrar account controls your domain name, which is your online identity. A strong password means using at least 16 characters, mixing uppercase and lowercase letters, numbers, and symbols. Shorter passwords and dictionary words can be cracked quickly by automated tools, even if they look complicated to a human.
It’s just as important to keep this password unique to your registrar account. Never reuse a password from another service. Password reuse is one of the most common ways accounts get compromised. When a breach at some related site leaks your email and password, attackers try those same credentials everywhere, including domain registrars. If your registrar password matches one you used on a forum or a shopping site, a breach you never even heard about could cost you your domain.
Enable registrar lock (domain lock)
A registrar lock (sometimes called a transfer lock or clientTransferProhibited) prevents your domain from being transferred to another registrar. This stops unauthorized transfers, which are a key vector in domain hijacking.
In the STW control panel, you can manage domain locks from Domains → My Domains → [your domain] → Registrar Lock. It’s a simple On/Off switch to enable or disable registrar lock status.

Use least-privilege access
If your team or organization shares DNS management access, follow the principle of least privilege: give each person only the access they need to do their job. Your DNS host and registrar control panels may support multiple user accounts or roles. A junior employee updating one DNS record doesn’t need admin access to your entire account. Limiting access reduces the damage if any one account is compromised.
Monitor your domain
Keep an eye on:
- WHOIS records: unexpected changes to contact information or nameservers, and whether your registrant email and phone number are still current.
- DNS records: set up monitoring or spot-check periodically for unauthorized changes to A, NS, or MX records.
- Expiration dates: a lapsed domain can be registered by someone else.
- Auto-renewal settings: make sure auto-renewal is enabled for domains you want to keep.
Losing a domain because you forgot to renew it is far more common than losing one to a sophisticated attack.
Stale WHOIS records (the public registration details that identify who owns a domain and how to contact them) are the same kind of slow-burn risk: details go quietly out of date after a staff change, a company move, or an email migration, and everything keeps working fine until the moment you need them to be correct. If your registrant email is wrong when a transfer alert fires or when you need to prove ownership in a dispute, you are starting from behind.
You can check your current WHOIS information with a lookup tool like whois yourdomain.com on the command line, or through a web-based services such as who.is or, for .no domains, Norid’s domain lookup.
To update WHOIS information, log into your registrar’s control panel. In the STW control panel, you’ll find this under Domains → My Domains → Manage → Update the WHOIS contact information for your domain. Make a habit of checking once a year, and update immediately after any change to your organization’s contact name, address, or email.
Step 3 — Additional Protections
DNS over HTTPS (DoH) and DNS over TLS (DoT)
These encrypt DNS queries between your device and the resolver, preventing network-level interception and snooping. They complement DNSSEC by protecting the query itself.
Major public resolvers support both:
| Resolver | DoH | DoT |
|---|---|---|
| Google (8.8.8.8) | Yes | Yes |
| Cloudflare (1.1.1.1) | Yes | Yes |
Most modern browsers (Chrome, Firefox, Edge) support DoH and can be configured to use it. This is a client-side setting, so you don’t need to change anything in your DNS zone.
CAA records
A CAA record (Certificate Authority Authorization) is a DNS record that specifies which certificate authorities are allowed to issue TLS/SSL certificates for your domain. This helps reduce unauthorized certificate issuance, because a CA that follows CAA checks should refuse issuance when it is not on your list.
yourdomain.com. CAA 0 issue "letsencrypt.org"This record says: “Only Let’s Encrypt is allowed to issue certificates for this domain.” If an attacker tries to get a certificate from a different CA, the CA is required to check the CAA record and refuse.
CAA records are added in the DNS Manager like any other record. If you use a specific certificate provider, adding a CAA record is a low-effort, high-value security measure.
DNS Security Checklist
| Action | Where |
|---|---|
| Enable 2FA on your registrar account | Registrar control panel |
| Use a strong, unique password | Registrar control panel |
| Enable registrar/domain lock | Registrar control panel |
| Enable auto-renewal | Registrar control panel |
| Restrict user access to least privilege | Registrar/DNS host control panel |
| Set up DNS change alerts or monitoring | DNS host (if supported) |
| Enable DNSSEC | DNS host + registrar |
| Add CAA records | DNS zone editor |
| Use encrypted DNS (DoH/DoT) | Browser/OS settings |
The first four are things you can do right now, in a few minutes. They address the most common attack vectors (account compromise and accidental expiration) and don’t require any DNS expertise beyond what you already have.
If You Suspect Your Domain Has Been Hijacked
If you notice unexpected DNS changes, traffic being redirected, or login activity you don’t recognize, act quickly:
- Don’t wait: change your registrar password immediately. Don’t use the same device you suspect was compromised. Log in from a different machine or network.
- Check your nameservers. Run
dig NS yourdomain.comand compare the results against what your registrar shows. If the nameservers have changed without your knowledge, your domain has been hijacked. - Check your DNS records. Log into your DNS host and verify that your A, MX, and NS records haven’t been modified.
- Lock the domain. If you can still access your registrar account, enable registrar lock immediately to block unauthorized transfers.
- Contact your registrar’s support team. Explain the situation clearly. If you’ve lost account access, they can initiate identity verification and account recovery. Gather any evidence you have (email confirmations, change logs, original registration details).
- Document everything. Note the timestamp of when you noticed the issue, what changed, and any notifications you received. This helps your registrar and, if necessary, legal or law enforcement authorities.
- Check connected services. If email was redirected, assume email communications during that window could be compromised. Consider alerting customers or colleagues if sensitive data may have passed through.
Note: Registrar recovery times vary. Some complete it in hours, others take days. Acting fast and contacting support immediately is the single most important thing you can do.
Conclusion
DNS security is about protecting two things: the accuracy of DNS answers (DNSSEC prevents forgery) and the control of your domain (account security prevents hijacking). 2FA, strong passwords, and registrar locks stop the attacks that actually happen most often.
DNSSEC, CAA records, and encrypted DNS add deeper layers of protection. Not all providers support all of these yet, but the trend is clearly toward making them standard.
And with that, we’ve reached the end of the ServeTheWorld Guide to DNS. Over ten parts, you’ve gone from “what is DNS?” to managing records, configuring email, understanding propagation, and now hardening your domain’s security. That’s a lot of ground. The next time you need to point a domain, troubleshoot a missing email, or figure out why a change hasn’t taken effect yet, you’ll know exactly where to look, and more importantly, you’ll understand why the fix works.
Quick links to the full series:
- DNS Fundamentals
- DNS Players
- Common DNS Record Types
- How to Update DNS
- A Records & Subdomains
- Email DNS Records
- SRV Records
- Reverse DNS
- DNS Propagation
- DNS Security (this article)
Next steps: